
'17 F-150 Build Log
 10-26-2017, 09:46 AM
#1

I started a build log over at DIYMobilAudio.com at this link: http://www.diymobileaudio.com/forum/...-some-new.html , but thought it may be good to have here also, for fellow F150 enthusiasts. I'll try to keep both up to date as I work this build, likely copying and pasting over here.
A couple weeks ago I picked up a new '17 F150 XLT. Coming off of a '14 FX4, the downgrade in audio was shocking! So much so, that it compelled me to dig out some old audio gear and do an install! I'm trying to do this entire install under $1k. We'll see how well I can manage that!
I had considered using a LOC/DSP such as the JL FIX86, but after reading up on the capability of FORSCAN and an OBD programmer, I can use this to de-EQ my trucks signal and have it output a line-level signal. So instead of using a JL FIX, I can take advantage of a full DSP, such as the TWK88.
When it came to drivers, I was pretty undecided. Back in 2003/2004 I had a buddy sponsored by Kicker, so I was able to get some 6.5 components pretty cheap. They were ok, but I sold them with my old Tahoe. I eventually demo'd some ARC Audio Black and really liked them, but for $700? No way. After doing a bit of research, I found that there are SB drivers that are basically the same thing! So, to get this off the ground, I decided to give the SB drivers a shot.
Equipment I'll be re-using from long long ago:
Kicker SX650.1 Amp to drive an equally old Solobaric L7 S12 Sub
Kicker SX700.3 Amp to drive front speakers
The new:
SB Acoustics SB17NRXC35-4 Mid
SB Acoustics SB29RDC-C000-4 Tweeter
JL Audio TWK88 DSP
My plan is go fully active - why not? I'll run 2 channels of the 700.4 to the front tweeters and the other 2 channels to the mids. Eventually I'll add another 2 channel amp for some rears - using a preset in the TWK to turn them on when family is onboard.
I ordered some Noico 80mil Sound deadening material from Amazon
Fast Rings also ordered, along with panel popper tools.
From my local audio shop, I bought a Stinger 4ga amp install kit, and will pick up the TWK88 today. I'm trying to do this on a budget, but also trying to buy some stuff through the shop as they have been helpful with answering my questions.
So.. where to begin? I decided to tear into the doors and add sound deadening material - probably to max overkill levels, so lets go!
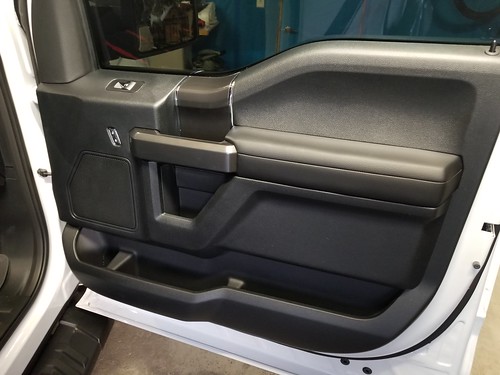
Here's my untouched, virgin door about to be violated!
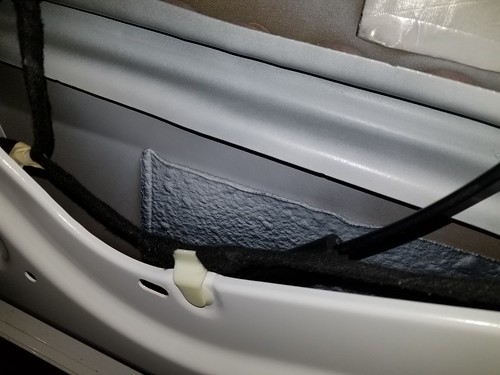
Door card removed - not as easy as it looks! Removed the thin plastic panel and butyl seal, will make a better panel and re-use the butyl probably. I also pulled off the white foam covering a few holes and the black stickers, covering yet more holes. Cleaned it all up using some denatured alcohol.
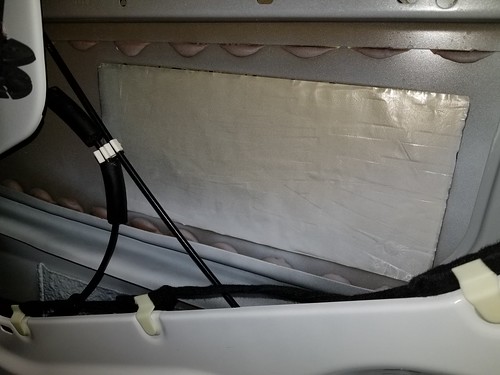
Interesting that the door already had some soundproofing material, though not very securely attached. I did my best to fix that. This section looks like some standard butyl sound proofing, though in the lower part of the door was something different.. some odd spongy material that was attached, then sprayed over. I'll leave that alone.
Interesting spongy stuff:
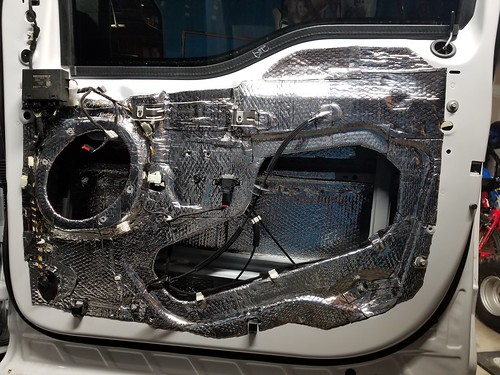
I pretty much went to town for a few hours friday night adding the Noico SD material. I decided to re-use the factory speaker screw holes, so I cut around the locations. I will add some riv-nuts later to hold my new access panel in place. I was too impatient to wait for the tool purchase! Here's the finished door:
Next up is buying some material for speaker baffles and the door panels. I will get some 1/4" MDF for making templates. The baffles will be made from a nylon cutting board I can get at Sam's Club for about 8 bucks. Not sure what material the panel will be made from. I've considered 1/4" MDF painted and covered with SD material. I do NOT want to have it disintegrate later and re-do it, so I may find some 1/4" plastic somewhere.
So, Saturday will be shopping for materials and some tools and off to my Dad's to fabricate some templates for the baffles and panels.
A couple weeks ago I picked up a new '17 F150 XLT. Coming off of a '14 FX4, the downgrade in audio was shocking! So much so, that it compelled me to dig out some old audio gear and do an install! I'm trying to do this entire install under $1k. We'll see how well I can manage that!
I had considered using a LOC/DSP such as the JL FIX86, but after reading up on the capability of FORSCAN and an OBD programmer, I can use this to de-EQ my trucks signal and have it output a line-level signal. So instead of using a JL FIX, I can take advantage of a full DSP, such as the TWK88.
When it came to drivers, I was pretty undecided. Back in 2003/2004 I had a buddy sponsored by Kicker, so I was able to get some 6.5 components pretty cheap. They were ok, but I sold them with my old Tahoe. I eventually demo'd some ARC Audio Black and really liked them, but for $700? No way. After doing a bit of research, I found that there are SB drivers that are basically the same thing! So, to get this off the ground, I decided to give the SB drivers a shot.
Equipment I'll be re-using from long long ago:
Kicker SX650.1 Amp to drive an equally old Solobaric L7 S12 Sub
Kicker SX700.3 Amp to drive front speakers
The new:
SB Acoustics SB17NRXC35-4 Mid
SB Acoustics SB29RDC-C000-4 Tweeter
JL Audio TWK88 DSP
My plan is go fully active - why not? I'll run 2 channels of the 700.4 to the front tweeters and the other 2 channels to the mids. Eventually I'll add another 2 channel amp for some rears - using a preset in the TWK to turn them on when family is onboard.
I ordered some Noico 80mil Sound deadening material from Amazon
Fast Rings also ordered, along with panel popper tools.
From my local audio shop, I bought a Stinger 4ga amp install kit, and will pick up the TWK88 today. I'm trying to do this on a budget, but also trying to buy some stuff through the shop as they have been helpful with answering my questions.
So.. where to begin? I decided to tear into the doors and add sound deadening material - probably to max overkill levels, so lets go!
Here's my untouched, virgin door about to be violated!
Door card removed - not as easy as it looks! Removed the thin plastic panel and butyl seal, will make a better panel and re-use the butyl probably. I also pulled off the white foam covering a few holes and the black stickers, covering yet more holes. Cleaned it all up using some denatured alcohol.

Interesting that the door already had some soundproofing material, though not very securely attached. I did my best to fix that. This section looks like some standard butyl sound proofing, though in the lower part of the door was something different.. some odd spongy material that was attached, then sprayed over. I'll leave that alone.
Next up is buying some material for speaker baffles and the door panels. I will get some 1/4" MDF for making templates. The baffles will be made from a nylon cutting board I can get at Sam's Club for about 8 bucks. Not sure what material the panel will be made from. I've considered 1/4" MDF painted and covered with SD material. I do NOT want to have it disintegrate later and re-do it, so I may find some 1/4" plastic somewhere.
So, Saturday will be shopping for materials and some tools and off to my Dad's to fabricate some templates for the baffles and panels.
Last edited by JKoop; 10-26-2017 at 09:50 AM.
 10-26-2017, 09:49 AM
#2
Day 2!
Time to fabricate some baffles and the access panel cover. I've got some shopping to do. Off to Sam's club to purchase a couple HDPE cutting boards. They'll work great as baffle material - they are about 1/2" thick and I can easily get 2 baffles from one cutting board. For less than $9 it's perfect.
For the access panel cover, I'm not sure what material I'll use yet. The HPDE cutting boards aren't big enough so I'll have to source it from somewhere. The local home improvement store has a sheet of 1/4" HPDE for $54, so I may end up going that route, though it's more than I want to spend. Anyone want to buy some baffles/access panel covers? :P
I do have a couple pieces of 1/4" MDF that i'll be using to make templates, so here we go:
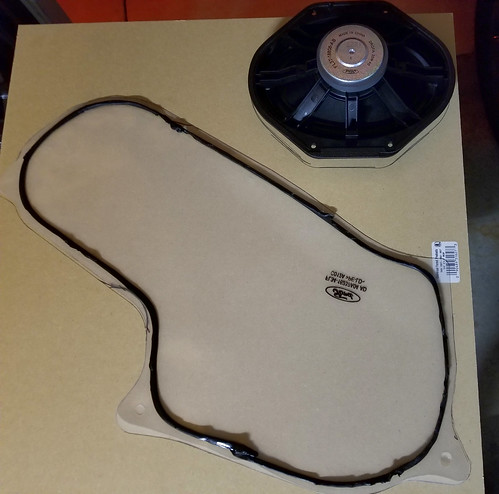
Using stock speaker and the plastic that is covering the access hole now, I traced out the shape of the template:
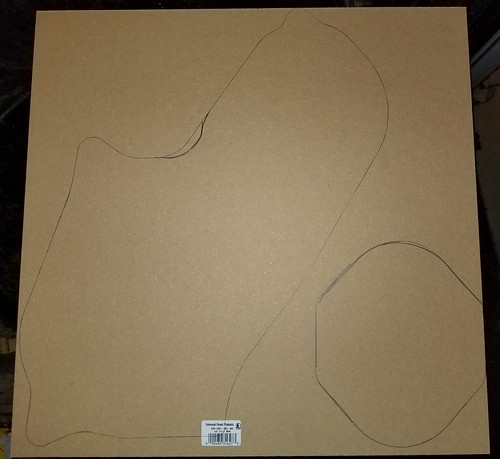
I used my jig saw to rough cut them before I went over to my Dad's house. He's got a pretty good woodshop setup, so it'll be much easier to do this with some good tools. It makes a HUGE difference!
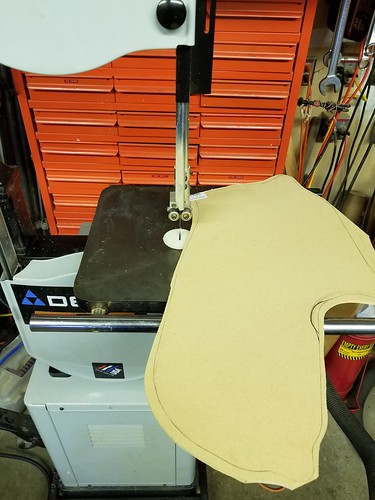
I cut the baffle template out a bit more closely with the band saw:
Sanded it down using the spindle and belt sander:
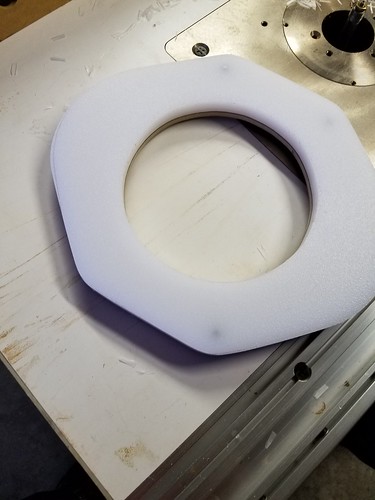
Once I was satisfied with the shape, I transferred the shape to the HPDE. I cut it out using the band saw, then screwed the template onto the HPDE. I also rough-cut the inside hole. Over to the router table next. Using a flush trim bit, I trimmed the HPDE to match the template.
Over to the router table next. Using a flush trim bit, I set the height to only cut the HPDE and trace the template. I then trimmed off the excess material, ending up with a pair of baffles matching the template.
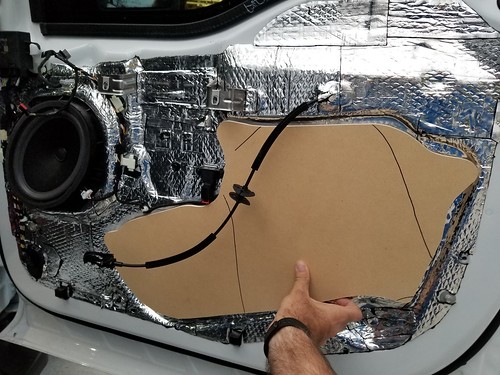
Next, I rough-cut the access panel from the 1/4" MDF on the band-saw. Back to the belt and spindle sander to finish up the shape.
Then a test-fit on the door. Looks pretty good!
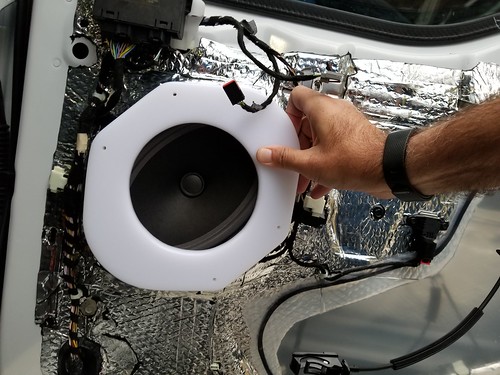
Baffle looks like it'll work well also.
Today's work is complete.. I have a pair of baffles and a template for the access panel cover. I did make a 2nd panel cover since I had all the equipment out - I am kicking around the idea of painting/sealing the MDF panel and using it. I should really go get some HPDE and do it right though.
I'll probably go home and start working on putting the sound deadening material in the driver's door.
Time to fabricate some baffles and the access panel cover. I've got some shopping to do. Off to Sam's club to purchase a couple HDPE cutting boards. They'll work great as baffle material - they are about 1/2" thick and I can easily get 2 baffles from one cutting board. For less than $9 it's perfect.
For the access panel cover, I'm not sure what material I'll use yet. The HPDE cutting boards aren't big enough so I'll have to source it from somewhere. The local home improvement store has a sheet of 1/4" HPDE for $54, so I may end up going that route, though it's more than I want to spend. Anyone want to buy some baffles/access panel covers? :P
I do have a couple pieces of 1/4" MDF that i'll be using to make templates, so here we go:
Using stock speaker and the plastic that is covering the access hole now, I traced out the shape of the template:
I cut the baffle template out a bit more closely with the band saw:

Sanded it down using the spindle and belt sander:
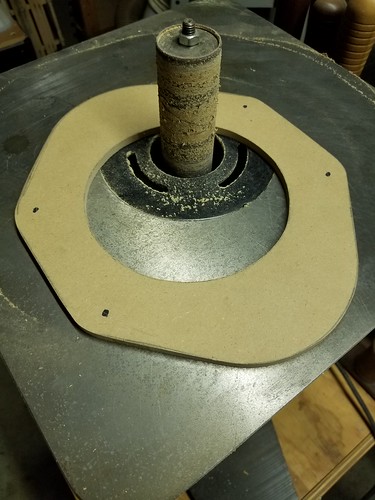
Once I was satisfied with the shape, I transferred the shape to the HPDE. I cut it out using the band saw, then screwed the template onto the HPDE. I also rough-cut the inside hole. Over to the router table next. Using a flush trim bit, I trimmed the HPDE to match the template.

Over to the router table next. Using a flush trim bit, I set the height to only cut the HPDE and trace the template. I then trimmed off the excess material, ending up with a pair of baffles matching the template.

Next, I rough-cut the access panel from the 1/4" MDF on the band-saw. Back to the belt and spindle sander to finish up the shape.
Then a test-fit on the door. Looks pretty good!
Baffle looks like it'll work well also.
Today's work is complete.. I have a pair of baffles and a template for the access panel cover. I did make a 2nd panel cover since I had all the equipment out - I am kicking around the idea of painting/sealing the MDF panel and using it. I should really go get some HPDE and do it right though.
I'll probably go home and start working on putting the sound deadening material in the driver's door.
Last edited by JKoop; 10-26-2017 at 09:51 AM.
10-26-2017, 09:52 AM
#3
Ok, so another day of work. I'm working on the driver's door, putting in the sound dampening material, installing riv-nuts for the access panel cover, and I'll even take a crack at running new wire through my door boots - molex connectors!
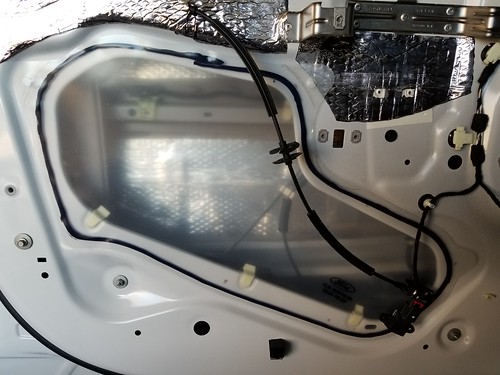
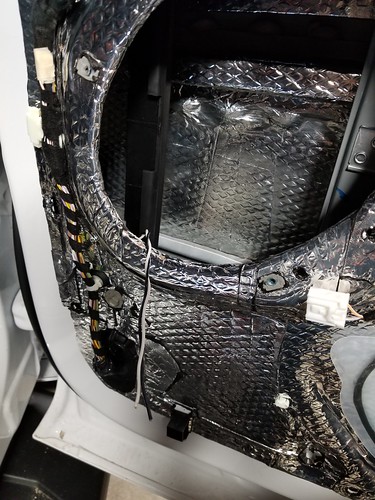
Door card removed - nothing exciting to see here.
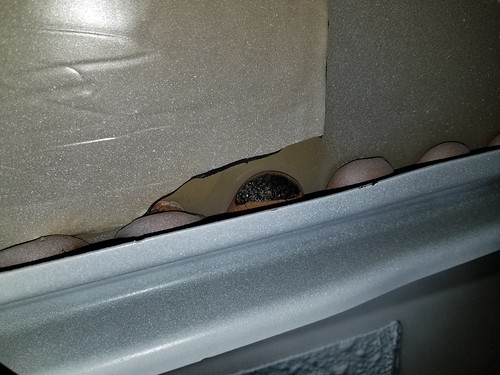
Looks like there's some moisture in the door. Makes sense since I did just drive home in the rain. I inspected the existing sound dampening material and found that they did a really really poor job of installing it. Rolling it caused water to squirt up and out of the top so obviously it's not adhered to the door properly. I'll have to cut out that section, clean it up and get it ready for new stuff to be applied over it.
I also noticed that the factory sound dampener was put on very poorly at the bottom - it stuck up and covered these foam "mounds". When they sprayed the doors, the dampener prevented paint from getting where it needed to, so it looks like there's some staining taking place.. eventually it will be rust if not taken care of. So, I cut around that also, and will clean it up and put some primer on it.
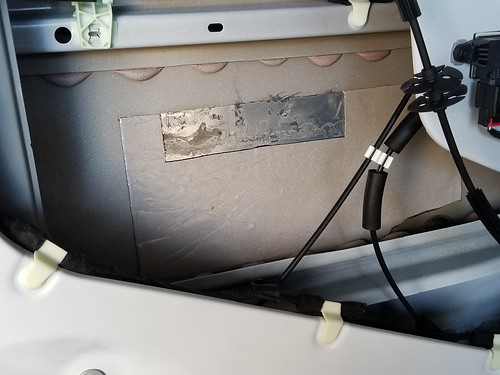
I applied the dampener inside the door after drying it out with a towel and blowing a heater in there for a while. I then started working on the access panel again. I want to see how this riv-nut thing works. :P
I laid out some possible locations for the screws. I need to verify if they will work, so I took the existing plastic access cover and mapped my screw holes to it.. over to the door and made a few adjustments.
I then re-marked the holes on my MDF cover and drilled the holes. Now back over to the door to transfer these holes to the door. I held it in place using tape while marking the holes. In hindsight, I should have made ONE hole, finished the riv-nut, mounted it securely, then moved on to the next one.
After the holes were marked, I put tape over them to help keep the bit from walking. It worked very well. I then drilled all the holes. Again, in hindsight I would have done this differently, and will on the passenger side. I'll finish 2 rivnuts then mount the panel cover, and use the holes as guides for the drilling. On this drivers side door, the bottom 2 holes are off a bit. Not a big deal. I can either enlarge the holes a bit, or if I decided to make plastic panel covers, I can relocate the holes a bit. they are off by less than 1/8".
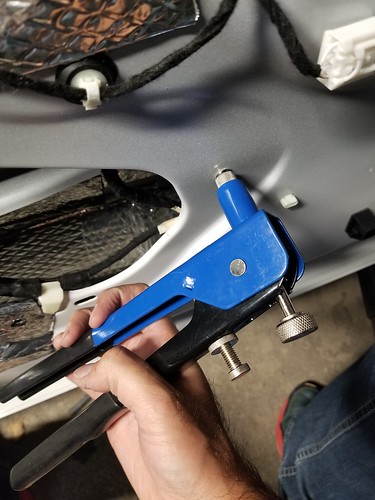
Using an el-cheapo riv-nut tool I put in the riv-nuts. I have read about some guys using some touch-up paint to cover the bare metal from drilling. I didn't have any on hand, so I used some RTV around the back to seal it up. I think this will be better as I'm thinking that putting in the riv-nut will end up taking the paint off again.
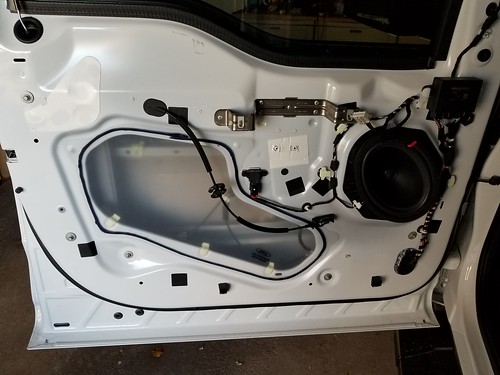
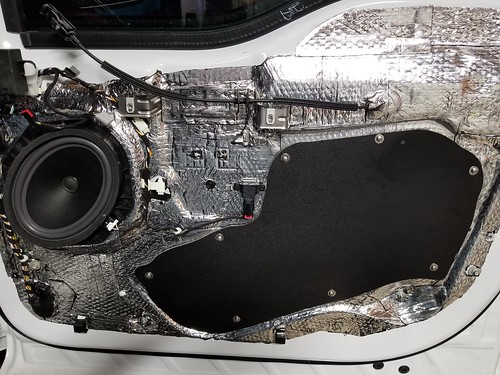
Riv-nuts in place and I added started working on adding more dampening material.
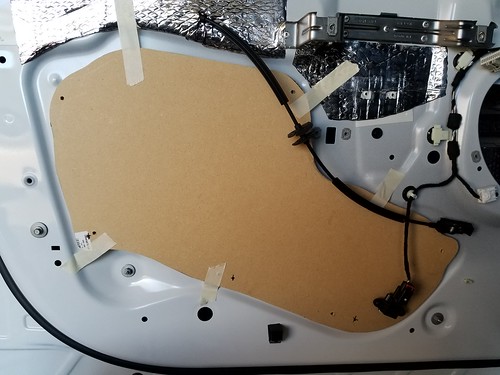
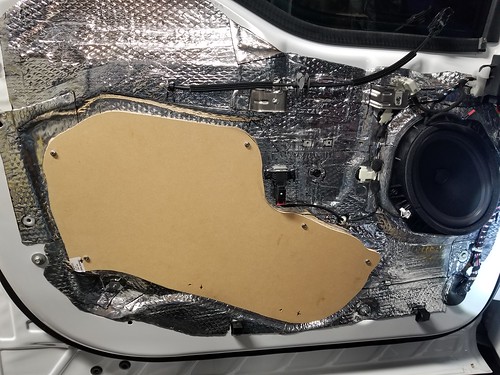
Here's the door after I completed the sound dampening and mounted the panel on again. You'll see the two holes at the bottom with no screws - those holes will have to be re-located a bit. I don't want to do that now though. I'll wait until I have access to a drill press, and some plastic to re-fab the panels.
Next I'll take a crack at running new wire - what could possibly go wrong??
Door card removed - nothing exciting to see here.
Looks like there's some moisture in the door. Makes sense since I did just drive home in the rain. I inspected the existing sound dampening material and found that they did a really really poor job of installing it. Rolling it caused water to squirt up and out of the top so obviously it's not adhered to the door properly. I'll have to cut out that section, clean it up and get it ready for new stuff to be applied over it.
I also noticed that the factory sound dampener was put on very poorly at the bottom - it stuck up and covered these foam "mounds". When they sprayed the doors, the dampener prevented paint from getting where it needed to, so it looks like there's some staining taking place.. eventually it will be rust if not taken care of. So, I cut around that also, and will clean it up and put some primer on it.
I applied the dampener inside the door after drying it out with a towel and blowing a heater in there for a while. I then started working on the access panel again. I want to see how this riv-nut thing works. :P
I laid out some possible locations for the screws. I need to verify if they will work, so I took the existing plastic access cover and mapped my screw holes to it.. over to the door and made a few adjustments.

I then re-marked the holes on my MDF cover and drilled the holes. Now back over to the door to transfer these holes to the door. I held it in place using tape while marking the holes. In hindsight, I should have made ONE hole, finished the riv-nut, mounted it securely, then moved on to the next one.
Using an el-cheapo riv-nut tool I put in the riv-nuts. I have read about some guys using some touch-up paint to cover the bare metal from drilling. I didn't have any on hand, so I used some RTV around the back to seal it up. I think this will be better as I'm thinking that putting in the riv-nut will end up taking the paint off again.
Riv-nuts in place and I added started working on adding more dampening material.

Here's the door after I completed the sound dampening and mounted the panel on again. You'll see the two holes at the bottom with no screws - those holes will have to be re-located a bit. I don't want to do that now though. I'll wait until I have access to a drill press, and some plastic to re-fab the panels.
Next I'll take a crack at running new wire - what could possibly go wrong??
10-26-2017, 09:53 AM
#4
New wire. I probably dont' NEED to run new wire to the doors considering that I'm only running about 85w to the door speaker right now. But I hope to eventually upgrade the amps and probably get new drivers too - I'm already eyeing up the SI mids! So, it's probably best that new wire is run. I don't like the idea of splicing into the existing factory wire either.
I researched and read the horror stories about dealing with molex connectors. So I stopped by the Audio shop and asked what he wants to run the wire for me. He said $75-80. Hmmmm. Ok, I'll let him know, maybe do it friday when I pick up my TWK88 from him.
I went home and did a little googling to see what these molex connectors are like. I have zero experience with them! I've always seen running wire through the door boots as an absolute nightmare, so... lets do it!
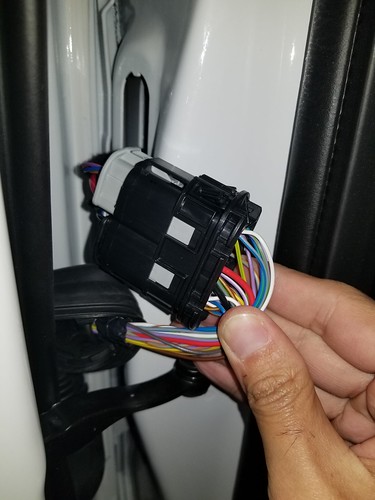
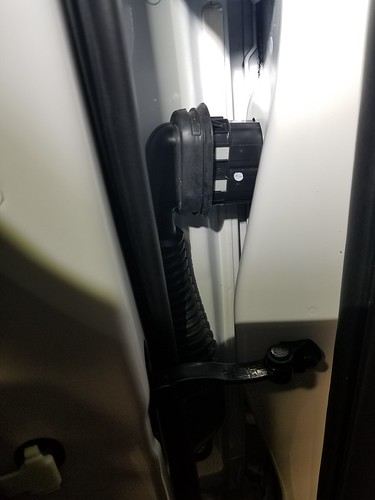
First thing is to remove the molex connector from the door. I did this by popping off the top boot. A little prying with a panel popper tool did the trick. Then, on the top of the connector there are two small tabs that get pressed in while I pull out.. pop, the top comes out. One tab on the bottom and the connector comes out as a whole - not so bad!
Hmm.. now what? After messing around with the molex connector for a min, I found a couple tabs that allow me to separate the connector. from the backside (truck side) there are two plugs that go into the back of the connector. I removed those and checked out what kind of room I have to work with. Fortunately the top gray connector has NO pins in the middle, so that's what I'll use. My speaker wire is some really nice twisted/shielded wire from work but I don't want to drill a 1/4" hole though the connector to run wire.. so instead I'll strip the wire back, run it through the connector and then twist it again after.
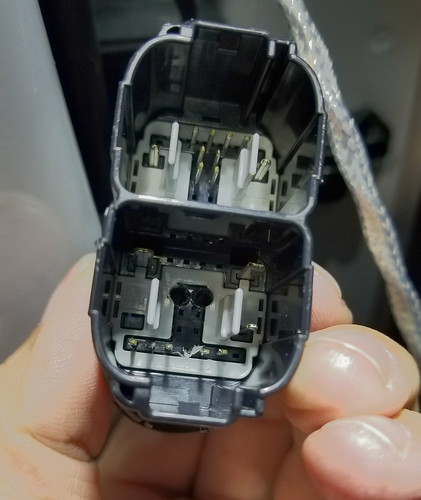
I picked a small drill, just bigger than the wire and carefully.. CAREFULLY drilled through the connector. No hurry and no need to hammer the throttle on the drill. I very slowly drilled through, being careful to feel the backside for when the drill popped through. That was successful.. so I did another hole right next to it. Spent a little time cleaning it up so the connector would go back together again without hunks of plastic in the way. A little test fit and success! Wire goes through no problem.
To make sure I got the hole exactly correct on the backside gray plug, I inserted it back into the molex connector then ran the drill through to make a small pilot hole. I took the gray connector back out and finished the hole.
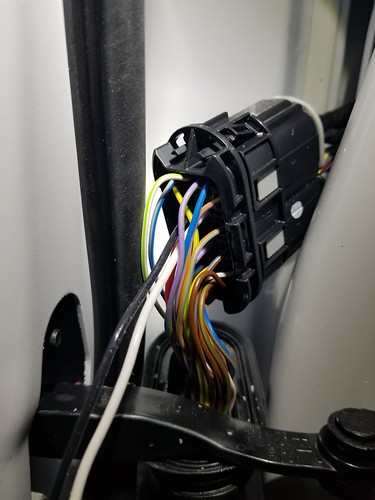
molex connector holes look like this
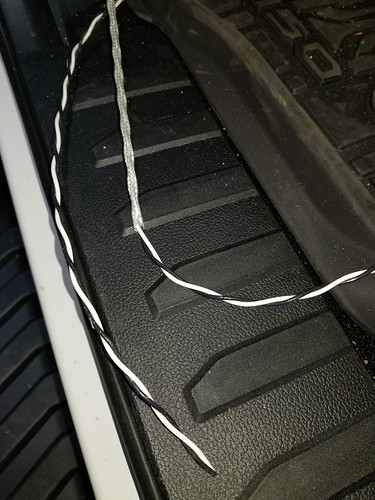
Here's a shot of my wire.. I stripped back about 2ft of shielding so I could run it through the molex connector.
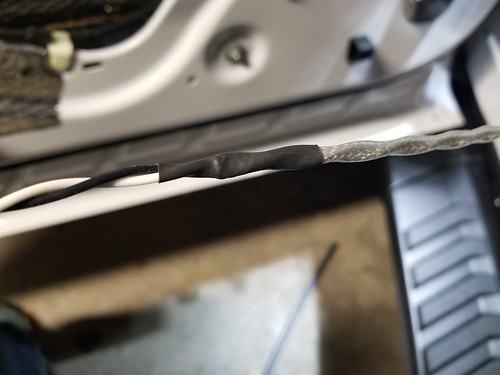
A little heat shrink to tidy things up and protect it.
I heard that running the wire through the driver side and into the cabin was really hard, especially with the emergency brake there. I tried it with the un-stripped end of my cable since it's nice and stiff.. went through no problem! A little poking back there and it wasn't bad at all. Now, how to get my stripped end through? I didn't take pics but I took a 3/4" piece of shrink tubing I had that's about a foot long and ran it over the wire that came through to the cabin.. worked the tubing so it poked out the hole so it basically bridged from the door jamb to inside the cabin. I pulled the un stripped end of wire back out, then ran my stripped wire through the tube starting from inside the cabin, to the outside.. easy! Pulled the shrink tube out and we're ready for the next phase.
I need to run the wire through the gray connector, then through the molex connector. I untwisted the wire and it ran through easily. I pulled it up to the shrink junction.
Then I had to feed it through the molex connector and out the backside. No problem there either. I put the molex connector back together and everything looks good! Just need to figure out how to get the wire through the boot.
Unfortunately I didn't take any pics of this.. I guess I was too focused on figuring it out. I may just do an entire guide when I do the passenger door and post it separately. I popped the boot grommit out on the door and cut a zip tie that held a wire in place inside the door.. I worked the bundle of wire out as much as I could to get the boot as straight as possible. Since the bottom of the boot was taped up, I had to cut off the tape to expose the opening. I used the unstripped end of my cable to again run up the boot and out the top. It took a little wiggling and massaging the boot to get it through, but I did it. No lube was needed, but it would have helped I'm sure.
Once I got the cable out the top of the boot, I taped my new speaker wire on and pulled it back through and out the bottom.
I retaped the bottom of the boot with electrical tape to seal it back up and reinstalled the boot into the door. I was surprised how easily it went back together. Not so bad at all.
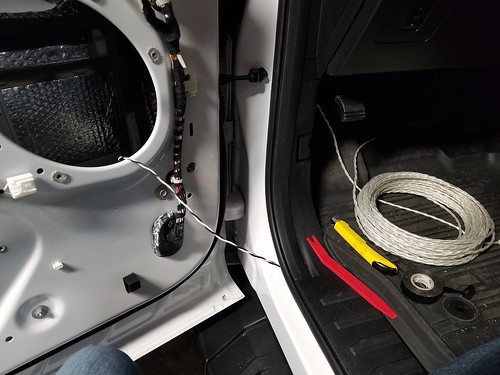
Here's some fresh new re-twisted wire just waiting for a new driver to.. well, drive!
I just had to re-install the upper boot gromit thinger. The easiest way to accomplish this, I found, was to put the boot back on the molex plug first. Once the boot is back on the molex connector, it pops right back in place, sealing to the truck just like it's supposed to.
Ok.. I think that's enough for tonight. While this is all going on, my son is sitting on my driver's seat "working" on his homework.. or not really working. It's time to close up shop for the night and get his homework done!
Tomorrow I'll tackle the other door, and if I can leave work early I will try to pick up some plastic to remake those panel covers.
I researched and read the horror stories about dealing with molex connectors. So I stopped by the Audio shop and asked what he wants to run the wire for me. He said $75-80. Hmmmm. Ok, I'll let him know, maybe do it friday when I pick up my TWK88 from him.
I went home and did a little googling to see what these molex connectors are like. I have zero experience with them! I've always seen running wire through the door boots as an absolute nightmare, so... lets do it!
First thing is to remove the molex connector from the door. I did this by popping off the top boot. A little prying with a panel popper tool did the trick. Then, on the top of the connector there are two small tabs that get pressed in while I pull out.. pop, the top comes out. One tab on the bottom and the connector comes out as a whole - not so bad!
Hmm.. now what? After messing around with the molex connector for a min, I found a couple tabs that allow me to separate the connector. from the backside (truck side) there are two plugs that go into the back of the connector. I removed those and checked out what kind of room I have to work with. Fortunately the top gray connector has NO pins in the middle, so that's what I'll use. My speaker wire is some really nice twisted/shielded wire from work but I don't want to drill a 1/4" hole though the connector to run wire.. so instead I'll strip the wire back, run it through the connector and then twist it again after.
I picked a small drill, just bigger than the wire and carefully.. CAREFULLY drilled through the connector. No hurry and no need to hammer the throttle on the drill. I very slowly drilled through, being careful to feel the backside for when the drill popped through. That was successful.. so I did another hole right next to it. Spent a little time cleaning it up so the connector would go back together again without hunks of plastic in the way. A little test fit and success! Wire goes through no problem.
To make sure I got the hole exactly correct on the backside gray plug, I inserted it back into the molex connector then ran the drill through to make a small pilot hole. I took the gray connector back out and finished the hole.
molex connector holes look like this
Here's a shot of my wire.. I stripped back about 2ft of shielding so I could run it through the molex connector.
A little heat shrink to tidy things up and protect it.
I heard that running the wire through the driver side and into the cabin was really hard, especially with the emergency brake there. I tried it with the un-stripped end of my cable since it's nice and stiff.. went through no problem! A little poking back there and it wasn't bad at all. Now, how to get my stripped end through? I didn't take pics but I took a 3/4" piece of shrink tubing I had that's about a foot long and ran it over the wire that came through to the cabin.. worked the tubing so it poked out the hole so it basically bridged from the door jamb to inside the cabin. I pulled the un stripped end of wire back out, then ran my stripped wire through the tube starting from inside the cabin, to the outside.. easy! Pulled the shrink tube out and we're ready for the next phase.
I need to run the wire through the gray connector, then through the molex connector. I untwisted the wire and it ran through easily. I pulled it up to the shrink junction.

Then I had to feed it through the molex connector and out the backside. No problem there either. I put the molex connector back together and everything looks good! Just need to figure out how to get the wire through the boot.
Unfortunately I didn't take any pics of this.. I guess I was too focused on figuring it out. I may just do an entire guide when I do the passenger door and post it separately. I popped the boot grommit out on the door and cut a zip tie that held a wire in place inside the door.. I worked the bundle of wire out as much as I could to get the boot as straight as possible. Since the bottom of the boot was taped up, I had to cut off the tape to expose the opening. I used the unstripped end of my cable to again run up the boot and out the top. It took a little wiggling and massaging the boot to get it through, but I did it. No lube was needed, but it would have helped I'm sure.
Once I got the cable out the top of the boot, I taped my new speaker wire on and pulled it back through and out the bottom.

I retaped the bottom of the boot with electrical tape to seal it back up and reinstalled the boot into the door. I was surprised how easily it went back together. Not so bad at all.
Here's some fresh new re-twisted wire just waiting for a new driver to.. well, drive!
I just had to re-install the upper boot gromit thinger. The easiest way to accomplish this, I found, was to put the boot back on the molex plug first. Once the boot is back on the molex connector, it pops right back in place, sealing to the truck just like it's supposed to.
Ok.. I think that's enough for tonight. While this is all going on, my son is sitting on my driver's seat "working" on his homework.. or not really working. It's time to close up shop for the night and get his homework done!
Tomorrow I'll tackle the other door, and if I can leave work early I will try to pick up some plastic to remake those panel covers.
10-26-2017, 09:54 AM
#5
Another day, a bit more progress. I stopped by a plastics shop and scored a 2x6 sheet that was left over from a job, for only $25. It was near my Dad's house so I popped over there and routed them out quick.
I went home and alternated between catching a few minutes of the baseball game and working on running new speaker wire though the passenger side molex connector. No major issues encountered. It was kind of funny - my wife was out wondering what I was doing so I explained how I had to run wire.. as soon as I said I need to drill through the molex connector, she left. lol "This is too stressful!" She says "how do you know what to do!?" I said "you just start hacking away". She left. Maybe I should have answered with a bit more of a confidence inspiring comment. :P
I'll skip all the pics I took of ripping trim off, drilling, running wire.. etc.. but there is new wire!
Last thing of the evening was to install the riv-nuts on the passenger door and test fit the new panel.
I made a small error when trying to drill one more hole. I drilled through the panel thinking there was door behind it, but nope. So I had to relocate the hole. I filled it in with a little RTV.
Next I need to cover the panel with sound dampening material. I'm debating between cutting the sound dampening to the exact size of the panel so it's easy to remove OR, cutting the material a little bigger and sealing the panel in. Still can easily be cut away to remove if necessary. Thoughts??
That's it for today!
Last edited by JKoop; 10-26-2017 at 10:00 AM.
 10-26-2017, 10:27 AM
#7
Interesting question! Some google searching is in order.. so far I've found that during curing it can etch the surface, but it may promote better adhesion that way. If it's a cosmetic thing, no worries! I'll have to do some more digging to see if there are any other concerns. Thanks for the question!!
Trending Topics
10-26-2017, 10:41 AM
#8
Texas A&M Aggie
Interesting question! Some google searching is in order.. so far I've found that during curing it can etch the surface, but it may promote better adhesion that way. If it's a cosmetic thing, no worries! I'll have to do some more digging to see if there are any other concerns. Thanks for the question!!

 10-26-2017, 10:52 AM
#9
Hopefully it's fine! I saw a thread on here about what you can/can't use, but I can't find it anymore as it wasn't directly about it. Good luck! I can't wait to see more updates, I'm putting off doing more to mine for now. I pulled the junk Sony subwoofer out and put a Pioneer shallow mount behind the seat. That's got me satisfied for now.
Assuming you have the Sony system - that's a hell of a lot better than stock! My '14 FX4 had the Sony. I liked it, but should have also upgraded the sub. I'm really hoping that this new system takes me beyond what the Sony was in my FX4.
Was it difficult pulling the insulation from the back wall? I'm putting my amps right where you have your sub. I may not remove any of the insulation and just put the rack in front of it (vertically), attached to the floor at the seat anchor points using a couple L brackets. I'll try using the ground on the back wall of the cab though.
10-26-2017, 11:13 AM
#10
Texas A&M Aggie
Now I'm nervous! lol It would be a nightmare to remove the RTV! I'll do some more research. Hopefully my doors don't fall off! :P
Assuming you have the Sony system - that's a hell of a lot better than stock! My '14 FX4 had the Sony. I liked it, but should have also upgraded the sub. I'm really hoping that this new system takes me beyond what the Sony was in my FX4.
Was it difficult pulling the insulation from the back wall? I'm putting my amps right where you have your sub. I may not remove any of the insulation and just put the rack in front of it (vertically), attached to the floor at the seat anchor points using a couple L brackets. I'll try using the ground on the back wall of the cab though.
I do, the factory sub was like 60W or something. I've got a 300W RMS sub now. Lol WAY better. Yours should be leaps and bounds better.
Nope, there's like 4 christmas tree pins, just be careful with them and you can reuse them. My amp is held on my velcro (15lb outdoor), and my sub box is held to the back with the same stuff. Hardest part was figuring out where to run the power wire (went along the top of the frame, then through the cab vent), and what wiring to tap into. I used a ground where the passenger seat clips to the back wall, zip tied the wiring to the sliding window cables to keep things clean.

