
My first upgrade + How to: Sync2 to Sync3 with Apple CarPlay (lots of photos)
 08-07-2017, 10:45 PM
#1


Hey Everyone! So after leasing a 3.5 Ecoboost for about a year I decided to turn in my lease and buy a similarly equipped Lariat. Only thing was it is a 2015 and still had sync2. So, my first change and "how to" is on my Sync 2 to Sync3 upgrade. I looked at some other DIY's but I didn't feel 100% on the new USB wiring. I wrote this to squash all confusion for anyone looking to do this.
First off, big thanks to member TexasFording. He sold me my sync 3 kit with everything I needed at a killer price. He answered questions and was so helpful. Thanks Joe!
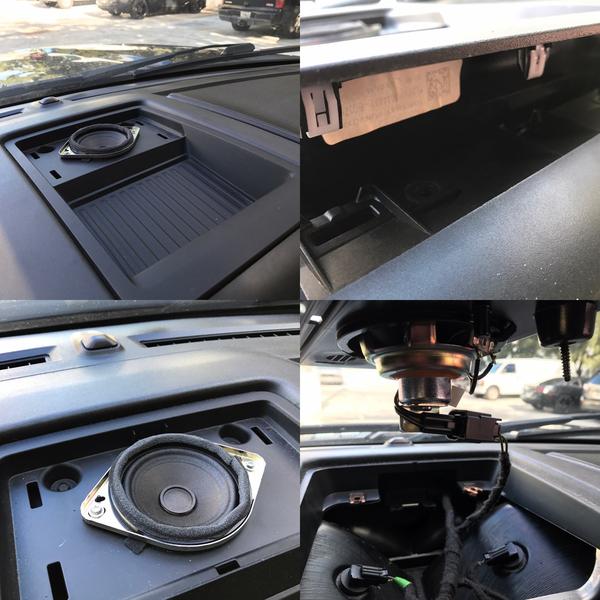
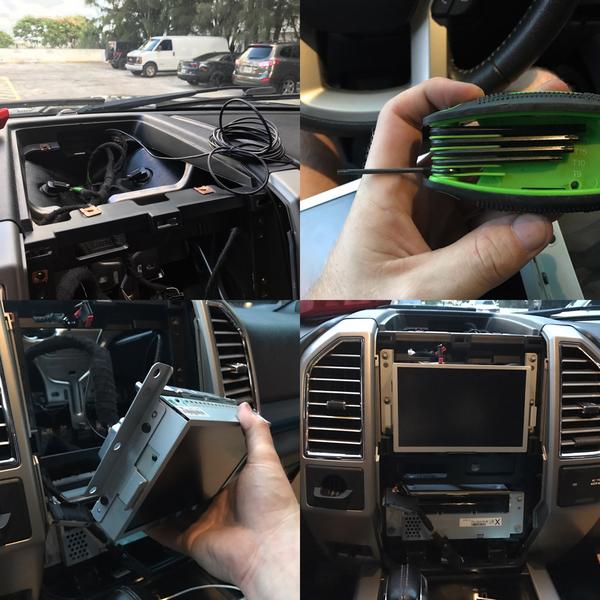
REMOVE SPEAKER GRILL AND SPEAKER TRAY
Start by prying the front left of the speaker grille. Its held on by pressure clips just like everything else thats not bolted. Remove the two 7mm bolts in the back that you can now see. This will let you take the whole top tray off with its speaker. Unclip the speaker to put the piece of trim to the side.
Remove two 7mm screws the hold to top of the radio trim on. (removed In photo)
REMOVE CENTER RADIO TRIM
Pull firmly but carefully on the top of the center radio trim. You will have to unplug the Hazards/ traction/ and any other buttons you have on top.
Unplug the Radio and AC controls.
Pull off the complete front radio trim
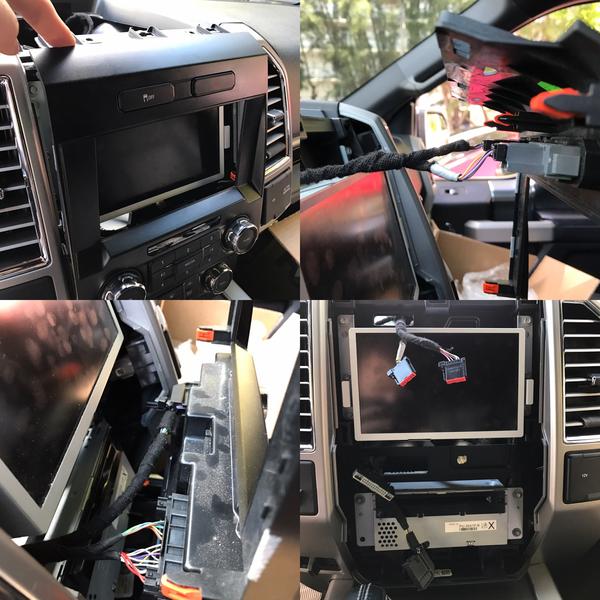
REMOVE SYNC2 SCREEN AND CD HARDWARE
The Sync2 will have (6) 7mm bolts holding it in place. Remove those bolts and pull the radio forward slightly to reach the plugs behind. You will be unplugging the mini USB cable that goes to your current USB hub and one other large plug
The CD player will have 4) 7mm bolts. Remove these as well and unplug the cables behind. Remove
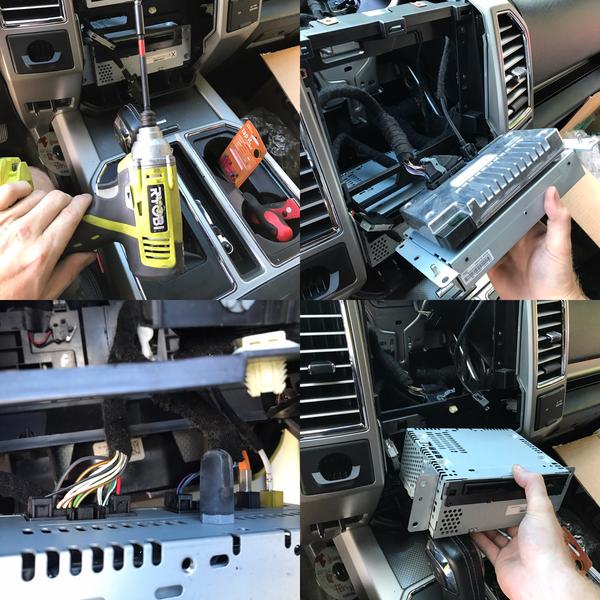
NEW USB HUB FOR CARPLAY
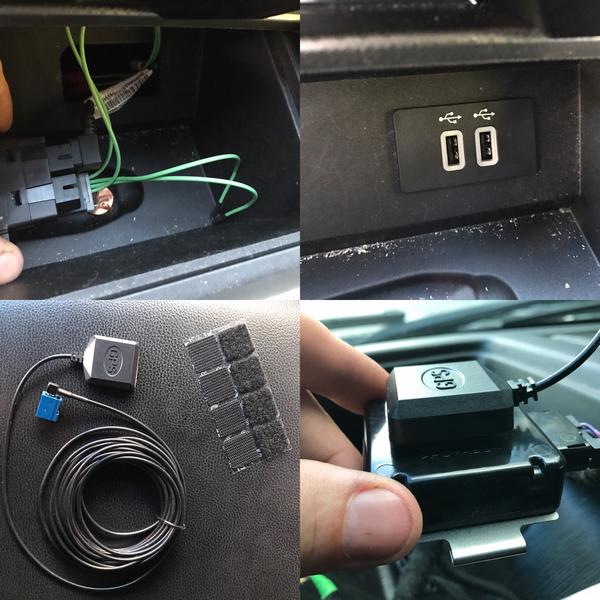
Now its time to switch the USB hub to the new one. Put a Pry tool underneath the old USB hub and when you can get your finger under it, pull outward. Unplug the mini usb cable as well as the power and wire clip. Carefully cut back the black factory tape to be able to see more of the wires that powered the old USB hub. You will be tapping into two of these wires to be able to power your new hub.
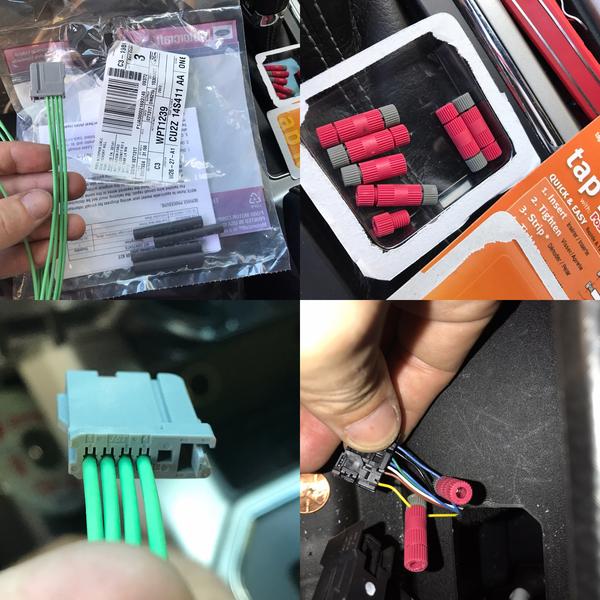
I used a very clean wire tap called "Tap It". I bought them on Amazon and they are used for small gauge wires. Its very easy and I like how neat it makes everything look.
Take the new power harness for the Sync 3 Hub (green) and locate wire 1 and wire 4. The plug will have tiny little numbers.
Locate the yellow (number 1) and the blue (number 12) wires on the old usb hub. This will be your power (1) and ground (12) wires for the new hub. Tap into those wires and connect them to the respective wires on the new, green usb power harness. Middle two cables in the new wire harness (green) are not used. Cover them with electrical tape.
New Harness wire 1 (green) tapped to old harness wire 1 (yellow at one end of the plug). New Harness wire 4 (green) tapped to wire 12 ground (blue on opposite end of old plug).
INSTALL NEW USB AND NEW GPS ANTENNA
Once the New USB is connected as I mentioned above. Connect the Hub to the new harness and then connect the old Mini USB to the new usb hub. the USB symbols will be on top.
Take the new GPS antenna and apply 3M double sided tape. I didn't have that on me so I used some velcro I had which will work just fine. Pull out the old GPS antenna which is located just behind the center speaker/ tray. Apply the new GPS on to the top of the old GPS. Run the Cable and connect to the back new Sync3 Hardware/screen. The plug GPS will be blue and it will connect to the back of the Sync3 in the bottom corner. The male gps plug will also be blue on the sync 3 hardware. Finally plug In the mini usb into the black slot in the new Sync3 (not the grey). Look at Sync2 back vs Sync3 back to see the blue gps male plug and the black mini usb plug.

TRANSFER BRACKETS FROM SYNC2 TO SYNC3
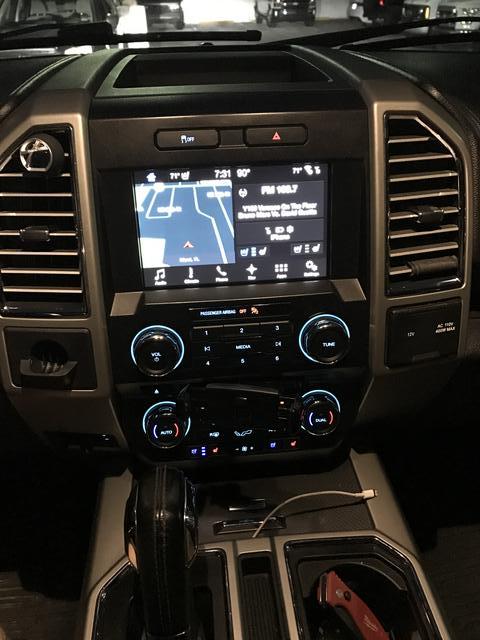
I saw here that other DIYs said I needed to drill new holes. When I took off the old bracket it fit perfectly to the new Sync3 holes. The torx you'll need is a T9. Put the bracket on the new Sync3 and pay attention to the orientation of the new screen. At this point I turned on my truck to see if everything was working and to check orientation of the new screen.
Start putting stuff back together now. Do the reverse of what you did to take it a part. CD player, Sync3, buttons/ radio/ ac plugs, Replace center trim, install top 2) 7mm bolts, plug in top speaker, install top speaker tray, install 2 rear bolts, finally install top speaker grill.
TEST AND ENJOY
*Do this at your own risk. Don't be dumb and blame me if you mess up.*
First off, big thanks to member TexasFording. He sold me my sync 3 kit with everything I needed at a killer price. He answered questions and was so helpful. Thanks Joe!
REMOVE SPEAKER GRILL AND SPEAKER TRAY
Start by prying the front left of the speaker grille. Its held on by pressure clips just like everything else thats not bolted. Remove the two 7mm bolts in the back that you can now see. This will let you take the whole top tray off with its speaker. Unclip the speaker to put the piece of trim to the side.
Remove two 7mm screws the hold to top of the radio trim on. (removed In photo)
REMOVE CENTER RADIO TRIM
Pull firmly but carefully on the top of the center radio trim. You will have to unplug the Hazards/ traction/ and any other buttons you have on top.
Unplug the Radio and AC controls.
Pull off the complete front radio trim
REMOVE SYNC2 SCREEN AND CD HARDWARE
The Sync2 will have (6) 7mm bolts holding it in place. Remove those bolts and pull the radio forward slightly to reach the plugs behind. You will be unplugging the mini USB cable that goes to your current USB hub and one other large plug
The CD player will have 4) 7mm bolts. Remove these as well and unplug the cables behind. Remove
NEW USB HUB FOR CARPLAY
Now its time to switch the USB hub to the new one. Put a Pry tool underneath the old USB hub and when you can get your finger under it, pull outward. Unplug the mini usb cable as well as the power and wire clip. Carefully cut back the black factory tape to be able to see more of the wires that powered the old USB hub. You will be tapping into two of these wires to be able to power your new hub.
I used a very clean wire tap called "Tap It". I bought them on Amazon and they are used for small gauge wires. Its very easy and I like how neat it makes everything look.
Take the new power harness for the Sync 3 Hub (green) and locate wire 1 and wire 4. The plug will have tiny little numbers.
Locate the yellow (number 1) and the blue (number 12) wires on the old usb hub. This will be your power (1) and ground (12) wires for the new hub. Tap into those wires and connect them to the respective wires on the new, green usb power harness. Middle two cables in the new wire harness (green) are not used. Cover them with electrical tape.
New Harness wire 1 (green) tapped to old harness wire 1 (yellow at one end of the plug). New Harness wire 4 (green) tapped to wire 12 ground (blue on opposite end of old plug).
INSTALL NEW USB AND NEW GPS ANTENNA
Once the New USB is connected as I mentioned above. Connect the Hub to the new harness and then connect the old Mini USB to the new usb hub. the USB symbols will be on top.
Take the new GPS antenna and apply 3M double sided tape. I didn't have that on me so I used some velcro I had which will work just fine. Pull out the old GPS antenna which is located just behind the center speaker/ tray. Apply the new GPS on to the top of the old GPS. Run the Cable and connect to the back new Sync3 Hardware/screen. The plug GPS will be blue and it will connect to the back of the Sync3 in the bottom corner. The male gps plug will also be blue on the sync 3 hardware. Finally plug In the mini usb into the black slot in the new Sync3 (not the grey). Look at Sync2 back vs Sync3 back to see the blue gps male plug and the black mini usb plug.
TRANSFER BRACKETS FROM SYNC2 TO SYNC3
I saw here that other DIYs said I needed to drill new holes. When I took off the old bracket it fit perfectly to the new Sync3 holes. The torx you'll need is a T9. Put the bracket on the new Sync3 and pay attention to the orientation of the new screen. At this point I turned on my truck to see if everything was working and to check orientation of the new screen.
Start putting stuff back together now. Do the reverse of what you did to take it a part. CD player, Sync3, buttons/ radio/ ac plugs, Replace center trim, install top 2) 7mm bolts, plug in top speaker, install top speaker tray, install 2 rear bolts, finally install top speaker grill.
TEST AND ENJOY
*Do this at your own risk. Don't be dumb and blame me if you mess up.*

The following 3 users liked this post by Al3xMac:
08-07-2017, 11:00 PM
#2
Senior Member
Good job. This is my next mod I've been planning for a while, now that most of the bugs are ironed out with the latest version. I will start ordering things next week. I've bookmarked this thread for future reference. Thanks!
08-07-2017, 11:05 PM
#3
Thanks Carrier. When I was looking to buy a new truck I was set on a 2016+ for sync 3 but then I figured the sync3 upgrade would be less expensive and I got a great deal on my 2015. The sync3 is so much quicker than sync2. So far I'm definitely happy with it. Good luck with your upgrade.
08-08-2017, 09:07 AM
#4
Senior Member

yeah it is a nice upgrade from MFT. Plus its needed to support PTBA if one wants to add it.
08-08-2017, 09:50 PM
#6
Senior Member
Pro Trailer Backup Assist.
Check his sig for details.
Check his sig for details.

