When you click on links to various merchants on this site and make a purchase, this can result in this site earning a commission. Affiliate programs and affiliations include, but are not limited to, the eBay Partner Network.
I haven't done it so I don't know how long it will take. Just an estimate. Good luck.
It definitely won't take a week.
I haven't modded my F150 lights yet, but plan on doing it in a few weeks. I have experience doing this on other cars, so I'm confident it's a 3 day process or less. Basically it goes like this:
1. Remove any screws holding the lens to the body of the light (not sure if this is the case on F150 lights).
2. Bake lights to soften glue (160 degrees for 5 minutes at a time, IIRC). It will soften the butyl to the point where you can pull it apart with your fingers, with a plastic trim pry tool used to start the separation.
3. Scrape as much of the OEM glue while it's warm, using a heat gun to warm up further if needed. You want to remove all the glue as best you can, as you will want fresh butyl to re-seal.
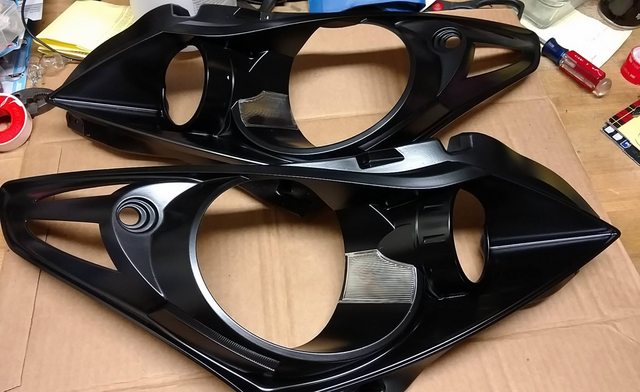
4. Mask off whatever will not be painted. Scuff up exposed plastics with sandpaper or 3m pad to give a good surface for paint.
5. Spray primer. Let dry/cure FULLY
6. Spray coats of paint (you will probably want to wet sand in between coats to remove any orange peel that may have formed).
7. Once you're happy with results, run a bead of butyl glue (TRS Butyl link) in the channel between the lens and body.
8. Press lenses back onto body as best you can cold, then heat back up in the oven.
9. Press together further with plyers (wrapped in electrical tape, so you don't mar your lights), and use any screws that may connect the lens to tighten even further. This is your weather proofing, so make sure you do a good job sealing back up!
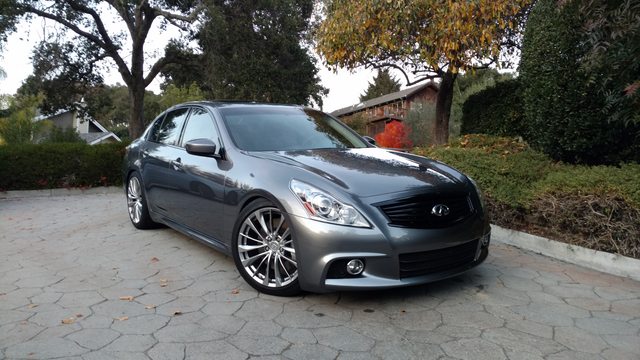
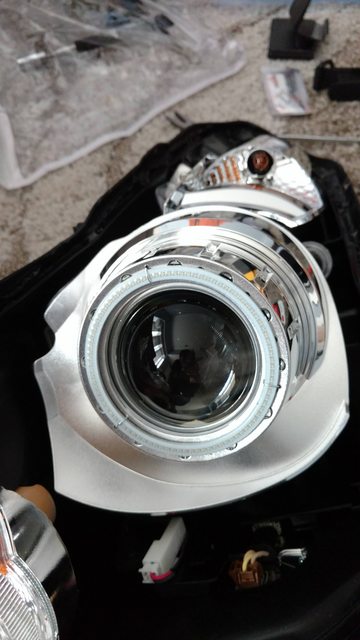
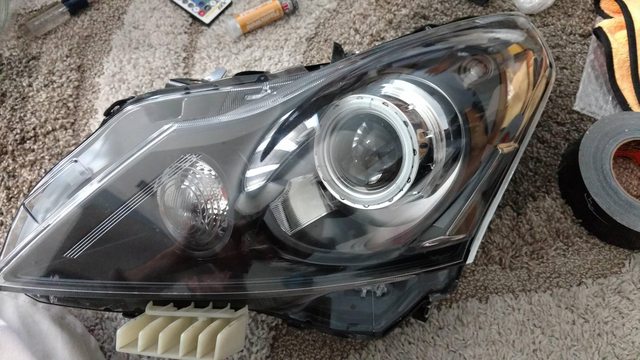
Here are a couple pics from when I modded the lights on my G37: blacked out housing, smoked side markers, installed RGB angel eyes, new projector lenses, modified projector shroud for razor sharp cutoff, etc.
I haven't modded my F150 lights yet, but plan on doing it in a few weeks. I have experience doing this on other cars, so I'm confident it's a 3 day process or less. Basically it goes like this:
1. Remove any screws holding the lens to the body of the light (not sure if this is the case on F150 lights).
2. Bake lights to soften glue (160 degrees for 5 minutes at a time, IIRC). It will soften the butyl to the point where you can pull it apart with your fingers, with a plastic trim pry tool used to start the separation.
3. Scrape as much of the OEM glue while it's warm, using a heat gun to warm up further if needed. You want to remove all the glue as best you can, as you will want fresh butyl to re-seal.
4. Mask off whatever will not be painted. Scuff up exposed plastics with sandpaper or 3m pad to give a good surface for paint.
5. Spray primer. Let dry/cure FULLY
6. Spray coats of paint (you will probably want to wet sand in between coats to remove any orange peel that may have formed).
7. Once you're happy with results, run a bead of butyl glue (TRS Butyl link) in the channel between the lens and body.
8. Press lenses back onto body as best you can cold, then heat back up in the oven.
9. Press together further with plyers (wrapped in electrical tape, so you don't mar your lights), and use any screws that may connect the lens to tighten even further. This is your weather proofing, so make sure you do a good job sealing back up!
Here are a couple pics from when I modded the lights on my G37: blacked out housing, smoked side markers, installed RGB angel eyes, new projector lenses, modified projector shroud for razor sharp cutoff, etc.
From this:
To this:
VERY NICE! I guess it's not as difficult as I thought. Thanks for the detailed instructions.
It is not going to be cheap to have your OEM LED units opening up and modified. It will be much cheaper to sell your silver OEM LED units and then buy the SE if those look the part for you. You should be able to get about $1500 for your OEM headlights.
It is not going to be cheap to have your OEM LED units opening up and modified. It will be much cheaper to sell your silver OEM LED units and then buy the SE if those look the part for you. You should be able to get about $1500 for your OEM headlights.
If you're looking to put the switchback LED trim lights to go with the blacked out housings, you will still have to open them up... might as well save the 500 bucks and open the silver ones to paint.
It is not going to be cheap to have your OEM LED units opening up and modified. It will be much cheaper to sell your silver OEM LED units and then buy the SE if those look the part for you. You should be able to get about $1500 for your OEM headlights.
Yesterday I started the project. And let me tell you, taking these things apart is a PiTA. After about an hour of basically zero progress, I had pretty much gave up and told myself I’m buying Anzos. Went outside smoked a cigarette and had a beer. After calming down, I decided to give it one more try. And after another hour and a half I had the first one apart. What satisfaction it was when it finally broke loose. Took about an hour and a half one the second one also.
for anyone thinking of tackling this, you have to work fast and be forceful. Many times I thought something was going to break, but it didn’t happen. I say work fast because the permaseal is only going to release when it’s hot, like fresh out hot. So, I heated it in intervals. I started at 240 degrees for 20 minutes. Worked about 10 minutes. Then I did 260 for 10. I found that 280 worked the best. I only left it in the oven for 7 minutes at 280. Just work it a little bit at a time and eventually you’ll get there. Also, get a set of heavy duty lock ring pliers. If not for them, I don’t think I would’ve gotten anywhere. I used a hook and punch driver set for run along the seams after first heat to try and release some of the permaseal, reheated and just started working the screwdriver to get inside. Once inside, the pliers were my savior. I was able to slowly separate the lens a section at a time.
here is BigFordXLT's experience opening OEM lights.. i opened Anzo's so it was a little easier for me.. you are going to have to think about this and try some middle ground.. i find it you turn it up too high ex 275 if you use cardboard to lay the headlights on it can catch on fire
I opened my Anzos up and it was pretty easy. Took maybe 20 mins a side. Not sure how this will work on on the OEM chrome but some oven cleaner on the Anzo chrome made them a perfect shiny black. No need to paint. Put cleaner on, wait 10 mins, rinse off and done.

 02-10-2019, 07:44 PM