What did you do to your truck today?


 05-11-2014, 10:36 PM
Oooo a Custom Title.
To clarify the dashpad is the vinyl pad piece on the dashboard. All you have to do is take the old vinyl off, purchase some to match it, I got mine at Jo-Anne Fabrics for $10. It is called 'Dark Gray Automotive Vinyl' incase you goto the same place. Then get some spray-on adhesive for about $5 from an auto parts or home improvement store, spray the foam generously, but not too much, slowly apply the new vinyl and spread it around with your hands to prevent wrinkles or air pockets, cut the excess vinyl off, leaving about an inch extra to fold around the back of the pad, and press it firmly around the entire dash pad, let it sit overnight to dry.
Doing around the radio cutout is a little difficult, you have to heat the vinyl around the creases so that it bends properly around them, that or cut and fold it over if you don't mind having the cuts show. I personally just heated it.
Kind of hard to explain without showing you step-by-step, but hopefully this gave some idea. It is time consuming, and easy to mess up if you haven't done it before, so it's probably better to try and find one at a junkyard if you are worried about messing up.
05-11-2014, 11:06 PM

To clarify the dashpad is the vinyl pad piece on the dashboard. All you have to do is take the old vinyl off, purchase some to match it, I got mine at Jo-Anne Fabrics for $10. It is called 'Dark Gray Automotive Vinyl' incase you goto the same place. Then get some spray-on adhesive for about $5 from an auto parts or home improvement store, spray the foam generously, but not too much, slowly apply the new vinyl and spread it around with your hands to prevent wrinkles or air pockets, cut the excess vinyl off, leaving about an inch extra to fold around the back of the pad, and press it firmly around the entire dash pad, let it sit overnight to dry. Doing around the radio cutout is a little difficult, you have to heat the vinyl around the creases so that it bends properly around them, that or cut and fold it over if you don't mind having the cuts show. I personally just heated it. Kind of hard to explain without showing you step-by-step, but hopefully this gave some idea. It is time consuming, and easy to mess up if you haven't done it before, so it's probably better to try and find one at a junkyard if you are worried about messing up.
05-11-2014, 11:09 PM
Senior Member
Just pay for shipping and the materials and I'll gladly help if you are serious.
There are 7 nuts underneath the dashboard, you need to take the glove box out, there are 3 underneath of it, 1 to the left of the glovebox area in-between the glovebox and stereo, two above the stereo, and one to the left of the stereo.
It's a little bit of a pain to get a few of them off as you only have a few inches of space to fit a ratchet in there, but I can do it in about 5-6 minutes. Took me 30 minutes the first time I did it, lol.
I'll take a picture in the morning and show ya if you need it.
Last edited by Camacorn; 05-11-2014 at 11:11 PM.
05-11-2014, 11:27 PM
Just pay for shipping and the materials and I'll gladly help if you are serious. There are 7 nuts underneath the dashboard, you need to take the glove box out, there are 3 underneath of it, 1 to the left of the glovebox area in-between the glovebox and stereo, two above the stereo, and one to the left of the stereo. It's a little bit of a pain to get a few of them off as you only have a few inches of space to fit a ratchet in there, but I can do it in about 5-6 minutes. Took me 30 minutes the first time I did it, lol. I'll take a picture in the morning and show ya if you need it.
No need for Picts. Just was unsure as to how to get it off clips/ nuts ect! Thanks.
05-12-2014, 10:35 PM
Senior Member
I dropped my front tank and replaced the fuel pump, bought a 195 thermostat, I'm looking for some "classic looking" wheels and I need to level out my f150 a tad bit more
05-12-2014, 10:55 PM
Junior Member

Join Date: Jan 2014
Location: peoria IL
Posts: 22
Likes: 0
Received 0 Likes
on
0 Posts
replaced the turn signal flasher relay. it quit on me last night on the way home from work. got pulled over for it and got a fix it ticket. so the one i got is sightly larger then the oem motocraft part and its resting right against the fuse cover . so any one know if this will hurt it and can i relocate it till i can find a motocraft replacement
05-13-2014, 01:26 PM
Senior Member
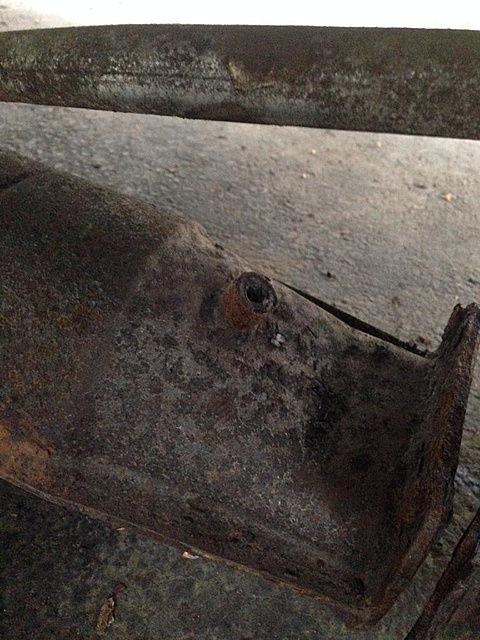
Finished putting the new manifolds on my 89 just need to replace the valve cover gasket and put it all back together. Was looking at the catalytic convertor anyone have any idea what this port on it is for? It's a small one towards the front of the truck
 05-13-2014, 03:08 PM
Senior Member
Think it's for the air tube but I'm not sure