Log In
Register
Forums
Ford F150 Forums
Introductions
General F150 Discussion
Members Builds
Aftermarket Products, Reviews & Installation
F150Forum.com Truck of the Month
Vendor Showcase
Maintenance Shop
Off-Road Section
Towing/ Hauling/ Plowing
Custom Fabrication Department
Performance, Tuning, and (LEGAL) Racing
Late Model F150s
F150 Lightning / EV models
2021+ Ford F150
Ford Raptor Forum
2015 - 2020 Ford F150
2009 - 2014 Ford F150
2004 - 2008 Ford F150
1997 - 2003 Ford F150
Engine / Drivetrain Talk
How-to Section
Super Duty Forum
Special Edition Models
Pre-1997 F150
1987 - 1996 F150
Engine Talk
How-To Section
Pre- 1987 / Classic Corner
Community
Site News and Update Information
Regional Forums
Trades & Sales
Newsletter Archive
Suggestions, Comments & Questions about the Forum
Gallery
Tools
Car Payment Calculator
Tire Rim Calculator
Vin Decoder
Members List
Live Feed
Marketplace
Vendor Directory
Become a Vendor
Member Marketplace
Vendor Marketplace
New Posts
View Dark Mode
Please register or login to enable Dark Mode.
Log In
Register
Threads
Google
Threads
Posts
Advanced
Dark Mode
Please register or login to enable Dark Mode.
Log In
Forgot your Password?
By logging into your account, you agree to our
Terms of Use
and
Privacy Policy
, and to the use of cookies as described therein.
or
Login with Google
Login with Facebook
Recent
Commented
Albums
My Pictures
Radiator Move
dazeeman
June 24, 2017
18
0
Sort:
Default
Default
Most Recent
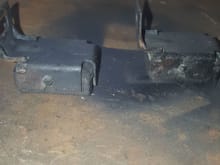
Original placement of the radiator and condenser lower mounts.
0
2017/06/24 20:52:33
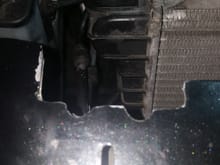
Remove deflector to reveal lip that needs to be trimmed. Here are the lower condenser Mounts,pry them out of the tangs
0
2017/06/24 20:51:08
Traced out outside edges of upper radiator mount in its stock location. I chose to move the stock ones instead of fabricating new ones. To do that i had to cut the support. It could be done without cutting,but this way was quicker for me.
0
2017/06/24 20:34:22
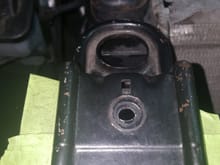
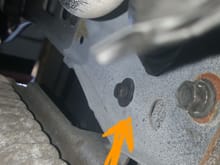
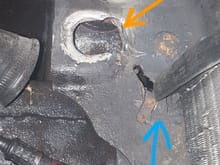
Here are the upper mounts, I used a grinder to remove 1/2 the rubber. After the pic, I removed a bit more shown with Orange line. This is done to all 4 rubber mounts.
0
2017/06/24 20:45:41
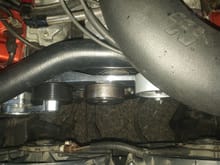
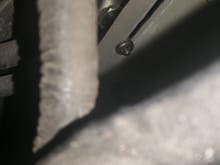
here is the other trans cooler bolt,its on a verticle center support. ground that down too. There may be more so look before bolting the core up.
0
2017/06/24 20:44:40
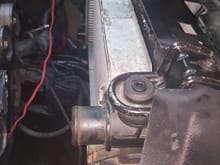
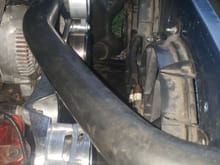
next to the hose is the trans cooler mount bolt. it was a little long so i ground it down. i could have used a shorter bolt,but it was too late to buy any or waste time looking.
0
2017/06/24 20:38:29
Look at all that elbow room Now !! That's with my blower pulleys in place.
0
2017/06/24 20:21:41
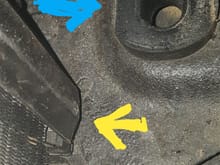
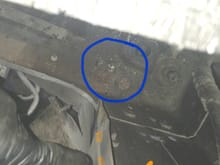
I cut along these lines from top to bottom on both sides.circled in blue is the tangs that held lower condenser rubber mounts in place. I hammered all but the rear two tangs down flat on both sides.
0
2017/06/24 20:49:35
The one on the right side shows where i needed to re bend them.
0
2017/06/24 20:39:53
All mounted up !! What you didn't see was me removing a bit of rubber on the lower radiator bushing
0
2017/06/24 20:27:10
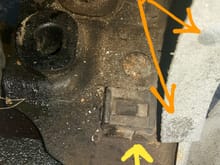
I ended up cutting more towards the front than in picture. Basucally cut to the tips of the 2 notches. Factory bolt hole has been cut out,but i put the jam nut into the elongated whole that guided the tab on the factory mount.
0
2017/06/24 20:31:52
Condenser bracket flipped and installed.
0
2017/06/24 20:36:25
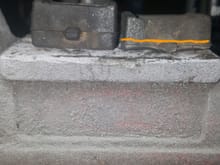
Followed the line and shortened upper mount . I also had to bend the angle a bit to match the radiator .
0
2017/06/24 20:28:50
fans in
0
2017/06/24 20:24:19
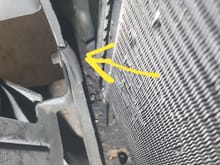
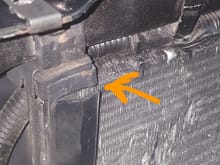
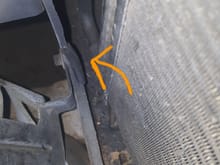
I lengthened the hole for lower radiator bushing toward the support about 2 inches. The blue arrow points to the tangs i flattened,leave the 2 tangs closest to the support up To keep condenser rubber in place against bottom of support.
0
2017/06/24 20:35:26
Both left and right sides of support cut the same,top to bottom.
0
2017/06/24 20:46:47
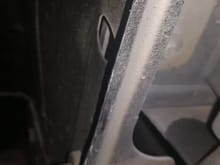
I used a nibbler to remove lip.I just followed a factory line
0
2017/06/24 20:47:42
I put a few pieces of split vacuum line at the corners of my cut for condenser contact. I painted everything I cut or ground.
0
2017/06/25 11:02:13