Let the fun begin - My 2012 King Ranch Retrofit + Planned step by step
 02-18-2015, 08:51 AM
#21
Senior Member


I had a quart of paint mixed up plus some aerosol cans for smaller projects. I'll most likely use the cans as the only compressor I have is 220 and there is no way for me to get a 220 line in my garage (Condo garage).
I'll be able to do it just fine with aerosol. I've painted a lot of stuff. It's just not my preferred method.
I'll be able to do it just fine with aerosol. I've painted a lot of stuff. It's just not my preferred method.
 02-18-2015, 09:41 AM
#22
Senior Member
Thread Starter


Yeah but if you know how to paint then the aerosol can come out flawless. I'm actually glad to hear your doing aerosol as most people that read this "how to" will be using that method. Are you going to go into detail on your painting process? That was always my weakest spot. Looking forward to the finished product and the rest of this "how to"!
I sure will! including my mini paint booth setup. It'll be redneck engineered to all hell but it'll work fine and control the overspray.
02-18-2015, 11:02 AM
#24
Senior Member
02-18-2015, 10:10 PM
#25
Senior Member
Thread Starter
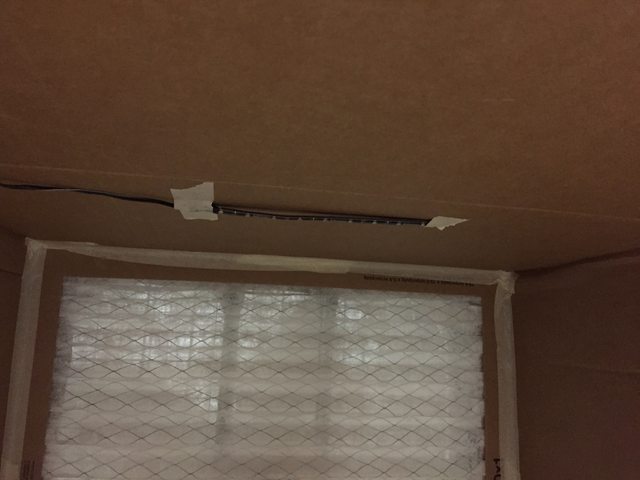
Building a SMALL, CHEAP, yet VERY EFFECTIVE paint booth
MINIMUM MATERIALS NEEDED:
20x20x12 box (minimum size, in my opinion)
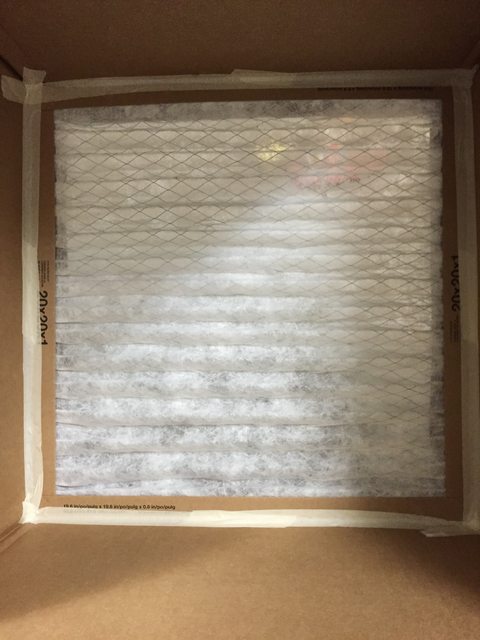
20x20x1 Air Conditioning Filter
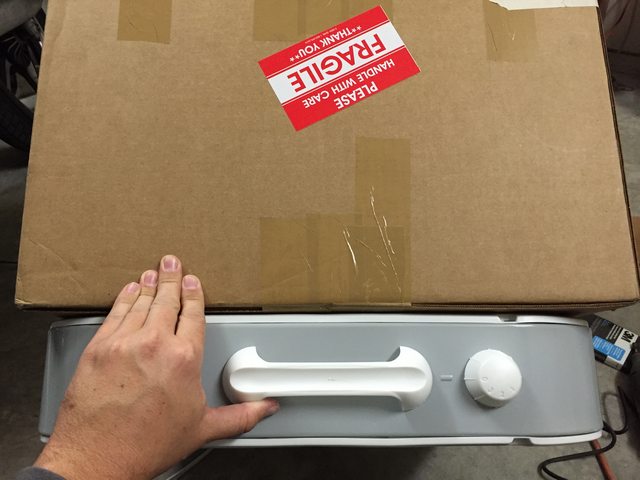
20 inch Box Fan
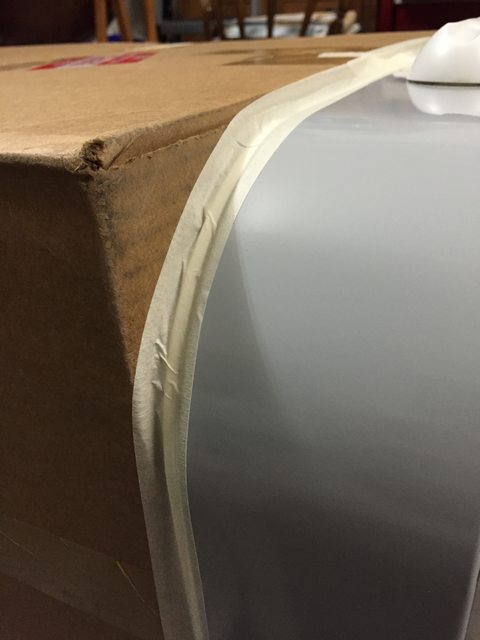
Masking Tape
MINIMUM TOOLS NEEDED:
Utility Knife/Box Cutter
Sharpie/Pen/Pencil
Straight edge
First the instructions step by step. Then I'll include them with pics.
*Optional... Drink beer* (insert randomly)
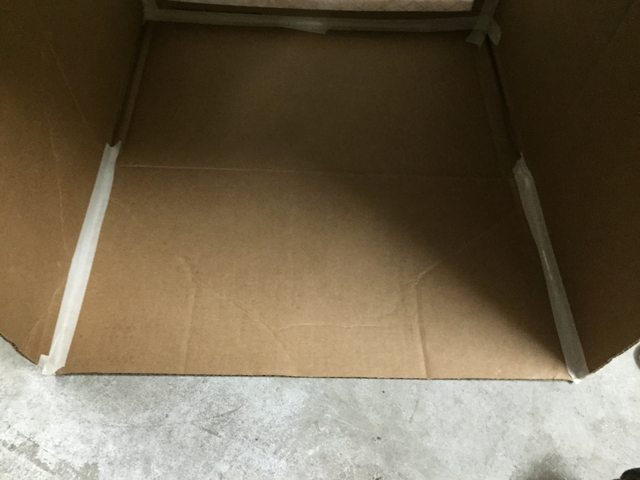
1) If not already completed, tape the bottom of the box shut.
2) Measure at least 1 and 1/2" in from the outside edge and make guide marks around bottom of box
3) Using straight edge, alight marks and draw your cut lines out solidly
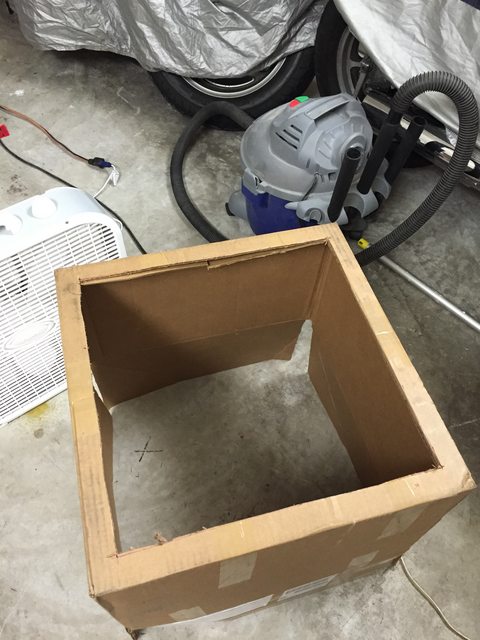
4) Using the box cutter/Utility knife, make your cuts to open a square in the bottom of the box.
5) Place the filter in the box, NOTE THE AIR FLOW DIRECTION and use small pieces of tape to hold it in place. Check fitment from bottom of box... Once fitment is correct seal off the edges. You don't want any air bleed possible if you're trying to minimize overspray and dust. Fumes will happen. Overspray/dust you don't want to happen.
6) Next tape 3 of the flaps together to make a more sealed off and bigger work area. Leave one flap loose. More on this later.
7) Check fitment of your fan AND DOUBLE CHECK AIR DIRECTION! You want the fan to PULL the air through the box. The air should blow OUT the back. Align it properly then use small pieces of tape to hold it in place. If you want to get super fancy you can use thin wire or screws for this part, but again this is a quick, cheap, and easy (just like your prom date ) paint booth.
8) Seal up the fan (wider masking tape is more helpful but I had to use this roll as it's starting to go bad. I won't use it on any critical parts, only for sealing this box up)
9) Plug in fan. Turn it on. Use a leaf/piece of paper to check that you have good flow through it.
10) Turn off fan - Fix your mistakes if any.
11) Now.... To get light inside the box, which you WILL want. You have a few options. You can cut a hole in the top of the box, tape a piece of plastic around the hole (seal it up, remember overspray is sneaky!) and place the lamp inside that hole. OR if you have white LED strips like I do. Temporarily take them up. When I get ready to spray I'll wire them into a 12v test power supply I have for extra light.
Now... in the most basic way your paint booth is done. This will pull paint particles to the filter instead of letting them float through the air. Some particles may get through the filter. Is there more that can be done to improve it? Sure... Depending how fancy/portable/storeable you want. You can make an air extraction system that sends the fumed air and potential passed through paint particles into a dryer house and out a window/vent/etc.
Materials
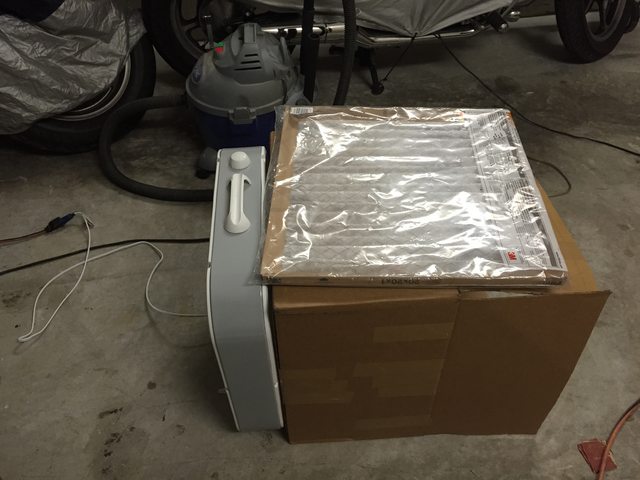
Box marked:
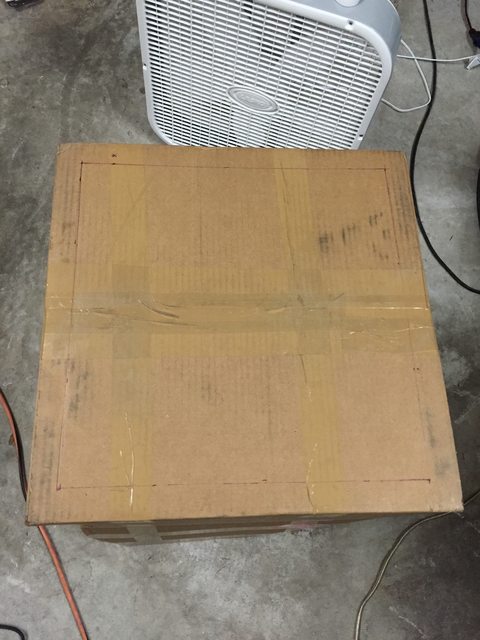
Box Cut:
Filter fitting:
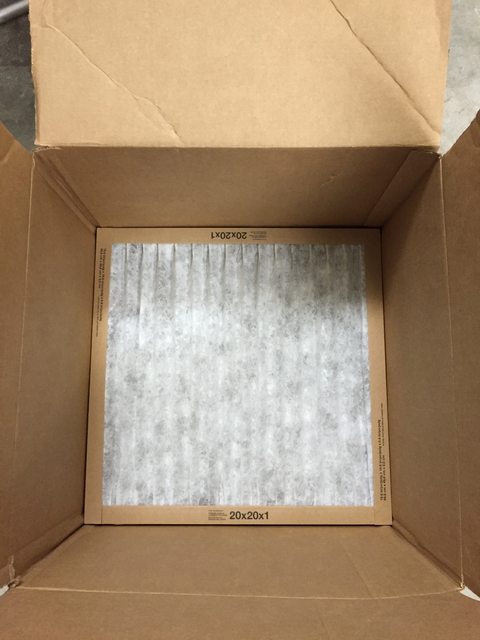
Filter taped/sealed:
3 Flaps taped for strength/Bigger work area:
Fan aligning:
Fan taped up:
Lights taped in:
MINIMUM MATERIALS NEEDED:
20x20x12 box (minimum size, in my opinion)
20x20x1 Air Conditioning Filter
20 inch Box Fan
Masking Tape
MINIMUM TOOLS NEEDED:
Utility Knife/Box Cutter
Sharpie/Pen/Pencil
Straight edge
First the instructions step by step. Then I'll include them with pics.
*Optional... Drink beer* (insert randomly)
1) If not already completed, tape the bottom of the box shut.
2) Measure at least 1 and 1/2" in from the outside edge and make guide marks around bottom of box
3) Using straight edge, alight marks and draw your cut lines out solidly
4) Using the box cutter/Utility knife, make your cuts to open a square in the bottom of the box.
5) Place the filter in the box, NOTE THE AIR FLOW DIRECTION and use small pieces of tape to hold it in place. Check fitment from bottom of box... Once fitment is correct seal off the edges. You don't want any air bleed possible if you're trying to minimize overspray and dust. Fumes will happen. Overspray/dust you don't want to happen.
6) Next tape 3 of the flaps together to make a more sealed off and bigger work area. Leave one flap loose. More on this later.
7) Check fitment of your fan AND DOUBLE CHECK AIR DIRECTION! You want the fan to PULL the air through the box. The air should blow OUT the back. Align it properly then use small pieces of tape to hold it in place. If you want to get super fancy you can use thin wire or screws for this part, but again this is a quick, cheap, and easy (just like your prom date
) paint booth.8) Seal up the fan (wider masking tape is more helpful but I had to use this roll as it's starting to go bad. I won't use it on any critical parts, only for sealing this box up)
9) Plug in fan. Turn it on. Use a leaf/piece of paper to check that you have good flow through it.
10) Turn off fan - Fix your mistakes if any.
11) Now.... To get light inside the box, which you WILL want. You have a few options. You can cut a hole in the top of the box, tape a piece of plastic around the hole (seal it up, remember overspray is sneaky!) and place the lamp inside that hole. OR if you have white LED strips like I do. Temporarily take them up. When I get ready to spray I'll wire them into a 12v test power supply I have for extra light.
Now... in the most basic way your paint booth is done. This will pull paint particles to the filter instead of letting them float through the air. Some particles may get through the filter. Is there more that can be done to improve it? Sure... Depending how fancy/portable/storeable you want. You can make an air extraction system that sends the fumed air and potential passed through paint particles into a dryer house and out a window/vent/etc.
Materials
Box marked:
Box Cut:
Filter fitting:
Filter taped/sealed:
3 Flaps taped for strength/Bigger work area:
Fan aligning:
Fan taped up:
Lights taped in:
02-18-2015, 10:15 PM
#26
Senior Member
Thread Starter
On the list for tomorrow:
Using a rotating assembly for easy painting at all angles. OR use wires... Depending on your part and angles.
How to drill new bolt holes in the EvoX-R's to free up mounting holes.
Disassembly of EvoX-R for preparation and painting the EvoX-R's shields for passive Demon Eyes
Photos Paint Booth in action
On the list for Friday:
How to: properly scuff, prepare, prime, and paint plastic using the black plastic shrouds as the example
There will be nothing for the weekend as I'll be out of town attending a wedding.
Last edited by jchargu3; 02-18-2015 at 10:18 PM.
02-19-2015, 10:33 PM
#27
Senior Member
Thread Starter
Today's progress didn't happen at all. I had to fight traffic, go return paint, go get new paint, go to lowes twice... Now I'm fighting with foreground limiter.
Here's what you need to know for mounting the EvoX-R projector....
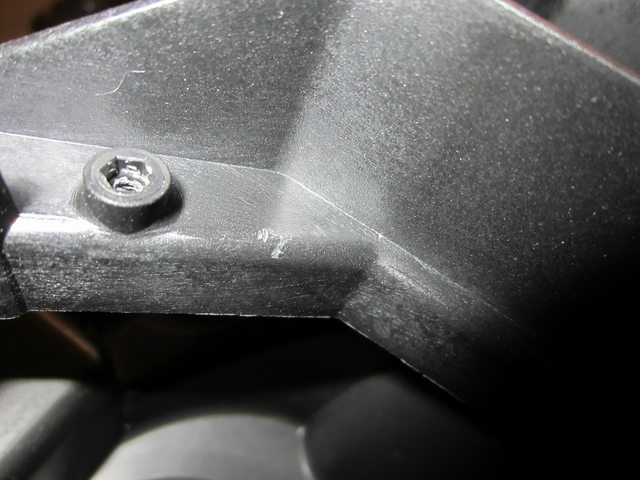
Here are the stock mounting studs. These line up with the EvoX-R Projector with the changing of screw locations

The two bottom screws are right where the mounting studs are. It's OKAY to remove these screws. You CAN use the stock T-15 Torx Screws to keep everything together and tidy
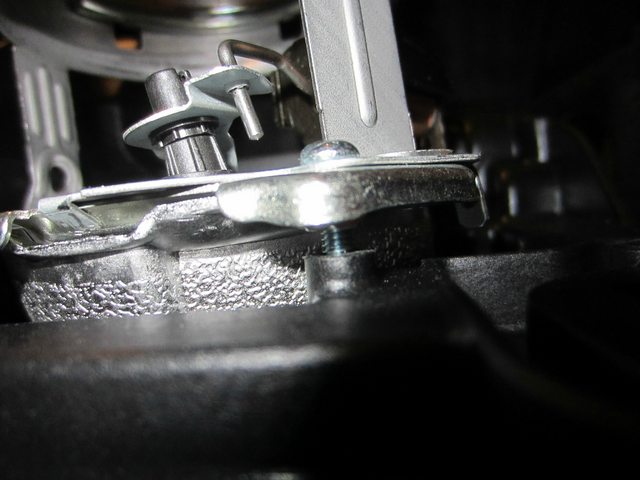
You'll surely need to remove the two top screws. Without modification to the housing, they won't fit... You can trim them way way way down if you don't want to remove them.
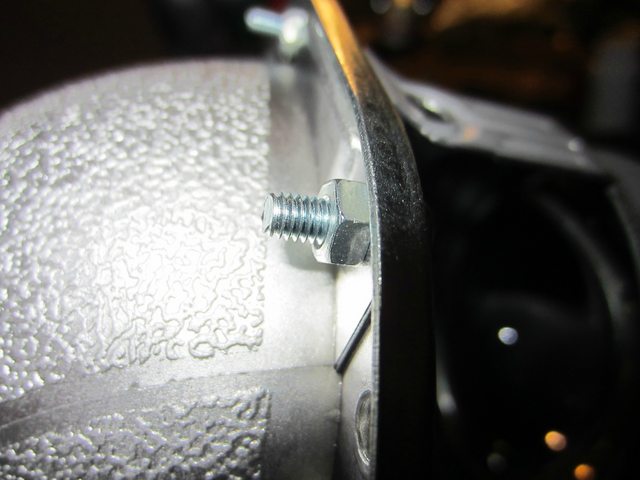
RED is where they are screwed together stock
GREEN is where you'll want to screw them in
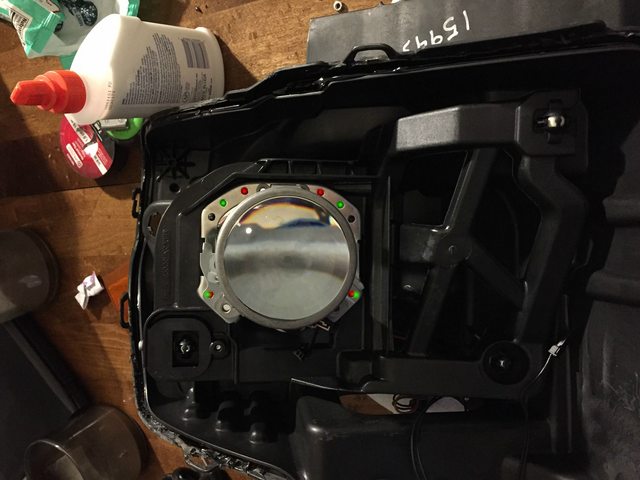
here you can see the mark the bolt made in the stock location.
With the bolts removed and the projector set into the housing, everything sits perfectly flush. No washers/spacers needed
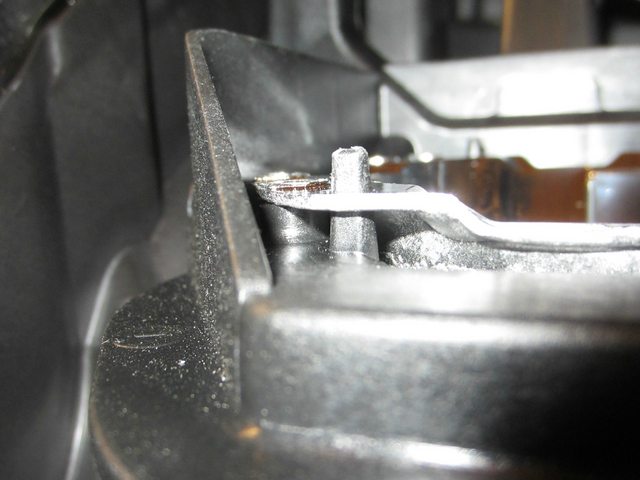
They screw in perfectly with the factory T-15 screws as well.
Here is why you either want to TRIM DOWN or Remove/Move the bolts on the top... One hole is open, the other is blocked by the plastic. I don't see a need for modifying the housing, and from what I could find, Bil and Dawson don't modify the housing either. As long as you don't strip out the factory mounting studs, you'll be fine using factory screws to put it all together.
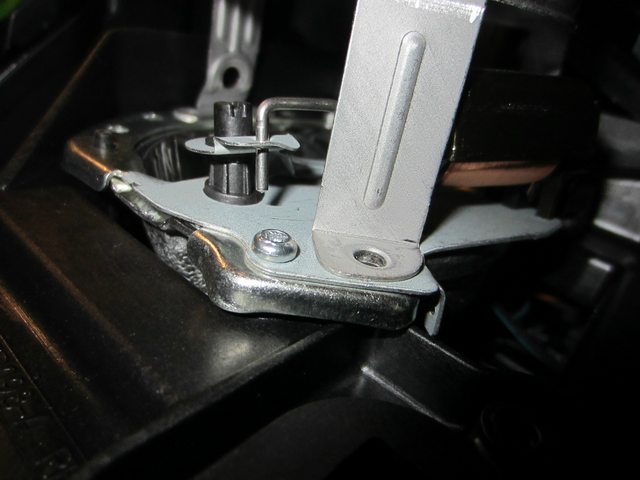
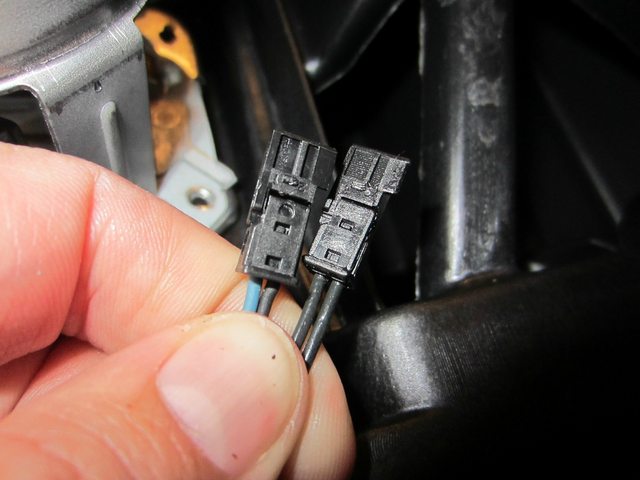
The High Beam solenoid wires are the same stock vs EvoX-R so no modification needed
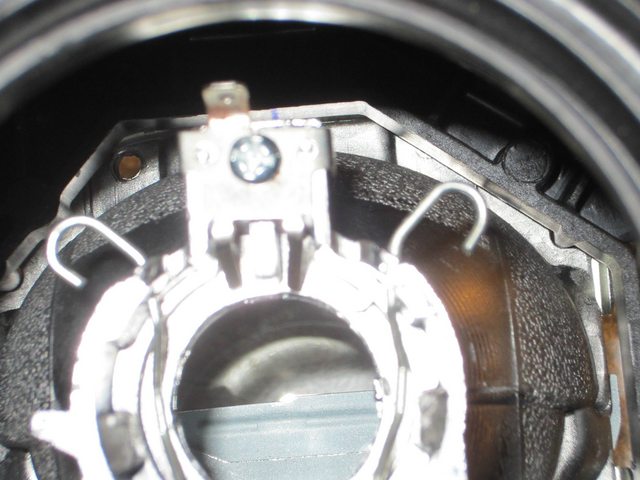
IF you are not making ANY modifications to the EvoX-R, simply clean it up, and bolt it up. It's a good idea at that point to place the HID capsule in the projector, hook up the ballast and give it a test fire to be sure you're getting optimal output. There are very minimal adjustments that can be done (within micrometers) UNLESS you do some more modification (cutting slots to move the bowl/etc.)
Here's what you need to know for mounting the EvoX-R projector....
Here are the stock mounting studs. These line up with the EvoX-R Projector with the changing of screw locations
The two bottom screws are right where the mounting studs are. It's OKAY to remove these screws. You CAN use the stock T-15 Torx Screws to keep everything together and tidy
You'll surely need to remove the two top screws. Without modification to the housing, they won't fit... You can trim them way way way down if you don't want to remove them.
RED is where they are screwed together stock
GREEN is where you'll want to screw them in
here you can see the mark the bolt made in the stock location.
With the bolts removed and the projector set into the housing, everything sits perfectly flush. No washers/spacers needed
They screw in perfectly with the factory T-15 screws as well.
Here is why you either want to TRIM DOWN or Remove/Move the bolts on the top... One hole is open, the other is blocked by the plastic. I don't see a need for modifying the housing, and from what I could find, Bil and Dawson don't modify the housing either. As long as you don't strip out the factory mounting studs, you'll be fine using factory screws to put it all together.
The High Beam solenoid wires are the same stock vs EvoX-R so no modification needed
IF you are not making ANY modifications to the EvoX-R, simply clean it up, and bolt it up. It's a good idea at that point to place the HID capsule in the projector, hook up the ballast and give it a test fire to be sure you're getting optimal output. There are very minimal adjustments that can be done (within micrometers) UNLESS you do some more modification (cutting slots to move the bowl/etc.)
02-19-2015, 10:42 PM
#28
Senior Member
Thread Starter
The Foreground limiter SAGA:
I saw this thread (http://www.hidplanet.com/forums/show...s-amp-template) on HID planet outlining foreground limiters for EvoX-R projectors and I thought "Hmm neat!" Plus adding a foreground limiter will give me more area to paint red for a better passive demon eye.
My problem with that specific foreground limiter is, even in his "less extreme" setting. It's fairly extreme! I don't want light being thrown 5 feet in front of the truck, but I don't want to completely eliminate the foreground. SOME foreground is nice..
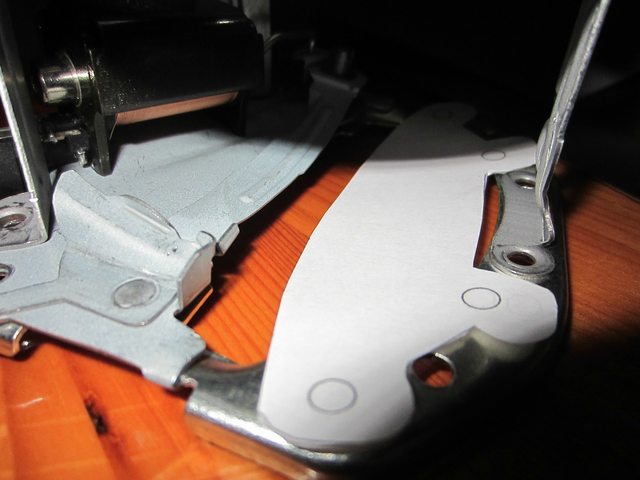
So I took his low res photo, put it in photoshop, did a quick sloppy select/border/print/cut and laid the projector on it.... Here's what I saw
While awesome, that's way too much foreground cut off! I notched the top of the paper for a little more clearance and it was still just too much, so I traced the foreground shield that I printer, then traced the projector and started just sketching some other lines...this is the mess I came up with
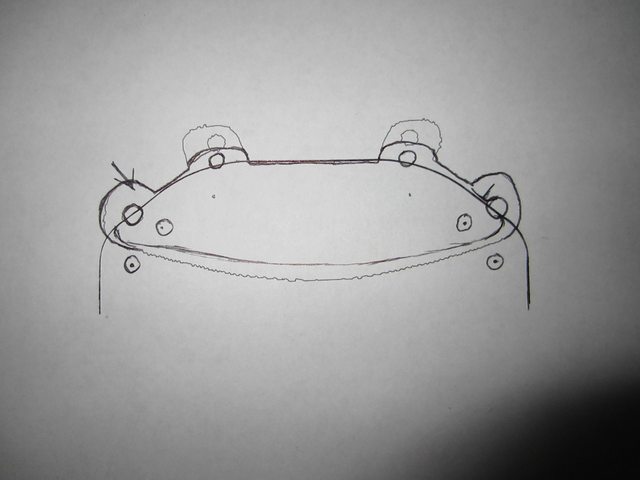
The jagged edge line is the original design from the HIDPlanet thread. The upper drawn line is the new line... It's still too low... Here is about what I'm trying to achieve
That should eliminate all the immediate light and put the light where I want it. Now though, it's bed time, as I'm exhausted so I'll do more figuring, tracing, and testing tomorrow... Once I have a proper foreground shield that suits my liking I'll convert it to PDF and post it here for your usage along with the instructions for cutting/mounting/etc.
I saw this thread (http://www.hidplanet.com/forums/show...s-amp-template) on HID planet outlining foreground limiters for EvoX-R projectors and I thought "Hmm neat!" Plus adding a foreground limiter will give me more area to paint red for a better passive demon eye.
My problem with that specific foreground limiter is, even in his "less extreme" setting. It's fairly extreme! I don't want light being thrown 5 feet in front of the truck, but I don't want to completely eliminate the foreground. SOME foreground is nice..
So I took his low res photo, put it in photoshop, did a quick sloppy select/border/print/cut and laid the projector on it.... Here's what I saw
While awesome, that's way too much foreground cut off! I notched the top of the paper for a little more clearance and it was still just too much, so I traced the foreground shield that I printer, then traced the projector and started just sketching some other lines...this is the mess I came up with
The jagged edge line is the original design from the HIDPlanet thread. The upper drawn line is the new line... It's still too low... Here is about what I'm trying to achieve
That should eliminate all the immediate light and put the light where I want it. Now though, it's bed time, as I'm exhausted so I'll do more figuring, tracing, and testing tomorrow... Once I have a proper foreground shield that suits my liking I'll convert it to PDF and post it here for your usage along with the instructions for cutting/mounting/etc.
The following users liked this post:
Jeriko (02-20-2015)
02-23-2015, 02:34 PM
#29
Senior Member
Thread Starter
Played with foreground limiters Sunday before leaving for my friends wedding. Saturday was recovery mode from bachelor party.
I don't want a massive limiter. I only want to get rid of the streaked light that typically is right in front of the vehicle. It's not useless, but when you're working with a beautiful projector it just takes away from it. from playing with paper and a projector I was bench testing, I found that an inch shield was perfect. as it covers 3/4" of the top of the bowl and it's just enough to get rid of the artifacts.
Granted I'd probably never see the artifacts in the drivers seat, this isn't being done out of necessity, it's simply because I CAN.
I bought aluminum flashing at lowes for 48 cents a piece. I bought 4 of them.
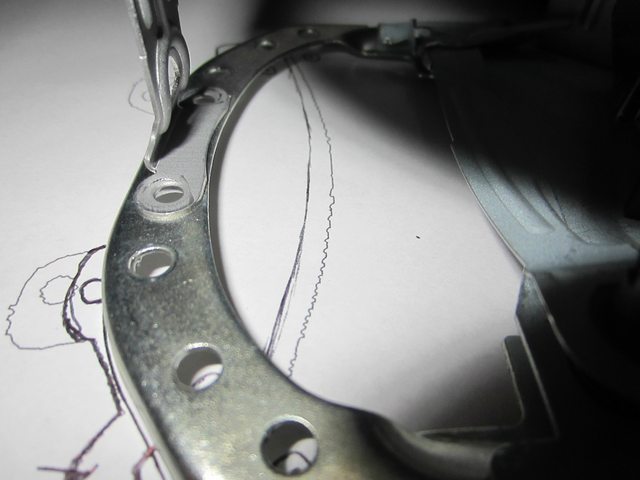
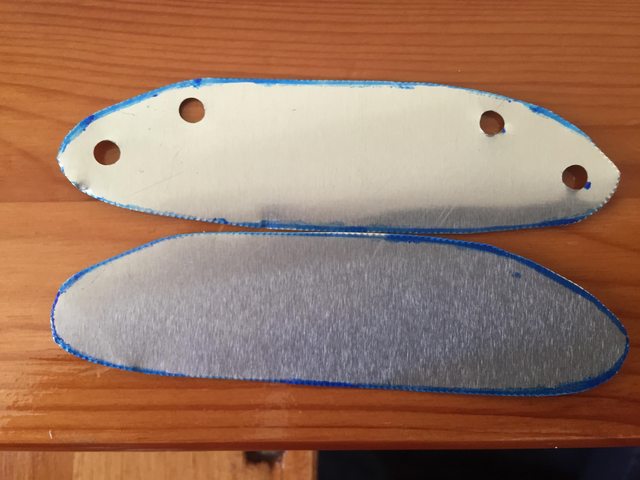
I traced a pattern I decided on from cutting the paper above out. Then using tin snips I cut them out
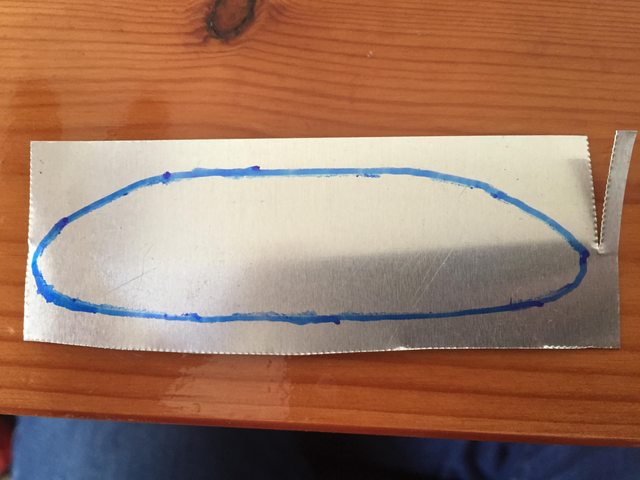
Drilled
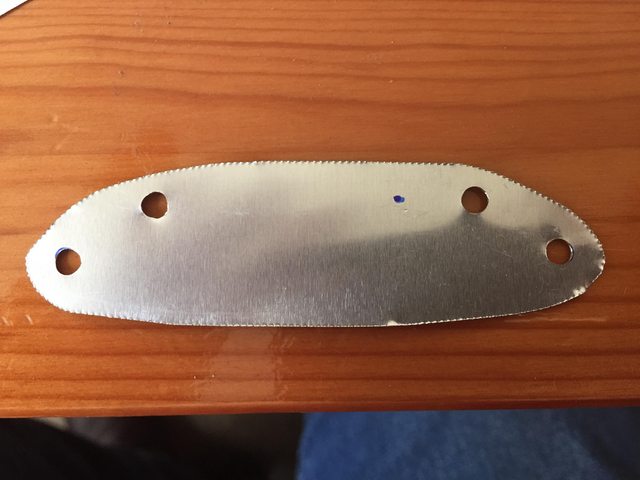
Cloned
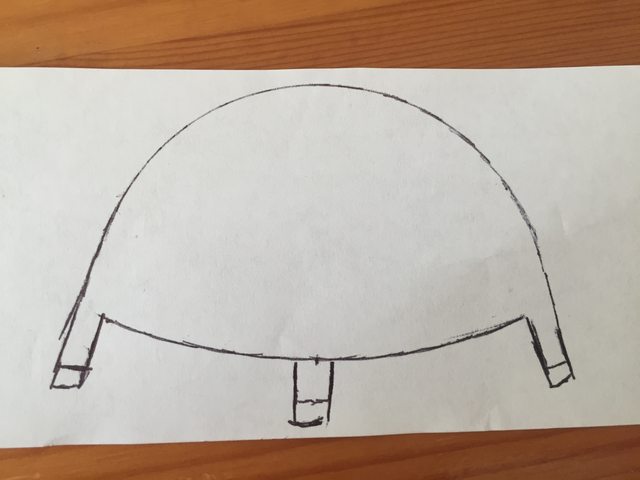
Then, the hardest, most maddening friggen thing ever. Making the solenoid cover/passive demon eye. OMFG I was over complicating and over thinking this so much. I wasted so much paper tracing, and cutting and adjusting.... Then I had a thought... I searched HID planet, found someone who has made shields... Took their picture and just eye balled it... and made some patterns.
This one failed.... too wide at the top and the legs that will hook to the lens mount were too low
Then, as I finished my beer....I looked at my chalice and thought...."Hmmmmm"
I placed the old template on top of the paper.. Rinsed my chalice... placed it on the old template...
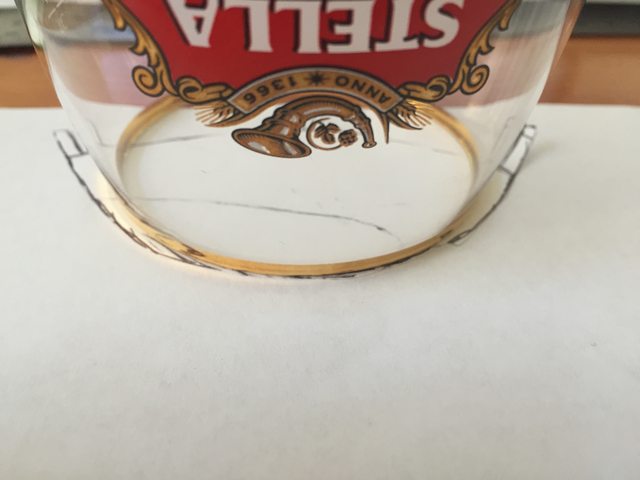
Hmmm.... This actually looks like the correct curve I need!
and VOILA!
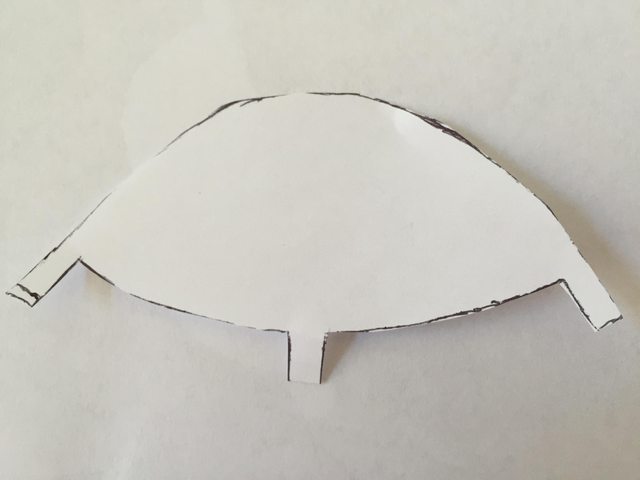
As I'm heading out the door I made notes for myself for today
Trim the top a bit and round it off some more... Lengthen the two side legs and it'll be perfect.
Once cut out of the aluminum after work. I'll smooth them with the Dremel, scuff them and paint them in the new paint booth.
I'll be using high temp Ford Red engine paint. Pics of that process will be uploaded.
I don't want a massive limiter. I only want to get rid of the streaked light that typically is right in front of the vehicle. It's not useless, but when you're working with a beautiful projector it just takes away from it. from playing with paper and a projector I was bench testing, I found that an inch shield was perfect. as it covers 3/4" of the top of the bowl and it's just enough to get rid of the artifacts.
Granted I'd probably never see the artifacts in the drivers seat, this isn't being done out of necessity, it's simply because I CAN.
I bought aluminum flashing at lowes for 48 cents a piece. I bought 4 of them.
I traced a pattern I decided on from cutting the paper above out. Then using tin snips I cut them out
Drilled
Cloned
Then, the hardest, most maddening friggen thing ever. Making the solenoid cover/passive demon eye. OMFG I was over complicating and over thinking this so much. I wasted so much paper tracing, and cutting and adjusting.... Then I had a thought... I searched HID planet, found someone who has made shields... Took their picture and just eye balled it... and made some patterns.
This one failed.... too wide at the top and the legs that will hook to the lens mount were too low
Then, as I finished my beer....I looked at my chalice and thought...."Hmmmmm"
I placed the old template on top of the paper.. Rinsed my chalice... placed it on the old template...
Hmmm.... This actually looks like the correct curve I need!
and VOILA!
As I'm heading out the door I made notes for myself for today
Trim the top a bit and round it off some more... Lengthen the two side legs and it'll be perfect.
Once cut out of the aluminum after work. I'll smooth them with the Dremel, scuff them and paint them in the new paint booth.
I'll be using high temp Ford Red engine paint. Pics of that process will be uploaded.
02-24-2015, 05:15 PM
#30
Official Bass Slapper
That looks completely awesome! And I have the same stella glass - easy enough to duplicate your results!