2012 STX Power Mirror wiring ??
 07-17-2013, 06:55 PM
#11
Senior Member
Thread Starter

Got one T/S installed and working without any problems ... except the heat!
I was wrong about the plugs ... they were the same. I may have been thinking of the 2007, having different plugs.
I was wrong about the plugs ... they were the same. I may have been thinking of the 2007, having different plugs.
 07-26-2013, 09:54 AM
#12

Can you post a link to one of the items from your ebay guy? or a link to his ebay store?
I looked but could not find him. Sent him an email but no reply yet.
I have the rear-facing LED signals already, but would like to get that wiring you showed in the photo. Did you get that from Jose?
Thanks again
Last edited by dchurch; 07-27-2013 at 10:02 PM. Reason: formatting
07-26-2013, 11:16 AM
#13

Hi tmajor, thanks for the tips. I want to do the same thing as you're doing - retrofit rear-facing signals into a mirror that doesn't have them.
Can you post a link to one of the items from your ebay guy? or a link to his ebay store?
I looked but could not find him. Sent him an email but no reply yet.
I have the rear-facing LED signals already, but would like to get that wiring you showed in the photo. Did you get that from Jose?
Thanks again
07-27-2013, 09:51 PM
#14
Well I went ahead and did the project without the special wiring harness.
To review, the project was to retrofit the rear-facing OEM LED turn signals into the mirror on a truck that has the blanks.
It's true there are no appropriate wires in the mirror. I just spliced into the wires on the inside of the door, using this wiring diagram to guide me:
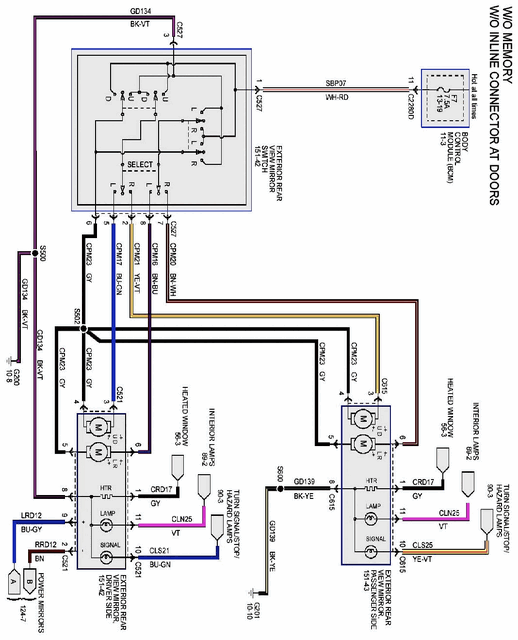
It's from a 2012 F150 without memory mirrors. I have a 2011, and it was the same.
Parts and materials you need:
Tools you need:
This took me about 3 hours including a trip to Radio Shack for a multimeter test lead. (I had a multimeter, but the ends were too fat to fit into the wiring blocks. So I got a clip that went onto the end of my multimeter with a "needle" pin that would fit where I needed it to fit. )
If you later want to do the project that turns the front-facing reflectors into blinkers, you can do that project just by prying up the mirror and removing the mirror backing. Then you splice the wires right there. It'll be much quicker.
To review, the project was to retrofit the rear-facing OEM LED turn signals into the mirror on a truck that has the blanks.
It's true there are no appropriate wires in the mirror. I just spliced into the wires on the inside of the door, using this wiring diagram to guide me:

It's from a 2012 F150 without memory mirrors. I have a 2011, and it was the same.
Parts and materials you need:
- Right Side LED Blinker: Ford Part # 7L3Z-13B374-A
- Left Side LED Blinker: Ford Part # 7L3Z-13B375-A
- 18ga wire, about 8 ft. 4 ft each of 2 different colors (one should be black)
- 4x 0.110 female tab disconnects
- 4x 16-18ga quick splicers
- electrician's tape
Tools you need:
- flat bladed screwdriver
- Test light or multi-meter to verify wiring
- T20 torx screwdriver
- 11mm wrench or adjustable wrench
- ratchet with 8mm and 6mm sockets
- wire fishing line or wire coat hanger
- flashlight to peek behind the mirror
- knife
- Pry off the mirror. This wasn't as tricky as people make it out to be. It took me about 2 minutes. You just have to find the right place to pry.
- remove the 4 torx screws. Remove the mirror backing.
- remove the "blank" by depressing the tab and sliding it out.
- insert the new turn signal into the space left by the blank, in the reverse process.
- remove the inner door panel. This requires the removal of 2 8mm bolts, one behind some plastic behind the door latch and one buried under a square piece of plastic trim in the door handle. So you need to remove those trim pieces first, then remove the bolts. Then, remove 2 6mm screws from the bottom of the door. After that, slide the door upward about 2 inches. There are plastic hooks on the inside of the door panel, which slide into slots on the door frame. By sliding upward, you free the door panel from the frame. After it is loose, just let it hang there.
- remove the sticky-back plastic from the triangular mirror mounting area on the inside of the door.
- disconnect the wiring block that leads into the mirror.
- use the test light or multimeter to verify the wires you want. On mine the ground was #8 and the turn signal was #10 on both sides, as in the diagram above.
- Quick-splice into those wires, attaching about 2 feet of black wire to the ground, and 2 feet of the other color to the #10 wire.
- remove the 3 11mm nuts that hold the mirror body onto the door. Remove the mirror body from the car.
- Using the coat hanger, fish from outside on the mirror body (where the turn signal connections are) , to the inside. You will have to loosen the sound insulation on the mirror mounting plate to get the coat hanger to emerge. Run that coat hanger through the insulation, and all the way through the door, right where the original wires go. I did this myself, but it might help to have another set of hands for this step.
- tape the ends of your ground and power wires onto the coat hanger, and pull through. At this point you will want to re-attach the mirror body to the door.
- Put some wire conduit around the wires specifically where they go through the door frame. The metal is sharp here. tape the conduit to the wires so it doesn't slide out of place.
- strip 1/4" of each wire, and crimp one of the 0.110 female disconnects on each one. Put them on the posts on the turn signal. Sorry I don't remember which is which, but it matters. If you connect them wrong, it won't work.
- Test: hit the hazards and see if the lights work. if they don't, swap the wires on the signal posts.
- When everything is good, put it all back together. The only tricky part here is the mirror. Just press it into place firmly, press the middle of the mirror to minimize stress. Use the flashlight to very that it is well seated. At first mine was not, I needed to press harder.
- Then do the other side.
This took me about 3 hours including a trip to Radio Shack for a multimeter test lead. (I had a multimeter, but the ends were too fat to fit into the wiring blocks. So I got a clip that went onto the end of my multimeter with a "needle" pin that would fit where I needed it to fit. )
If you later want to do the project that turns the front-facing reflectors into blinkers, you can do that project just by prying up the mirror and removing the mirror backing. Then you splice the wires right there. It'll be much quicker.
Last edited by dchurch; 07-27-2013 at 09:59 PM.
07-27-2013, 09:56 PM
#15
ps: I emailed Jose at Lightningparts@yahoo.com, he got right back to me.
He says they mostly sell mirrors, but can also sell these little parts - like wiring and signals.
Seems like a very helpful guy. I didn't end up buying anything from him, just figured I'd do it with splicers. For those who are interested, his ebay store is http://stores.ebay.com/One-Stop-Mirrors
He says they mostly sell mirrors, but can also sell these little parts - like wiring and signals.
Seems like a very helpful guy. I didn't end up buying anything from him, just figured I'd do it with splicers. For those who are interested, his ebay store is http://stores.ebay.com/One-Stop-Mirrors
07-27-2013, 11:38 PM
#16
Senior Member
Thread Starter
[MENTION=152585]dchurch[/MENTION]
Sorry, I didn't get back to you sooner, but it looks like you did fine. Those mirrors go back together a lot easier, if you apply a little Vaseline to the catches.
I believe, the outer wire on the T/S lamps is the negative connection.
Sorry, I didn't get back to you sooner, but it looks like you did fine. Those mirrors go back together a lot easier, if you apply a little Vaseline to the catches.
I believe, the outer wire on the T/S lamps is the negative connection.
07-27-2013, 11:59 PM
#17
Senior Member
Thread Starter
@dchurch
Sorry, I didn't get back to you sooner, but it looks like you did fine. Those mirrors go back together a lot easier, if you apply a little Vaseline to the catches.
I believe, the outer wire on the T/S lamps is the negative connection.
The part numbers for the reflectors are: 9L3Z-17E749-BA & 9L3Z-17E748-BA .. left & right.
Last edited by tmajor; 07-28-2013 at 12:10 AM.
08-01-2013, 08:03 PM
#18
Hey guys... I just completed this mod to my 2013 STX. The wiring diagram still works and is color coded exactly to this year model as well.
I zip-tied the new wiring right along with the factory power mirror wiring:

I found it easier to remove this red wiring harness piece in order to test for the proper wires:

Here is what it looks like once it is removed:

I took y'alls advice and added heat shrink to the connectors:

Done:

Overall, I am thrilled with this mod. Pretty easy to do and adds a lot to the truck!
I zip-tied the new wiring right along with the factory power mirror wiring:
I found it easier to remove this red wiring harness piece in order to test for the proper wires:
Here is what it looks like once it is removed:
I took y'alls advice and added heat shrink to the connectors:
Done:
Overall, I am thrilled with this mod. Pretty easy to do and adds a lot to the truck!
08-03-2013, 09:17 AM
#20
Senior Member
Thread Starter
They "could", but it would probably be cheaper to buy a new truck! You could do it yourself, find a cheap pair of mirrors "with" and then sell your mirrors or maybe, take it to a "tech school". It's an easy mod., if you have the parts and ability.

