Darth Vader Build
 07-20-2013, 11:28 PM
#1
Senior Member
Thread Starter


Since there's a Stormtrooper build, we need the evil Sith Lord for balance. 
Picked up my 2013 F150 FX4 EcoBoost SCab 402A, 3.73 E-Lock, 20" FX Wheels, in Tuxedo Black two weeks ago and after 500 miles, it's time for mods!
Had three Corsa systems before this (Silverado SS, CTS-V and Sierra Denali) so knowing what to expect, ordered a dB Performance Exhaust Part Number 24392. Also installed a Ford Resonator Delete Pipe Part Number 9L3Z5A212C between the Y-Pipe and the Corsa, and finished the 3" pipes off with a Rolling Big Power 3 x 4" Adapter and .
Initial start-up video of the exhaust -->


 07-21-2013, 12:30 PM
#3
Senior Member
Thread Starter
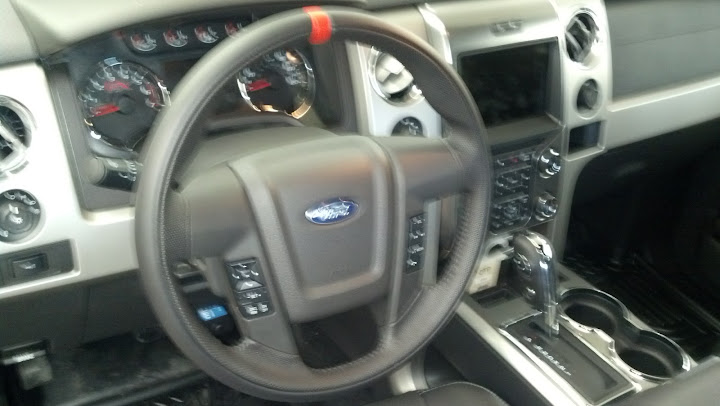
Installed a Raptor wheel today (Ford P/N BL3Z-3600-CB) and it was an incredibly easy 10 minute install by leveraging the previous work done by those on the forum.
In my research, the airbag removal looked like the toughest part of the install so I took the Raptor wheel out of the box and practiced on it first. Reading about those before me, thought that people were inserting allen wrenches into the backside of the wheel, parallel to the steering shaft.
After studying the Raptor wheel for a minute, noticed the three small holes around the side perimeter of the center section - one on right, left and one at the bottom. Pulled out the typical metric allen wrench set and pushed in a 4-mm wrench into one of the holes. After a little resistance for the initial push, the allen wrench contacted the spring clip and continuing to press the wrench in further, the spring clip moved enough to clear the airbag retaining pin/stud.

Still fearful of the airbag removal, decided to determine how far the allen wrenches were needed to be pushed so when I did the real thing, I would know if I had the airbag pin released or not or there was something else going on. Used the 4, 3 and 2.5-mm allen wrenches out of the set.

And determined that the left and right side wrenches needed to be inserted 2.5" while the bottom wrench needed to be inserted 1.75".


Ready to proceed, started the pickup engine and turned the wheel all the way to the left so the bottom hole in the steering wheel would be pointing straight up.

Next,took off the negative battery cable with a 7-mm socket

Easily popped the airbag out of the wheel, disconnected the three airbag wire harnesses (Note, pinch the sides of the black and white airbag plugs and pull straight out), unclipped the steering wheel controls harness, removed the center steering bolt with a size 50 Torx bit, 3" extension and 3/8" ratchet. For a second, thought I needed more leverage on the bolt put it finally popped free.
Reversed the process for the new Raptor wheel with some blue Loctite on the bolt threads and quite pleased with the final outcome. Crappy cell phone pic
In my research, the airbag removal looked like the toughest part of the install so I took the Raptor wheel out of the box and practiced on it first. Reading about those before me, thought that people were inserting allen wrenches into the backside of the wheel, parallel to the steering shaft.
After studying the Raptor wheel for a minute, noticed the three small holes around the side perimeter of the center section - one on right, left and one at the bottom. Pulled out the typical metric allen wrench set and pushed in a 4-mm wrench into one of the holes. After a little resistance for the initial push, the allen wrench contacted the spring clip and continuing to press the wrench in further, the spring clip moved enough to clear the airbag retaining pin/stud.
Still fearful of the airbag removal, decided to determine how far the allen wrenches were needed to be pushed so when I did the real thing, I would know if I had the airbag pin released or not or there was something else going on. Used the 4, 3 and 2.5-mm allen wrenches out of the set.
And determined that the left and right side wrenches needed to be inserted 2.5" while the bottom wrench needed to be inserted 1.75".
Ready to proceed, started the pickup engine and turned the wheel all the way to the left so the bottom hole in the steering wheel would be pointing straight up.
Next,took off the negative battery cable with a 7-mm socket
Easily popped the airbag out of the wheel, disconnected the three airbag wire harnesses (Note, pinch the sides of the black and white airbag plugs and pull straight out), unclipped the steering wheel controls harness, removed the center steering bolt with a size 50 Torx bit, 3" extension and 3/8" ratchet. For a second, thought I needed more leverage on the bolt put it finally popped free.
Reversed the process for the new Raptor wheel with some blue Loctite on the bolt threads and quite pleased with the final outcome. Crappy cell phone pic
07-21-2013, 12:39 PM
#4
Senior Member
Thread Starter
And backing up a bit, here's the Denali I traded in on the F150.

Went to the dealership with the plan of bringing home a fully loaded F350 but didn't like the slow ratio steering box compared to the F150, my old GMC or other vehicles in my garage. So after back-to-back-to-back test drives for three hours, decided to come home with the EcoBoost.

At home for the first time with it's other twin-turbo sister and seven liter big brother.
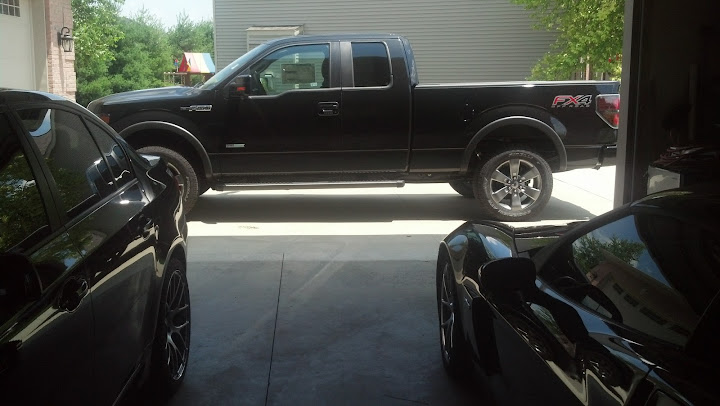
Went to the dealership with the plan of bringing home a fully loaded F350 but didn't like the slow ratio steering box compared to the F150, my old GMC or other vehicles in my garage. So after back-to-back-to-back test drives for three hours, decided to come home with the EcoBoost.
At home for the first time with it's other twin-turbo sister and seven liter big brother.
07-21-2013, 12:46 PM
#5
Senior Member
Thread Starter
Found some paint that is a close match to the factory FX4 wheel gray - Dupli-Color Wheel Coating spray paint in Graphite

Experimented on the dealer license plate surround

Will be using this for an upcoming bed accessory.
Experimented on the dealer license plate surround
Will be using this for an upcoming bed accessory.
The following 2 users liked this post by SNOW.:
Jeriko (08-20-2013),
SpeedViktm (08-18-2013)
