Dozier's 05 Super Crew Build
 07-13-2011, 02:58 PM
#1
Mr. Occifer
Thread Starter

Join Date: Jul 2011
Location: Fultondale, Al.
Posts: 34
Likes: 0
Received 0 Likes
on
0 Posts
Hello everyone! I am new here and made an introduction already. I have been looking around and learning about my new F150. It is an 05 model Super Crew. It is my very first F150. I thought I was going to be ok with the truck, but then found out about this spark plug issue. Phew! That is crazy! I do all my own wrench turning but think I will take it to the dealer for the first spark plug change. I will get around to it soon. Don't have a date set yet. Ok so I have always had Chevy Silverados and my wife knew I was looking for a new truck after I sold my 04 Extended cab Silverado. She convinced me to test drive a few F-150s and she loved the leather and sunroof in the trucks. We went to get a new 2011 Silverado a few weeks ago and she didn't want it because it didn't have leather and a sunroof. The leather package on the new truck was about 6k more than the cloth package. She wanted the F-150 so I went and bought one.
Anyone who knows me knows that I don't ever leave anything alone. I like to tinker and do little mods all the time to my vehicles. Nothing remains untouched. I have had completely tricked out suv's, trucks, bikes, cars, you name it, I've done it. So where to begin with this truck? Well, I decided since it's 4 wheel drive, I cannot do big wheels and lower the truck. So I guess the only option is to go up. I have comprised a nice list of mods to come on the truck. If you follow along, I will provide a decent write up on everything as I do it. Please no flaming or thread jacking. If you like this sort of thing, stay tuned. If not...Well. Holler.
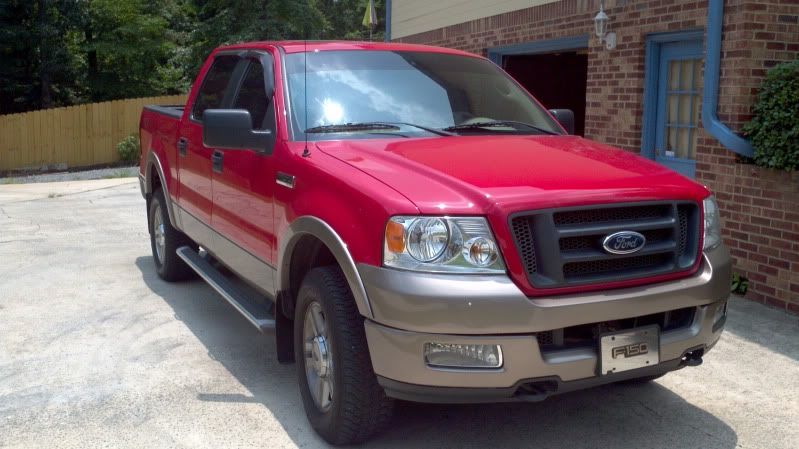
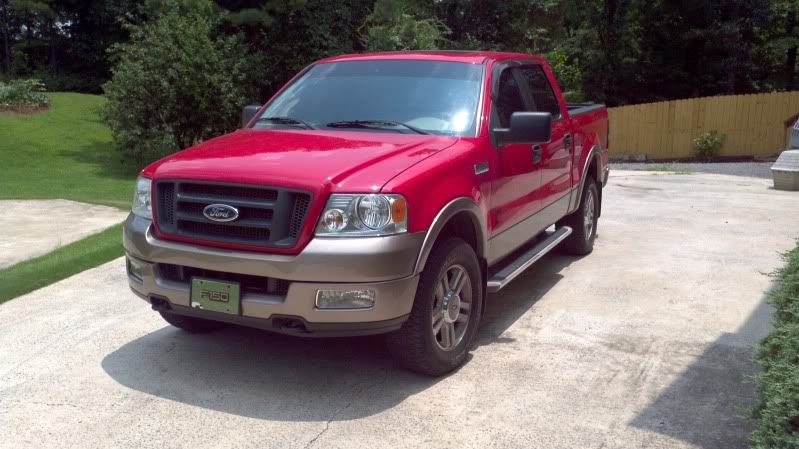
First things first. I didn't get pictures of the truck when I first bought it. Well, I did, however they managed to disappear. Think the wife deleted them on accident. Oh well. First pics you see is with some money already spent. I bought the truck about two weeks ago. Here is how she sits today.
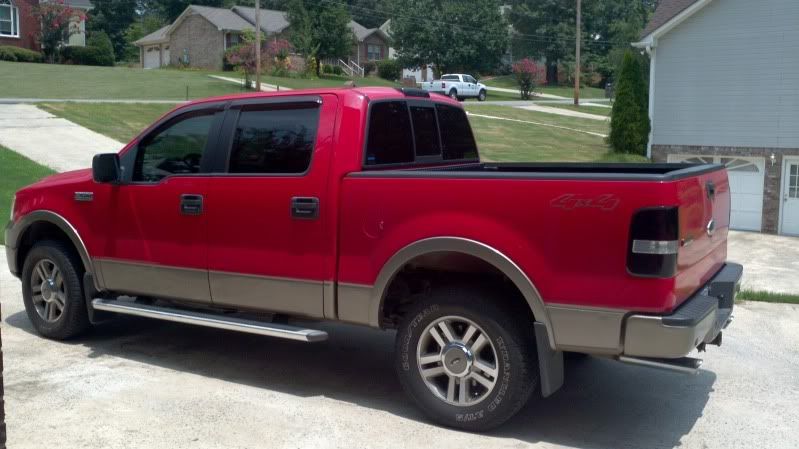
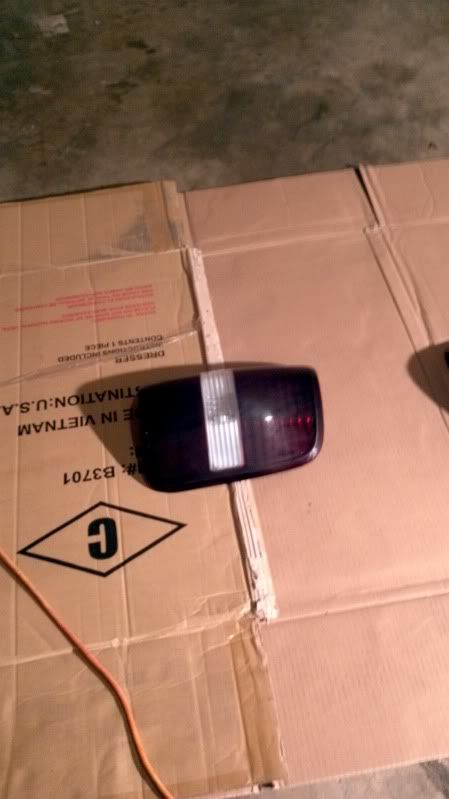
I got busy the first week on her. It now has a magnaflow exhaust system with duals straight out the back. Also has a Roush cold air intake system. Got the windows tinted 20%. Tested the windows with my tint meter while working (I'm a cop) and the rear windows showed 4% due to the factory tint already in the rear glass, and the front windows showed 14%. I love the tint, and it looks great. Also got down and tinted the tail lights yesterday and finished up this morning.
Anyone who knows me knows that I don't ever leave anything alone. I like to tinker and do little mods all the time to my vehicles. Nothing remains untouched. I have had completely tricked out suv's, trucks, bikes, cars, you name it, I've done it. So where to begin with this truck? Well, I decided since it's 4 wheel drive, I cannot do big wheels and lower the truck. So I guess the only option is to go up. I have comprised a nice list of mods to come on the truck. If you follow along, I will provide a decent write up on everything as I do it. Please no flaming or thread jacking. If you like this sort of thing, stay tuned. If not...Well. Holler.
First things first. I didn't get pictures of the truck when I first bought it. Well, I did, however they managed to disappear. Think the wife deleted them on accident. Oh well. First pics you see is with some money already spent. I bought the truck about two weeks ago. Here is how she sits today.
I got busy the first week on her. It now has a magnaflow exhaust system with duals straight out the back. Also has a Roush cold air intake system. Got the windows tinted 20%. Tested the windows with my tint meter while working (I'm a cop) and the rear windows showed 4% due to the factory tint already in the rear glass, and the front windows showed 14%. I love the tint, and it looks great. Also got down and tinted the tail lights yesterday and finished up this morning.

 07-13-2011, 03:36 PM
#3
Mr. Occifer
Thread Starter
Join Date: Jul 2011
Location: Fultondale, Al.
Posts: 34
Likes: 0
Received 0 Likes
on
0 Posts
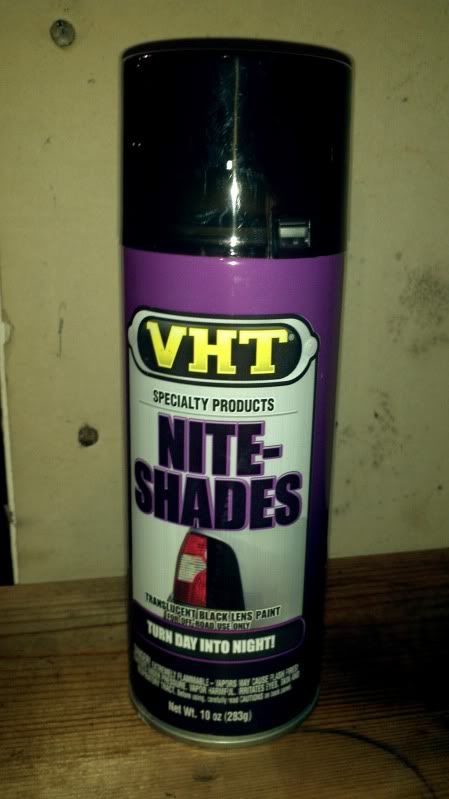
I tinted the tail lights with Nightshades tail light tint. If done properly this can be a very successful tint without the heavy expense of going to the body shop for them to paint the tail lights. I don't care to much for window tint on my tails either. I have done this to several vehicles and I am getting better at it on every set. This is my best set done yet.
Items you will need will be:
Nightshades tint
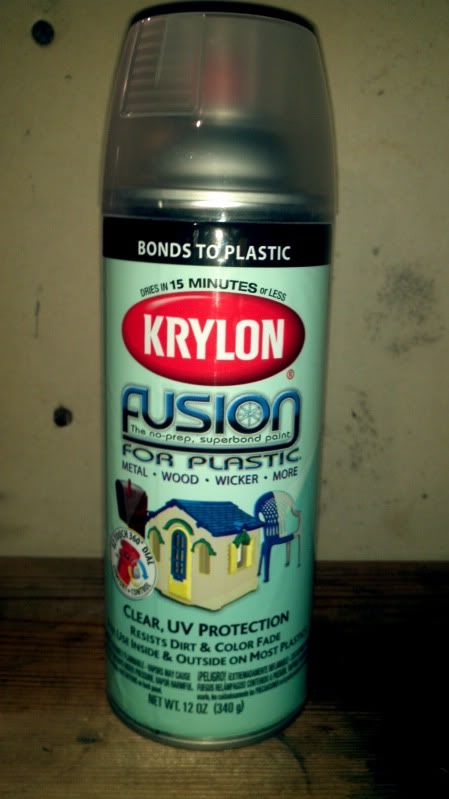
Your choice of clear coat. I used Krylon Fusion Clear
2000 grit sand paper wet/dry
Something to hold water in (bucket)
Buffing/rubbing compound (I used 3m)
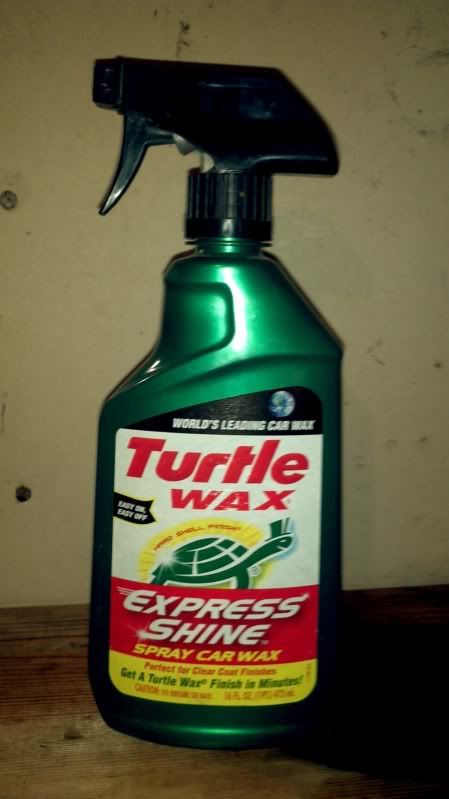
Wax (I used Turtle Wax...I had it laying around)
Painter's tape
Something to lay the tail lights on while painting
100% cotton terry cloths
All items can be purchased at your local auto parts store.
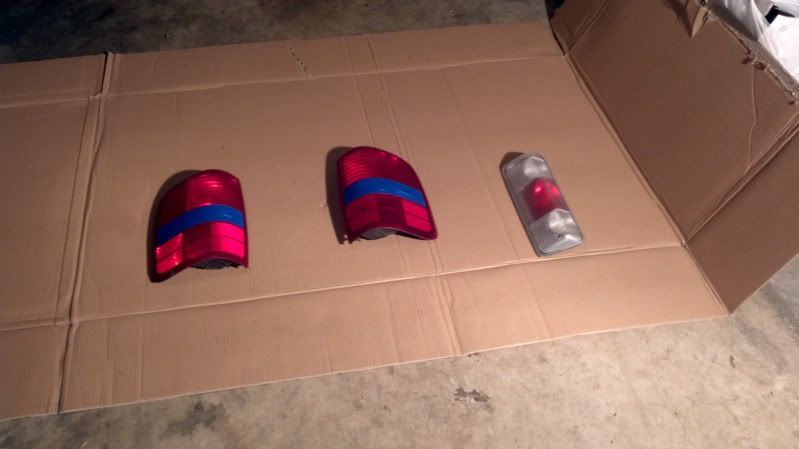
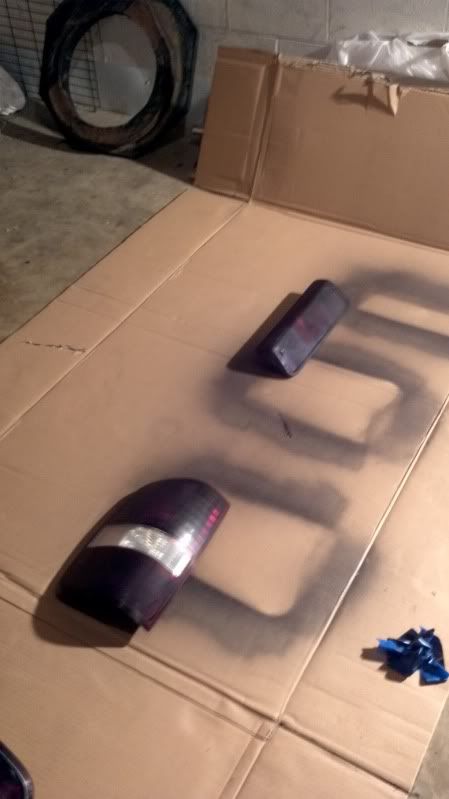
1. Take the tail lights out of the vehicle and clean/prep them thoroughly. You can use a degreaser or simply sand them good with the 2000 grit you picked up. I used 2000 grit sand paper and wet sanded all the lights real good to get all the surface crap off of them. If done properly, you won't have any shiny spots on the lights when done and dry. They should look very dull and almost cloudy.
2. Tape off any areas you do not want tint on. I taped off the reverse light section on the tail lights so that they would stay clear. I usually tape off the cargo bed lights also, however didn't want them for this truck. Once finished, place the lights on something that you can spray on. You don't want this stuff on your garage floor or anything for that matter. Be sure to wipe off the lights one final time with either acetone or a tac cloth of some sort. I just used a damp cloth to pick up any dust or whatever before I sprayed them. However I waited for the lights to be completely dry to the touch also.
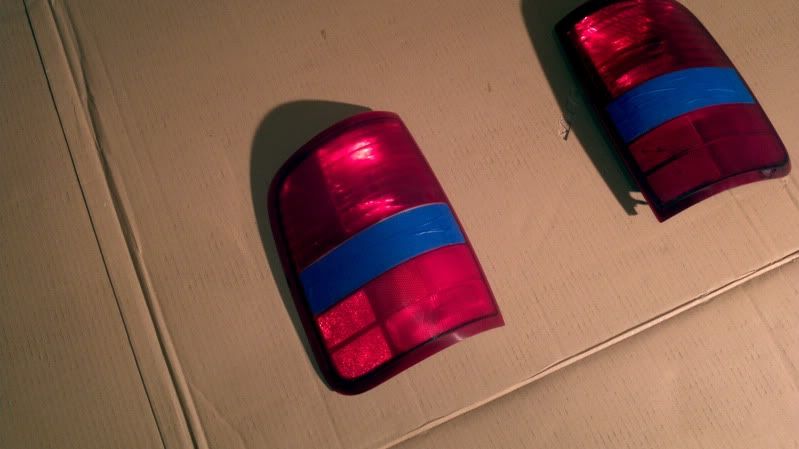

3. Before using the Nightshades tint be sure to shake the can well for about 1-2 minutes vigorously. Begin spraying the Nightshades tail light tint in a smooth sweeping spray pattern from one side of the tail light to the other side. Keep the can about 6 inches from the tail light surface. Move quick enough to not get any runs in the tint spray, but slow enough to get a good layer down on the light. If you wish to practice just find something to spray it on, so you know how it lays down. If you want multiple coats, you can lay as many as you like. It says on the can to do no more than three coats, however I know several people who used about six coats and you can still see the lights through the paint. After each coat, wait for the tint to flash so that the paint won't run. Wait about five minutes between coats that way you can lay down another even coat without having any imperfections at the first step. I only used two even coats on my lights. I don't want them completely blacked out. I just wanted a dark smoked color. After you've laid down the amount of coats you wish, wait about 3 hours before continuing.


Items you will need will be:
Nightshades tint
Your choice of clear coat. I used Krylon Fusion Clear
2000 grit sand paper wet/dry
Something to hold water in (bucket)
Buffing/rubbing compound (I used 3m)
Wax (I used Turtle Wax...I had it laying around)
Painter's tape
Something to lay the tail lights on while painting
100% cotton terry cloths
All items can be purchased at your local auto parts store.
1. Take the tail lights out of the vehicle and clean/prep them thoroughly. You can use a degreaser or simply sand them good with the 2000 grit you picked up. I used 2000 grit sand paper and wet sanded all the lights real good to get all the surface crap off of them. If done properly, you won't have any shiny spots on the lights when done and dry. They should look very dull and almost cloudy.
2. Tape off any areas you do not want tint on. I taped off the reverse light section on the tail lights so that they would stay clear. I usually tape off the cargo bed lights also, however didn't want them for this truck. Once finished, place the lights on something that you can spray on. You don't want this stuff on your garage floor or anything for that matter. Be sure to wipe off the lights one final time with either acetone or a tac cloth of some sort. I just used a damp cloth to pick up any dust or whatever before I sprayed them. However I waited for the lights to be completely dry to the touch also.
3. Before using the Nightshades tint be sure to shake the can well for about 1-2 minutes vigorously. Begin spraying the Nightshades tail light tint in a smooth sweeping spray pattern from one side of the tail light to the other side. Keep the can about 6 inches from the tail light surface. Move quick enough to not get any runs in the tint spray, but slow enough to get a good layer down on the light. If you wish to practice just find something to spray it on, so you know how it lays down. If you want multiple coats, you can lay as many as you like. It says on the can to do no more than three coats, however I know several people who used about six coats and you can still see the lights through the paint. After each coat, wait for the tint to flash so that the paint won't run. Wait about five minutes between coats that way you can lay down another even coat without having any imperfections at the first step. I only used two even coats on my lights. I don't want them completely blacked out. I just wanted a dark smoked color. After you've laid down the amount of coats you wish, wait about 3 hours before continuing.
07-13-2011, 03:37 PM
#4
Mr. Occifer
Thread Starter
Join Date: Jul 2011
Location: Fultondale, Al.
Posts: 34
Likes: 0
Received 0 Likes
on
0 Posts
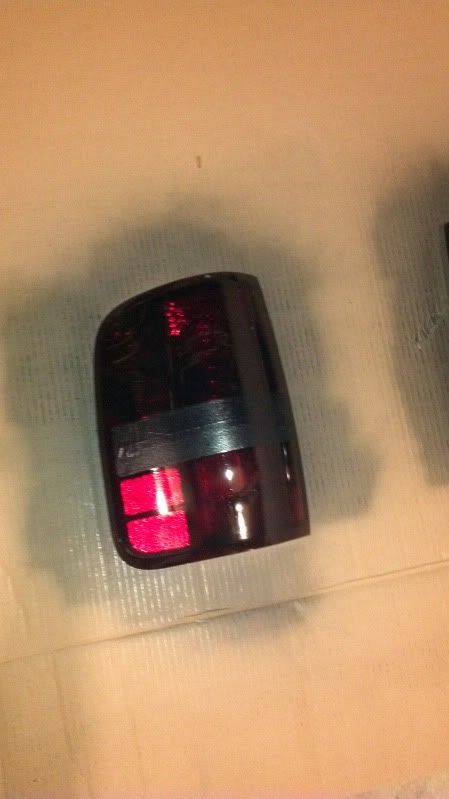
4. You have laid down your coats of Nightshades tint and waited about 3 hours and now your ready to wet sand your lights. Get a bucket or bowl of water and your 2000 grit sand paper. Pull off your painter's tape if you have any on the light. Keeping the sand paper saturated thoroughly with water, lightly sand the light in small circular motion. Sand for about 3 seconds and dip the sand paper back into the bucket of water. Every 3 seconds repeat this process until you have sanded the entire light evenly. Be sure to not press too hardly or you will clump up the paint into the sand paper. This is a delicate process. It should take about 5 minutes on each light to get a good wet sand. Once done with all the lights, be sure they are dry and place them back where you initially painted them.
5. Now that your lights are wet sanded again and dry, your ready for your clear coat. Grab the Krylon Fusion Clear and shake the can well for about 1-2 minutes vigorously to ensure it is mixed well. Spray the clear coat just as you did the Nightshades following the same directions. However you need to move quickly with this as it flows a little faster than the Nightshades did. Also you only wait one minute between coats with this can as it flashes much faster than the Nightshades does. You can apply between 4-6 coats of the clear coat. I used about 5 coats on each light. I still had about a quarter of a can of clear left after using a generous amount. After your done spraying the lights, let them sit for about 10-12 hours. It is common for the lights to look milky during the coating process and even afterwards.

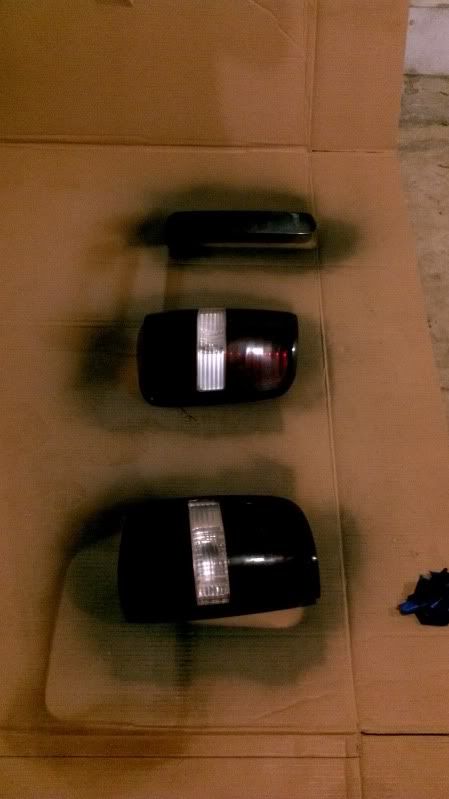
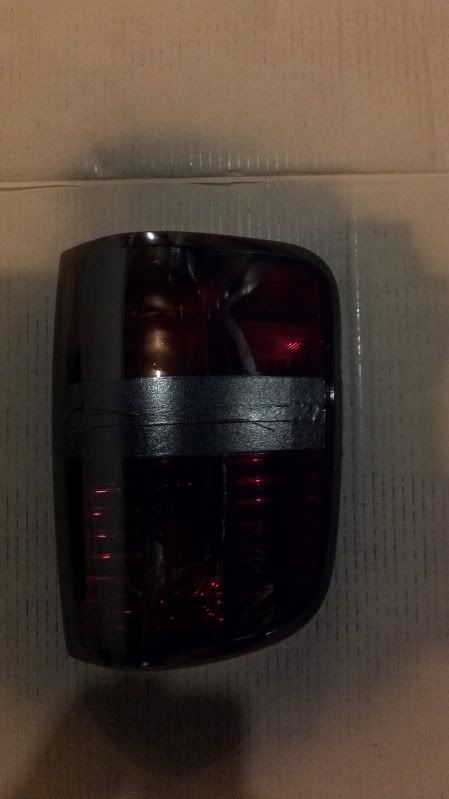
6. Now that you have let your lights sit and the paint cure, it is time again to wet sand the lights. Grab the same bucket of water or bowl and your sand paper. Following the same process as before, wet sand each light. Be sure to be careful not to press too firmly. When I started to sand my lights, they still had a light milky appearance to them. It is ok to sand them as long as you waited the grace period of about 10-12 hours. This process will once again make the lights look very dull and ugly. It gets better I promise.

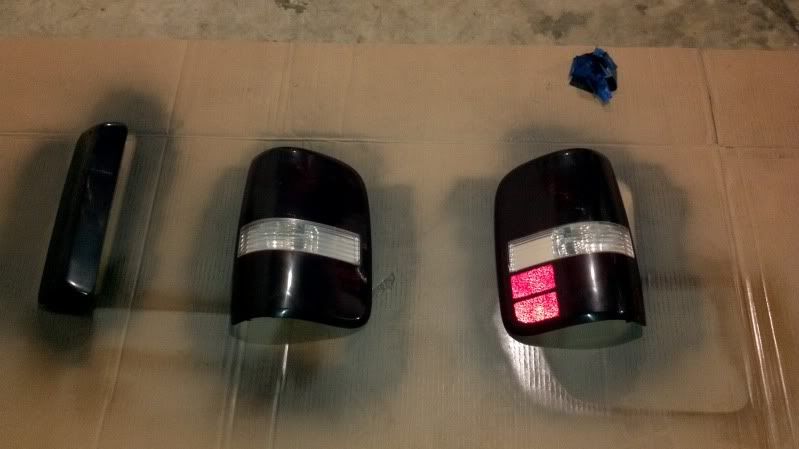

7. Now it is time to cut/buff your lights. Get out your rubbing compound. I used the 3m brand because it is a good quality compound. You may also use Mcguires or other good brands. Using a 100% cotton terry cloth, apply about a quarter sized amount onto the cloth and then begin rubbing it in a circular motion all over the tail light. Use a bout a 6" circle pattern. Go over the light for a few minutes and it should start to dry up a bit. Once it becomes nearly dry and starts to have a good bit of friction on the cloth, flip the cloth over to a fresh dry side and continue buffing. It should start to shine up decently. Repeat this same process on each light 2-3 times. I did my lights twice.
8. Get your wax out that you prefer to use. I used Turtle Wax only because it was readily accessible. I spray it on and use the same circular motion to rub and polish it into the tail lights. Be sure to use another 100% cotton terry cloth. I only put one coat on each tail light. I had a very nice highly glossy finish after this process so it didn't warrant for multiple coats.
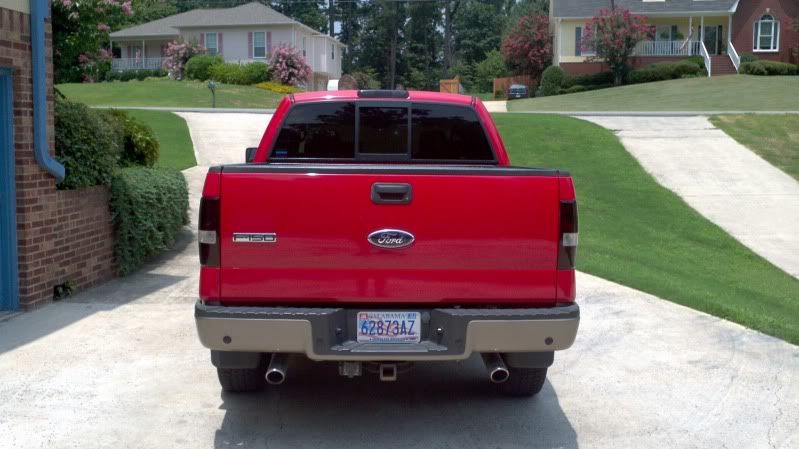
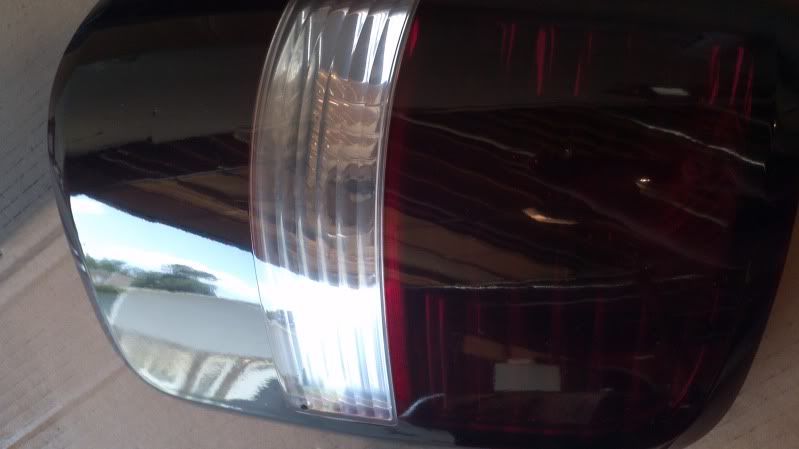
Ta Dah!!! You now have tinted tails. Very nice ones at that. Re-install and enjoy. Refer to the pictures of my truck in the beginning post to see the tail lights installed.

Check out my neighbor's house in the pic above!!!
5. Now that your lights are wet sanded again and dry, your ready for your clear coat. Grab the Krylon Fusion Clear and shake the can well for about 1-2 minutes vigorously to ensure it is mixed well. Spray the clear coat just as you did the Nightshades following the same directions. However you need to move quickly with this as it flows a little faster than the Nightshades did. Also you only wait one minute between coats with this can as it flashes much faster than the Nightshades does. You can apply between 4-6 coats of the clear coat. I used about 5 coats on each light. I still had about a quarter of a can of clear left after using a generous amount. After your done spraying the lights, let them sit for about 10-12 hours. It is common for the lights to look milky during the coating process and even afterwards.
6. Now that you have let your lights sit and the paint cure, it is time again to wet sand the lights. Grab the same bucket of water or bowl and your sand paper. Following the same process as before, wet sand each light. Be sure to be careful not to press too firmly. When I started to sand my lights, they still had a light milky appearance to them. It is ok to sand them as long as you waited the grace period of about 10-12 hours. This process will once again make the lights look very dull and ugly. It gets better I promise.
7. Now it is time to cut/buff your lights. Get out your rubbing compound. I used the 3m brand because it is a good quality compound. You may also use Mcguires or other good brands. Using a 100% cotton terry cloth, apply about a quarter sized amount onto the cloth and then begin rubbing it in a circular motion all over the tail light. Use a bout a 6" circle pattern. Go over the light for a few minutes and it should start to dry up a bit. Once it becomes nearly dry and starts to have a good bit of friction on the cloth, flip the cloth over to a fresh dry side and continue buffing. It should start to shine up decently. Repeat this same process on each light 2-3 times. I did my lights twice.
8. Get your wax out that you prefer to use. I used Turtle Wax only because it was readily accessible. I spray it on and use the same circular motion to rub and polish it into the tail lights. Be sure to use another 100% cotton terry cloth. I only put one coat on each tail light. I had a very nice highly glossy finish after this process so it didn't warrant for multiple coats.
Ta Dah!!! You now have tinted tails. Very nice ones at that. Re-install and enjoy. Refer to the pictures of my truck in the beginning post to see the tail lights installed.
Check out my neighbor's house in the pic above!!!
07-13-2011, 03:41 PM
#6
Mr. Occifer
Thread Starter
Join Date: Jul 2011
Location: Fultondale, Al.
Posts: 34
Likes: 0
Received 0 Likes
on
0 Posts
FYI...Here is my "To Do" list.
1. Smoke Tail Lights - Nightshades
2. Smoked headlight housing(http://www.autoanything.com/lights/7...0A1891994.aspx) 134.95
3. Tint windows (245.00) Audio Creations Hoover
4. HID Kit O-Nex. 130 headlights/90 foglights 8k
5. Level Kit (Autospring 3" Ebay 80.00)
6. 20" wheels (http://www.elites-wholesale.com/Shop/Control/Product/fp/vpid/7887778/vpcsid/0/SFV/32431) 782.00 shipped.
7. 35" tires Nitto Mud Grapplers 35x12.5x20 Keith Lazaar 330 each shipped.
8. 194 license plate LED's. Putco - Autoanything.com 30.00
9. 3156 reverse LED lights. Putco - Autoanything.com 70.00
10. Third brake light LED - D1 Concept 921 - 12.99
11. LED dome light map 906- 8.99 Dome - 578 12.99 D1 Concept Ebay Store
12. Billet Grille inserts upper and lower
13. Navigation touch screen, speakers, subs, amp, remote start alarm.


Trending Topics
07-17-2011, 10:38 PM
#8
Senior Member

awsome write up! truck looks good keep up the good work
07-17-2011, 11:12 PM
#9
Member

Nice looking truck you got. Love to color combo.
For the leds there is a vendor here that sells a cocomplete kit for our truck he does hids too. Under the vendor section
For the leds there is a vendor here that sells a cocomplete kit for our truck he does hids too. Under the vendor section