When you click on links to various merchants on this site and make a purchase, this can result in this site earning a commission. Affiliate programs and affiliations include, but are not limited to, the eBay Partner Network.
Bought it back in December, did some small preventative maintenance stuff on it...
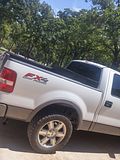
Oxford/Charcoal, Charcoal leather, 3.55 LS, factory 20's, center console shifted, power rear window.
Nitto TerraGrappler G2 305/50/R20's
MotoFab 2 inch Billet level
5% tint all around and over factory rear privacy glass
Clarion CZ702.
Have quite a bit of Audio gear waiting to go in it...
Sundown Audio SA-6.5 component set for the front doors, running active off a Zapco Z300 S2VX and an oldschool Sony 2 channel
couple hundred sq ft of Fat Mat and acoustic foam
Sundown Audio SAZ-2000D
Tantric Sounds HD-12
SkyHigh Car Audio RCA's
50 ft SkyHigh 2/0
100ft of 1/0
XS Power D4800
XS Power XP2000
Still have to purchase a group 65 battery for the primary battery, and a high output alt, most likely going with a Mike Singer built 320a 6 phase hairpin.
Exterior plans are basically staying stock. Might switch the factory 20's for some BMF Novakane's or a slick set of billets. Ditching the bullbar/PIAA combo and stuffing a pair of light bars behind the grill, maybe even a new insert.
Whole truck is getting sound deadened, primary concentration will be on the front stage. Not wanting to be loud, but a LOT of highway miles will get racked up on this truck, so my main goal is to have something I can jam out to metal in and demo some bass heavy stuff when the time comes. Truck sees a trailer nearly every weekend with either cars we are working on or toys, or brush/firewood. Might invest in a set of helper bags.
Haven't did much with the pickup as of late. Ditched the bullbar and PIAA's off the front, working on getting a set of factory tow hooks to fill the gaps from my buddy.
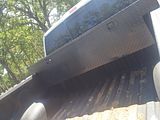
Have a really close family friend that runs a powdercoating shop here local, mostly does big work for Halliburton... took my cheapo diamond plate tool box to him last week to get powdercoated matte black. It's ready to be picked up and installed, gonna use it to house a few XS Power Batteries along with some of my tools I like to carry with me.
Hoping to get started on some custom audio work here in a few weeks.
Almost forgot, have a pretty sweet idea I'm gonna work on with the headlights as well...
apologies for not noticing your reply. Tires are great. Slight rubbing at full lock on lower control arms. Have put close to 5k miles on them so far. VERY quiet. Do great in rain, snow, and decently in mud.
Bought another amp, a Taramps 4x100 micro amp. And bought a Honda CRX for a get loud project, may be getting sold though. Got a stock pile of equipment now... Need to get some work done.
Well went and finally picked up my toolbox and got it put on a few days back. Left my job working for an electrician due to personal issues with the company owner, so I got quite a bit of free time until classes start again.
got it for basically free, or $1100, how ever you look at it lol. Came out of a mudtruck I bought and shelled a motor in. $1500 initial investment, sold the broke truck for $500.
Sorry about the pictures, idk what is up with the uploader or photobucket. Something is up.
TO BEGIN: Disconnect the battery using an 8mm wrench, SAFETY FIRST. No need to short something out if you don't need to.
Started out with some left over SkyHigh Car Audio 2/0 CCA and lugs, and some 1/0 for the grounds.
This stuff is huge, the 2/0 is really the same size as 4/0 Welding cable. Holds like 300a of current over 20ft, so it's plenty for about 2 ft from alternator to battery.
Began by pulling the plastic intake and air filter assembly. The intake tube is held down by 1 10mm bolt, which can be taken out with a socket. The air filter housing is held down by 4 10mm bolts that must be taken out with a wrench. A ratcheting end wrench is really nice here. Also, there is a vacuum connector on the passenger side, and an electrical connector on the drivers side that must be removed.
Take special care to not drop objects into the throttle body, ACCIDENTS DO HAPPEN.
Next, pull back the rubber cover of the alternator charging post, and disconnect the factory charging cable with a 10mm socket or wrench. Once the factory charging lead is disconnected, go ahead and break the small tabs off of the plastic piece with the linesman, it is pictured below.
To make your alternator to battery lead, you will need roughly 24-30 inches of cable. As mentioned above, I used SkyHigh 2/0 CCA and a hydraulic lug crimper. This is a VERY nice investment to make if you crimp a lot of lugs. Saved me atleast an hour of labor vs soldering lugs.
Once your lug is crimped and heatshrinked properly, go ahead and put it underneath the factory charging cable, then tighten everything back up.
Before putting your intake back on, use another ~24 inches of cable, lugs on both ends, to make a alternator bracket* to battery ground. Forgot to take a picture of this during the process, so here's a after picture. Use a 10mm socket or wrench to remove an upper alternator bracket bolt, place one lug underneath it, and tighten it back up. Make sure that there is enough slack in the cable to reach the negative post of the battery.
Now, we can go in the front passenger wheel well of the truck to do the BATTERY TO FRAME ground. Begin by taking 36-48 inches of cable, and crimping lugs on each end, heatshrinking also if you like. Take a 10mm wrench or socket with you, and possibly some PB Blaster aswell...make it easier on me.
Once you've got one end affixed to the frame and tightened back up, you can route the other end back over to the negative post of the battery.
Now, you may re insert your battery, and hook everything up!
Last, you can put your air intake back on. Wasn't that easy?
The main reasons to do this upgrade is to increase the current carrying capacity, along with the grounding capacity. Do your lightbars or stereo system like to dim other lights, or dip your voltage down low even with an upgraded battery? Perfrom this simple 1-2 hour job before throwing money at expensive batteries or alternators(which require this anyway).
I know, one of my positive lugs is taped up. Switching out to a different style terminal block here soon. The lugs won't end up being used at all, except on the negative terminal.
*In all my testings, and other readings with other car audio guys, we have found that the best engine block ground is directly to the case of the alternator. If you would like, you can in fact just ground to the engine block, or even ground to the alternator case and the engine block. This is known as the "Big 4 upgrade"
Finally got around to running the SkyHigh 2/0 back into the tool box. Still need to pick up a few 1/2 inch HW RIGID straps from the supply house to really finish it up. The Zipties will probably be fine but I want to be safe about it. Oh, and the helpers were with me all day today.
I ended up pulling it behind the wheel well liner. No chance of contact with the tire and away from the exhaust manifold.
Red heeler, blue heeler, and a wonderfully docile pit mix.
Prepping to get the amps thrown in. Going to hold out on my spare 4 channel for a bit, most likely selling it off to fund some other stuff.
Got the rear seat pulled off, rear wall deadened, and some monster SkyHigh 2/0 cable ran, one for hot and one for ground.
snapchat photo is the only picture I took, tend to play music with the phone so pics aren't as indepth if I don't pay attention. Going to run that A/C duct aluminum tape around the cab vents then sprayfoam them in the morning. Only space that lacks deadner now if is the firewall, rear doors, and roof. Well and floor but it's a long time away, same with the rest lol.
Amps are a little aged, the Sundown SAZ-2000D was one of the first ever ordered, came from a veteran by the screen name of OBIbassoholic, had a nasty walled Lincoln with 4 of the Sundown 2k's. Was shipped late 2009 to him iirc. The Zapco is a mid 90's classic powerhouse. 300w with 2 30a fuses? SURE! Potential for 800w+!
 05-16-2015, 07:02 PM