Big 3 + Starter wiring (How to)
 10-01-2012, 02:00 AM
#1

Why should I do the "Big 3" and what exactly does it do
I know alot of us members have quite a few electrical components running off factory wiring and our factory alternator. Hid's, Amps, Winches, Aftermarket HU's, Off Road Lights, Power inverters, CB's, etc.
Hence, I thought it could be very useful to find a place to show members the proper way to upgrade "The Big 3" to help out with the electrical load; I've been trying to find some info on the amps of our factory alt. but have yet to find a reliable source, so I would assume its in the range of 100-130 amps.
With that in mind, a 100 amp alternators can only send as much current as the wiring allows. This means our factory wiring is relying on ~6 ga wiring to transfer current to everything in the truck.
Mathematically, this would mean; (this is running at full capacity)
note: anything over, and your alt. will be unable to run your components and effective charge your batteries. The alt. needs to be somewhat > than the power you are pulling. Alts. are rated mainly at max ouput and not at idle. So consider this when doing your install and choosing an alt.
Here are the specs I calculated;
Amps = Watts / Volts
For a 100 amp Alt, you could get approx.
1440.000000 watts
For a 130 amp Alt, you could get approx.
1872.000000
And a 180 aftermarket alt.
2592.000000
Also note; no conductor is 100% efficient, but larger AWG wire helps to overcome resistance and transfer greater amounts of amperes throughout the system with smaller losses in energy. This is why people generally do the "big 3".
One more thing; I know this is a readily talked about topic, but your alternators primary purpose is not to charge your battery. It is made specifically to run all your electrical components such that your battery doesn't need to. Sure, your altenator charges the battery when current is available, but that is not its primary purpose. This is why when your alt. dies, your battery can only run the entire system for a very short time (its not a deep cell). The batteries main purpose is to help regulate spikes in voltage coming from the alt, and to crank the truck. And only when your alt. cant supply the system does your battery get used.
The information and description below was provided by mblouir from the how to section for the 04-08 model's. The process is the same for our model's so I used his overview.
How to Upgrade the Big 3
Note: This information is all over the web. If you’ve done research on it then you will recall most of the things I mention here. This isn’t something that I invented--it’s what I’ve learned by researching.
What exactly is the “Big 3”?
When someone refers to the Big 3 they are referring to upgrading the three main electrical wires in the vehicle’s system:
1. Battery (+) to alternator power wire
2. Battery (-) to ground
3. Engine block to ground
Why should I do this upgrade?
Our vehicle’s stock electrical systems were designed for such---stock electrical. When you start adding things like audio equipment (amplifiers), aftermarket lights, etc, you are increasing the demand put on your electrical system. Upgrading the Big 3 decreases the resistance in the electrical system. Less resistance means better flowing current which means lower or even non-existent voltage drops.
Most of the time stock wiring is right around 8 awg (give or take). It’s simply not designed for the extra current draw required by aftermarket items. Let’s use a garden hose as an analogy to electrical wiring. If you have a long, thin garden hose, the flow of water through it will be much less than a short, thick hose. Compare a 100-ft, 5/8” diameter garden hose to a 1-ft long, 6” diameter section of water supply PVC pipe. The flow will be much greater through the shorter, thicker section (less pressure). The same goes for electrical systems. The larger and shorter your wiring, the less resistance to the flow of current.
Even if you do not have any issues with voltage drops, dimming headlights, or anything like that, the Big 3 is still highly recommended. Stock electrical systems can benefit from the Big 3. It’s probably the cheapest upgrade one can do for their electrical system. While it’s generally recommended to use 4 awg or larger wiring for upgrading the Big 3, I highly recommend using 1/0 from the start. It’s the best option and only costs slightly more. Better to do it right the first time.
How to upgrade the Big 3
Note: The following is the method I used and the materials I used. If you have a different tool or method feel free to use it---as long as it gets the job done safely.
What you need
I highly recommend welding cable for this "how to"! It is super flexible and you do not need any plastic covers. It is highly durable and over 99% copper. Please be aware any wire containing ALUMINUM is not a good choice. Although the aluminum clad wire is cheaper, it does not conduct nearly as good as copper. So choose your materials appropriately.
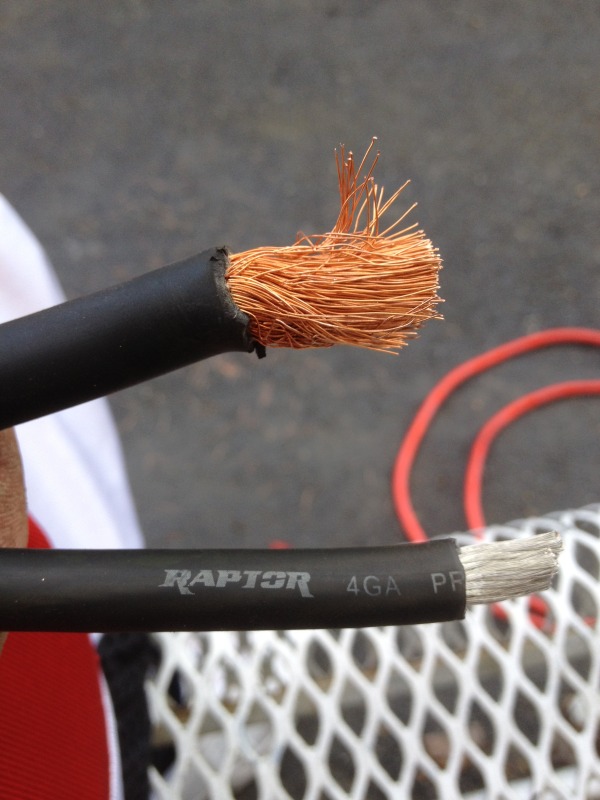
• Approximately 10 feet of flexible 1/0 high-strand wire (measure your vehicle’s existing wiring with a string to be sure, and overestimate) An extra 12 feet if you decide to do the starter upgrade.
• Six (6) 1/0 ring terminals
• In-line ANL fuse holder
• ANL fuse rated between 200 and 300 amps (I used 250A)
• Wire brush to clean contact points
• Extended battery posts for ring terminals
• Wire cutters large enough for 1/0
• Knife or wire strippers large enough for 1/0
• Crimpers large enough for 1/0 (or vise)
• Solder
• Propane torch or soldering gun
• Socket set for bolted connections
• Allen wrench set for connecting fuse
• Zip-ties
I wont go over how to attach ring terminals or install fuses, but this will give you an overview of how and where to attach the necessary wires. And again thanks to mblouir for the materials list and a thorough description.
I know alot of us members have quite a few electrical components running off factory wiring and our factory alternator. Hid's, Amps, Winches, Aftermarket HU's, Off Road Lights, Power inverters, CB's, etc.
Hence, I thought it could be very useful to find a place to show members the proper way to upgrade "The Big 3" to help out with the electrical load; I've been trying to find some info on the amps of our factory alt. but have yet to find a reliable source, so I would assume its in the range of 100-130 amps.
With that in mind, a 100 amp alternators can only send as much current as the wiring allows. This means our factory wiring is relying on ~6 ga wiring to transfer current to everything in the truck.
Mathematically, this would mean; (this is running at full capacity)
note: anything over, and your alt. will be unable to run your components and effective charge your batteries. The alt. needs to be somewhat > than the power you are pulling. Alts. are rated mainly at max ouput and not at idle. So consider this when doing your install and choosing an alt.
Here are the specs I calculated;
Amps = Watts / Volts
For a 100 amp Alt, you could get approx.
1440.000000 watts
For a 130 amp Alt, you could get approx.
1872.000000
And a 180 aftermarket alt.
2592.000000
Also note; no conductor is 100% efficient, but larger AWG wire helps to overcome resistance and transfer greater amounts of amperes throughout the system with smaller losses in energy. This is why people generally do the "big 3".
One more thing; I know this is a readily talked about topic, but your alternators primary purpose is not to charge your battery. It is made specifically to run all your electrical components such that your battery doesn't need to. Sure, your altenator charges the battery when current is available, but that is not its primary purpose. This is why when your alt. dies, your battery can only run the entire system for a very short time (its not a deep cell). The batteries main purpose is to help regulate spikes in voltage coming from the alt, and to crank the truck. And only when your alt. cant supply the system does your battery get used.
The information and description below was provided by mblouir from the how to section for the 04-08 model's. The process is the same for our model's so I used his overview.
How to Upgrade the Big 3
Note: This information is all over the web. If you’ve done research on it then you will recall most of the things I mention here. This isn’t something that I invented--it’s what I’ve learned by researching.
What exactly is the “Big 3”?
When someone refers to the Big 3 they are referring to upgrading the three main electrical wires in the vehicle’s system:
1. Battery (+) to alternator power wire
2. Battery (-) to ground
3. Engine block to ground
Why should I do this upgrade?
Our vehicle’s stock electrical systems were designed for such---stock electrical. When you start adding things like audio equipment (amplifiers), aftermarket lights, etc, you are increasing the demand put on your electrical system. Upgrading the Big 3 decreases the resistance in the electrical system. Less resistance means better flowing current which means lower or even non-existent voltage drops.
Most of the time stock wiring is right around 8 awg (give or take). It’s simply not designed for the extra current draw required by aftermarket items. Let’s use a garden hose as an analogy to electrical wiring. If you have a long, thin garden hose, the flow of water through it will be much less than a short, thick hose. Compare a 100-ft, 5/8” diameter garden hose to a 1-ft long, 6” diameter section of water supply PVC pipe. The flow will be much greater through the shorter, thicker section (less pressure). The same goes for electrical systems. The larger and shorter your wiring, the less resistance to the flow of current.
Even if you do not have any issues with voltage drops, dimming headlights, or anything like that, the Big 3 is still highly recommended. Stock electrical systems can benefit from the Big 3. It’s probably the cheapest upgrade one can do for their electrical system. While it’s generally recommended to use 4 awg or larger wiring for upgrading the Big 3, I highly recommend using 1/0 from the start. It’s the best option and only costs slightly more. Better to do it right the first time.
How to upgrade the Big 3
Note: The following is the method I used and the materials I used. If you have a different tool or method feel free to use it---as long as it gets the job done safely.
What you need
I highly recommend welding cable for this "how to"! It is super flexible and you do not need any plastic covers. It is highly durable and over 99% copper. Please be aware any wire containing ALUMINUM is not a good choice. Although the aluminum clad wire is cheaper, it does not conduct nearly as good as copper. So choose your materials appropriately.
• Approximately 10 feet of flexible 1/0 high-strand wire (measure your vehicle’s existing wiring with a string to be sure, and overestimate) An extra 12 feet if you decide to do the starter upgrade.
• Six (6) 1/0 ring terminals
• In-line ANL fuse holder
• ANL fuse rated between 200 and 300 amps (I used 250A)
• Wire brush to clean contact points
• Extended battery posts for ring terminals
• Wire cutters large enough for 1/0
• Knife or wire strippers large enough for 1/0
• Crimpers large enough for 1/0 (or vise)
• Solder
• Propane torch or soldering gun
• Socket set for bolted connections
• Allen wrench set for connecting fuse
• Zip-ties
I wont go over how to attach ring terminals or install fuses, but this will give you an overview of how and where to attach the necessary wires. And again thanks to mblouir for the materials list and a thorough description.
Last edited by ibd2328; 10-01-2012 at 02:05 AM.

The following 4 users liked this post by ibd2328:
10-01-2012, 02:00 AM
#2
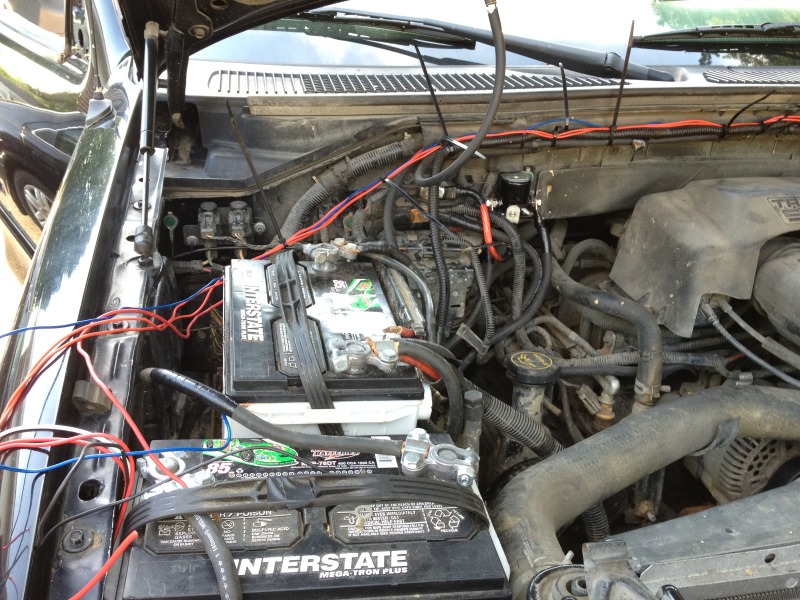
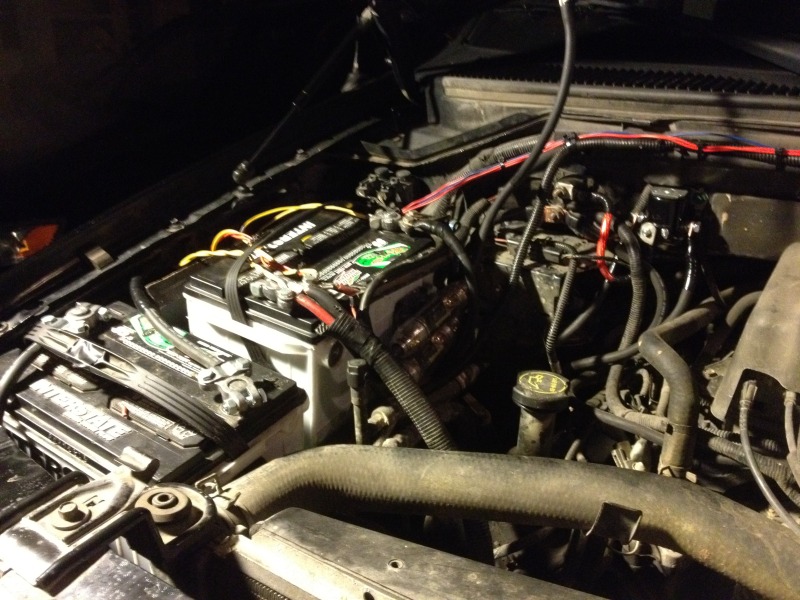
The first thing you want to do whenever you work on your electrical system is disconnect the negative terminal. Here is where you want to add your post extenders if necessary (but don�t reconnect negative terminal).
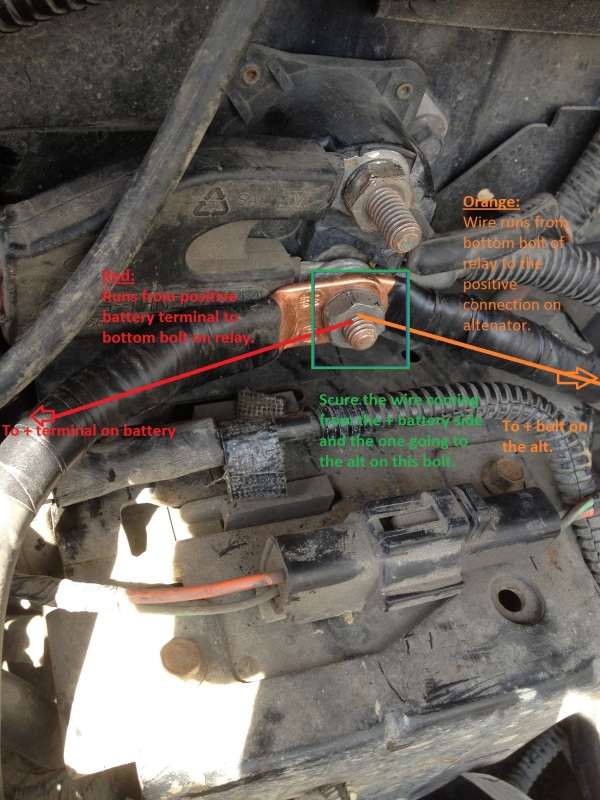
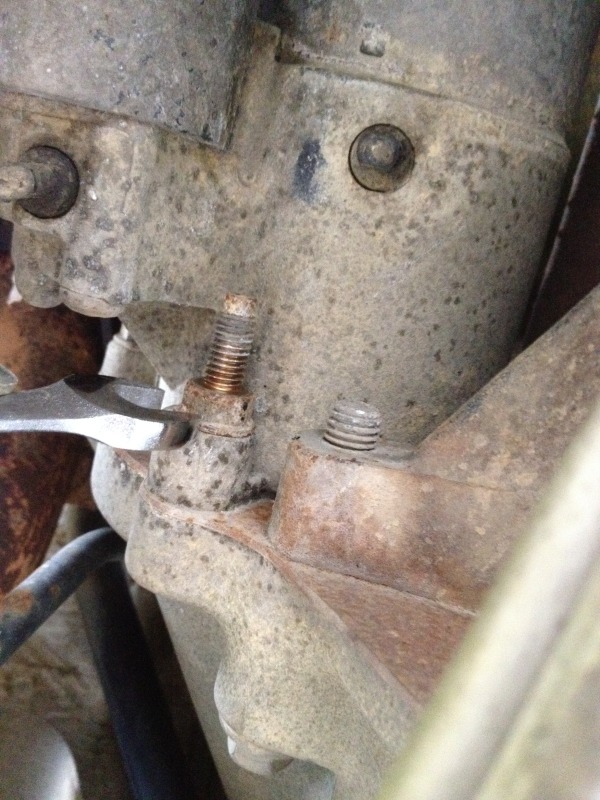
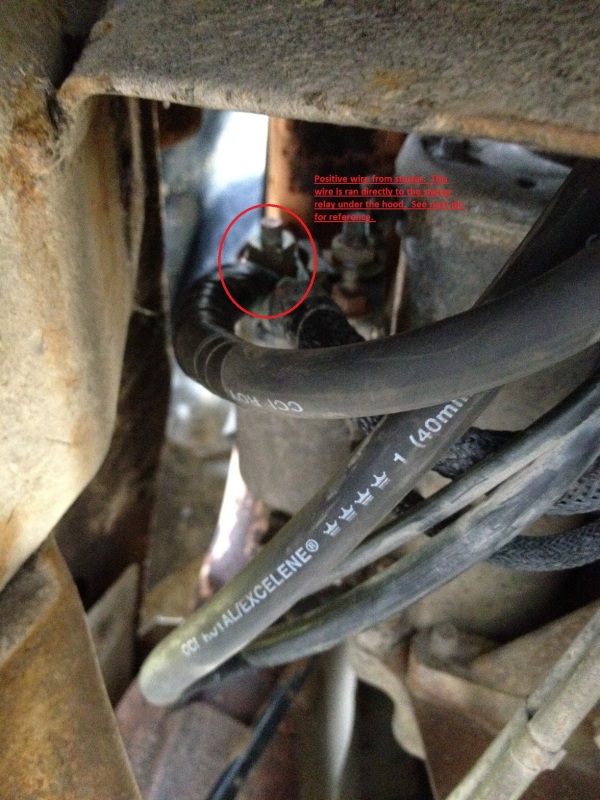
The main step is to find the starter relay on the firewire on the passenger side of the truck. All the main + connections will run form this point. (you can run directly to the battery, but I followed the schematics of the factory truck wiring).
For reference:
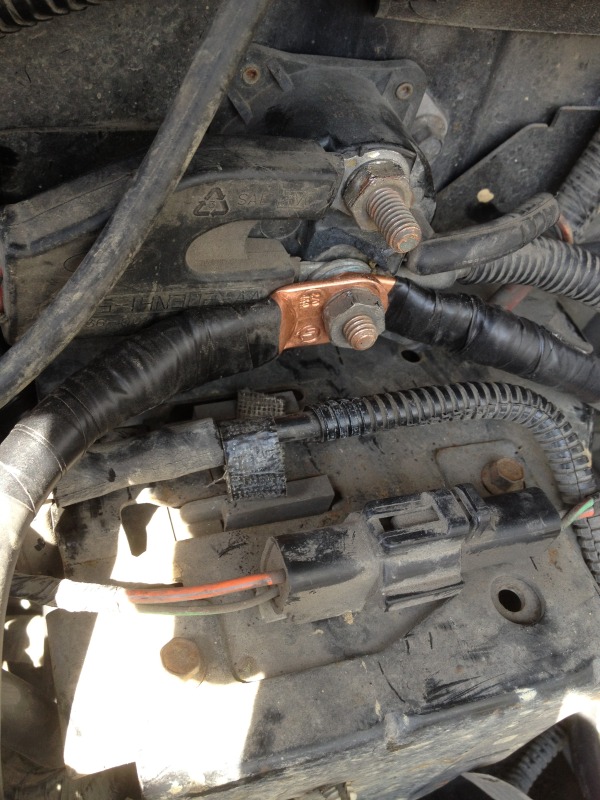
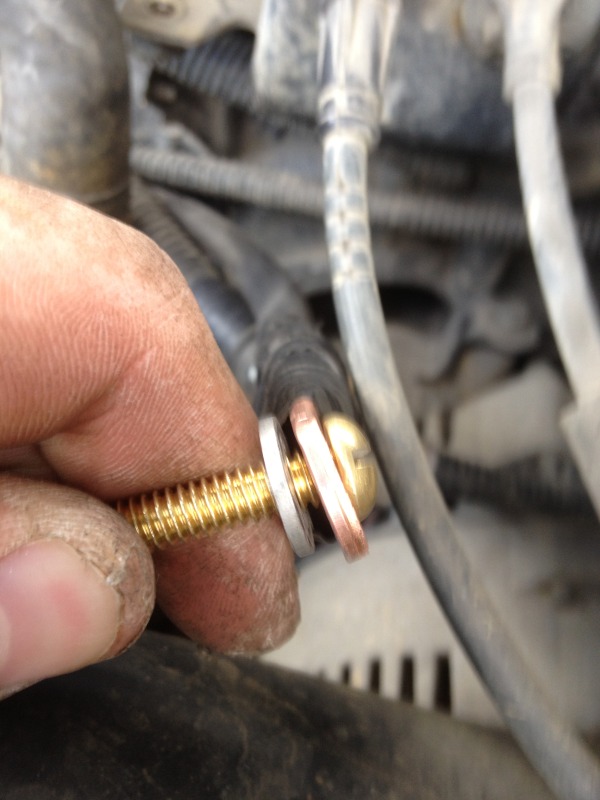
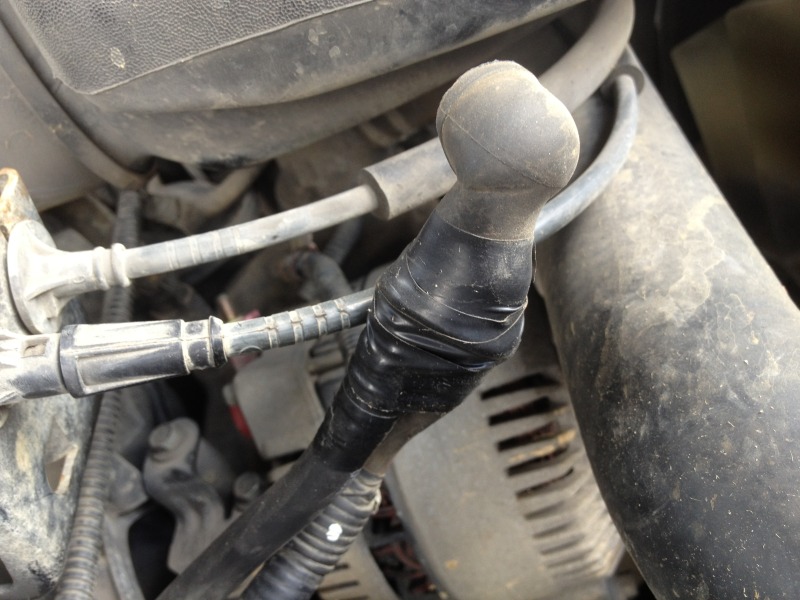
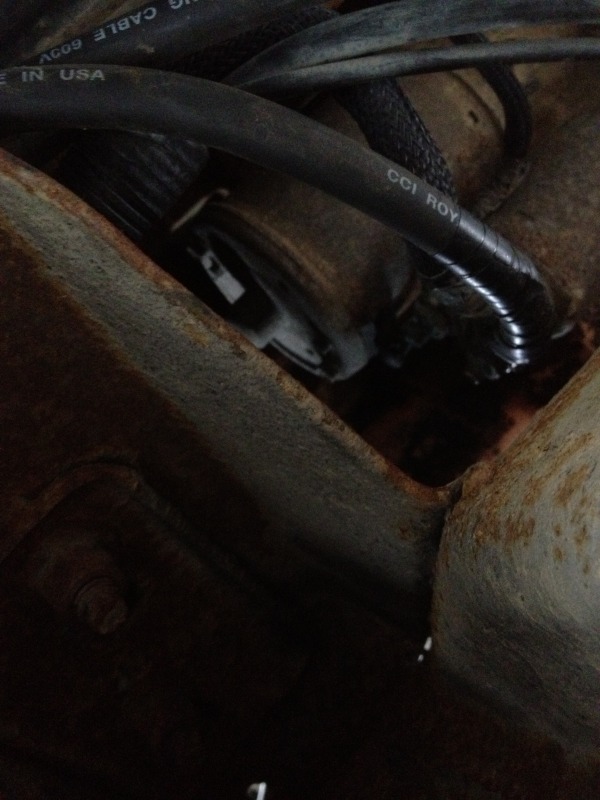
The first wire I added was the positive wire running from the (+) battery terminal to the stater relay, then to the alternator. I wanted to knock it out first since it required the most work (fusing). Go ahead and connect it to your positive terminal then to a fuse holder (without the fuse we will install that later). Out of the other end of the fuse holder run the wire to the bottom bolt on the starter relay. Once that is done you can go ahead and run the next wire from the same bolt on the relay to the pos. terminal (bolt) on the top of the alternator.
Here is the bolt you will be connecting to on the alt.
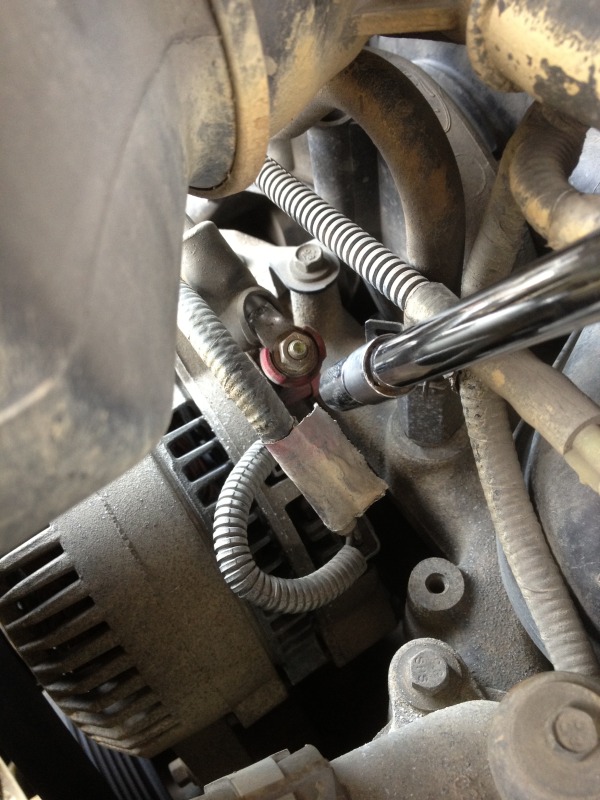
I kept my existing wiring, so I ran the bolt through both terminals on each wire and then connected it to the alt. then securely fasted them and put the rubber boot back on top.
The second one I upgraded was the - battery to chassis ground/frame (big 4)
This runs directly from the - (neg) battery terminal to a bolt on the chassis/frame. This bolt is located right under the passenger side fender well. Make sure to clean up the connection area by sanding or buffing the contact location.
Again, this runs directly from the bolt shown to the neg post on the battery.
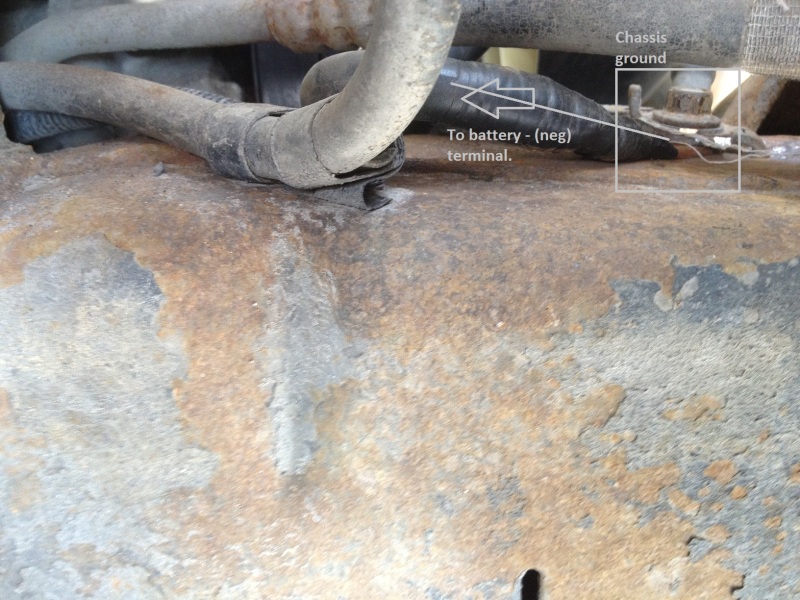
*For the big 4*
Run the another strand of wire, connecting it to the chassis then attaching it to the same bolt used in step 2. This helps to keep a solid ground throughout the truck.
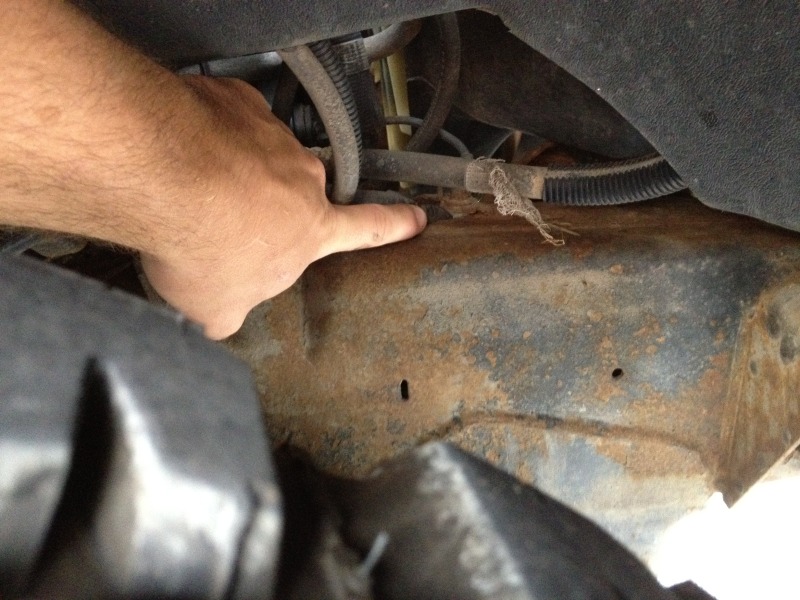
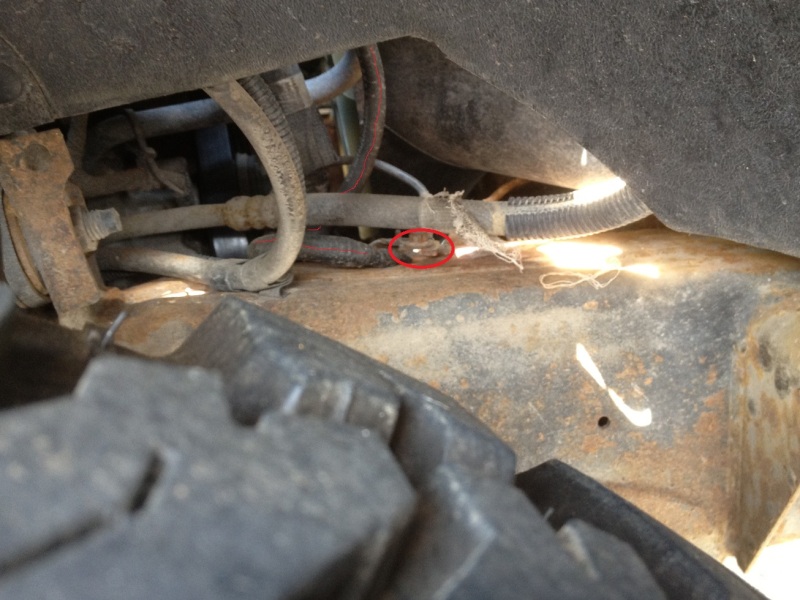
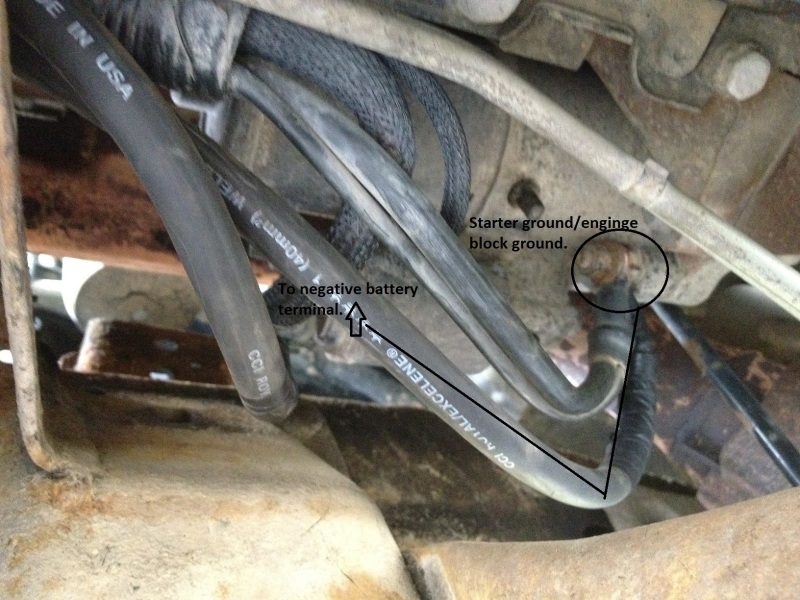
Step 3 - Engine block to ground. (I kept the factory engine block ground) but decided to use the starter/block ground instead. Considering your starter takes more amps than any other device on the truck, I thought this is the best place to do the engine ground since it connects to both the starter ground and block ground.
Here is the bolt we will need to loosen for the connection. Note: their are two nuts on this bolt! The back one holds the gasket secure so make sure and not let this come loose(Keep a wrench on it at all times when loosening).
The main step is to find the starter relay on the firewire on the passenger side of the truck. All the main + connections will run form this point. (you can run directly to the battery, but I followed the schematics of the factory truck wiring).
For reference:
The first wire I added was the positive wire running from the (+) battery terminal to the stater relay, then to the alternator. I wanted to knock it out first since it required the most work (fusing). Go ahead and connect it to your positive terminal then to a fuse holder (without the fuse we will install that later). Out of the other end of the fuse holder run the wire to the bottom bolt on the starter relay. Once that is done you can go ahead and run the next wire from the same bolt on the relay to the pos. terminal (bolt) on the top of the alternator.
Here is the bolt you will be connecting to on the alt.
I kept my existing wiring, so I ran the bolt through both terminals on each wire and then connected it to the alt. then securely fasted them and put the rubber boot back on top.
The second one I upgraded was the - battery to chassis ground/frame (big 4)
This runs directly from the - (neg) battery terminal to a bolt on the chassis/frame. This bolt is located right under the passenger side fender well. Make sure to clean up the connection area by sanding or buffing the contact location.
Again, this runs directly from the bolt shown to the neg post on the battery.
*For the big 4*
Run the another strand of wire, connecting it to the chassis then attaching it to the same bolt used in step 2. This helps to keep a solid ground throughout the truck.
Step 3 - Engine block to ground. (I kept the factory engine block ground) but decided to use the starter/block ground instead. Considering your starter takes more amps than any other device on the truck, I thought this is the best place to do the engine ground since it connects to both the starter ground and block ground.
Here is the bolt we will need to loosen for the connection. Note: their are two nuts on this bolt! The back one holds the gasket secure so make sure and not let this come loose(Keep a wrench on it at all times when loosening).
10-01-2012, 02:01 AM
#3
Once you have the top nut off, make sure the back bolt is secure.
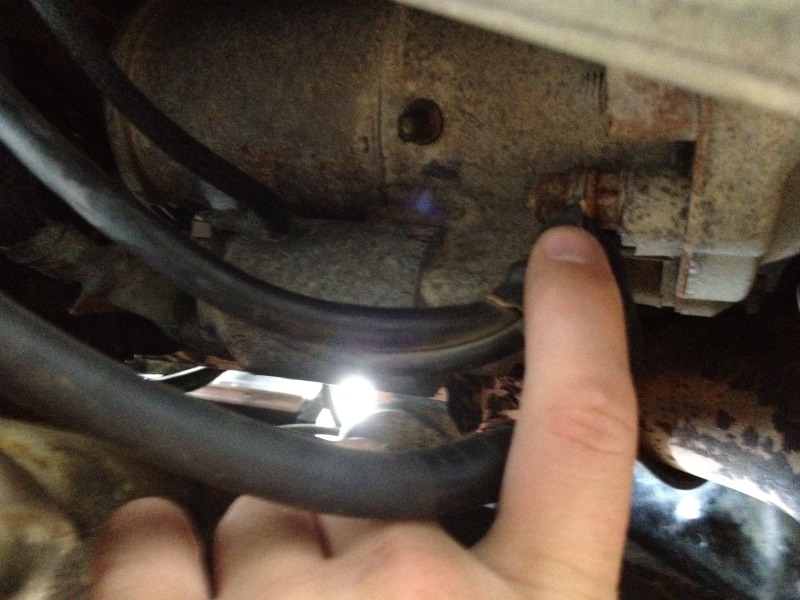
Then again I kept the existing wiring and doubled them up. This wire runs from the starter/block ground to your main ground (the one is step two) or you can choose to run it directly to the - (neg) battery terminal. Both work relatively the same, only the latter of the two takes up more wire.
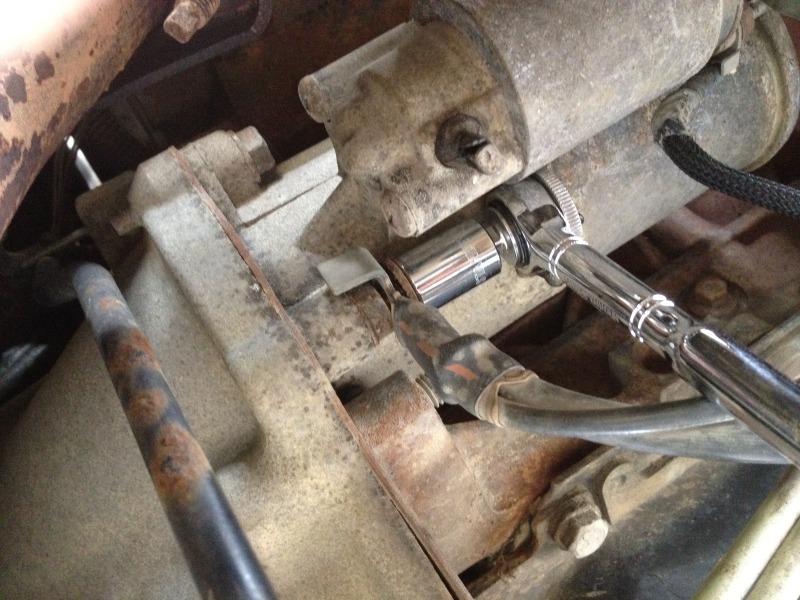
If you want more starting power
Considering how harsh our winters are here, I wanted to gain as much starter power as I could, so I decided to upgrade the + starter wire as well. This will make sure as much current as possible goes into cranking. Below are steps.
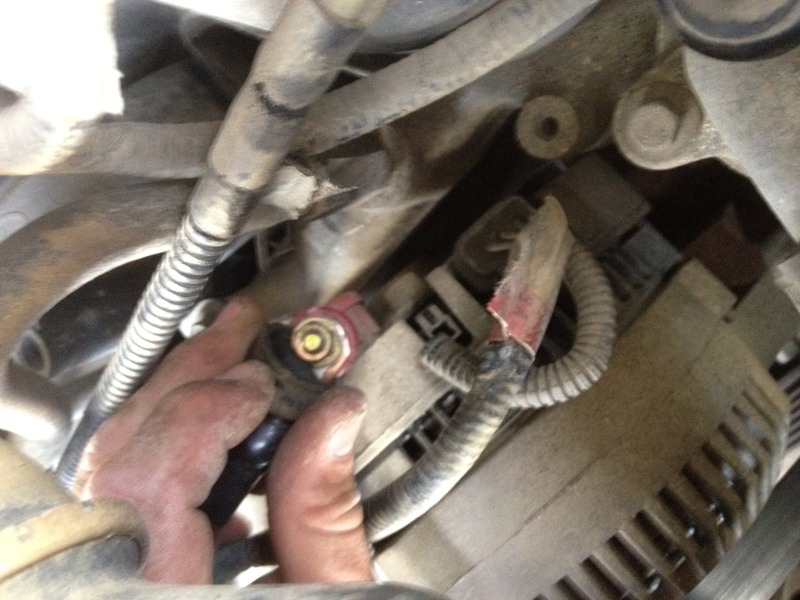
If you look on the opposite side of the starter (as the ground) you will see a lil red cap covering two bolts on your starter solenoid. The larger one on the left with the heavy ga wire is the one we are interested in. Its covered with a nylon coating (not where my socket is)
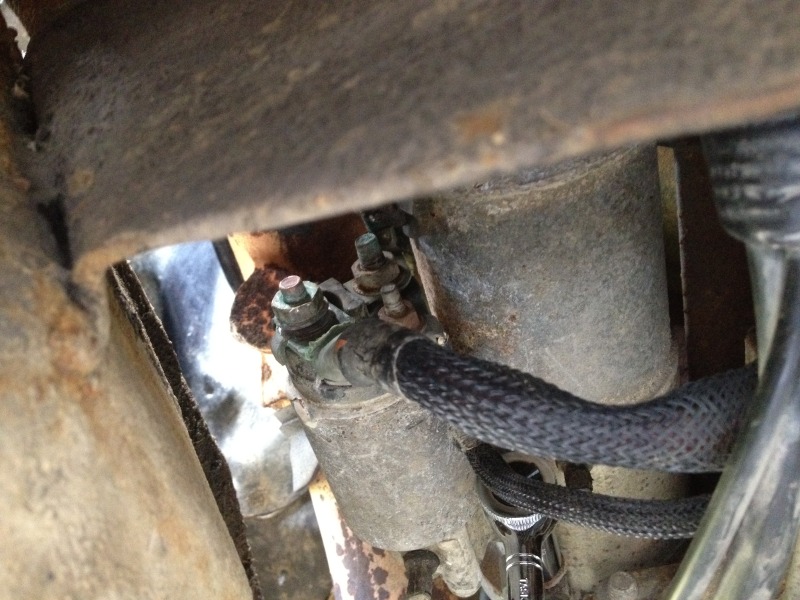
Once you have located the bolt run your heavy gauge wire from that bolt to the starter relay bottom bolt (on your firewall). You should already have two terminals added here, this will make the third. Current is always flowing from this location so be careful when doing this an not hit your wrench on the top bolt(ignition lead). Once you have the terminal connected to the bottom bolt, securely tightly and enjoy your work. This will dramatically increase the amperage going to your system and your starter for long lasting power.
Then install your fuse (the one that runs from the battery to the relay) and re-attach all your battery terminals to the post.
Then again I kept the existing wiring and doubled them up. This wire runs from the starter/block ground to your main ground (the one is step two) or you can choose to run it directly to the - (neg) battery terminal. Both work relatively the same, only the latter of the two takes up more wire.
If you want more starting power
Considering how harsh our winters are here, I wanted to gain as much starter power as I could, so I decided to upgrade the + starter wire as well. This will make sure as much current as possible goes into cranking. Below are steps.
If you look on the opposite side of the starter (as the ground) you will see a lil red cap covering two bolts on your starter solenoid. The larger one on the left with the heavy ga wire is the one we are interested in. Its covered with a nylon coating (not where my socket is)
Once you have located the bolt run your heavy gauge wire from that bolt to the starter relay bottom bolt (on your firewall). You should already have two terminals added here, this will make the third. Current is always flowing from this location so be careful when doing this an not hit your wrench on the top bolt(ignition lead). Once you have the terminal connected to the bottom bolt, securely tightly and enjoy your work. This will dramatically increase the amperage going to your system and your starter for long lasting power.
Then install your fuse (the one that runs from the battery to the relay) and re-attach all your battery terminals to the post.
The following 4 users liked this post by ibd2328:
10-01-2012, 02:01 AM
#4
Another side note: I Installed an extra battery and starter relay, so follow the instructions step by step, try not to follow wires, it can get confusing. Make sure to securely zip tie and shrink wrap/tape all connections and terminals.
If you are interested in adding a second battery, here is a link with some ideas and a walk-through
https://www.f150forum.com/f30/extra-...nstall-173102/
If you are interested in adding a second battery, here is a link with some ideas and a walk-through
https://www.f150forum.com/f30/extra-...nstall-173102/
10-01-2012, 02:07 AM
#5
I use this stuff for everything:
1AWG welding cable. This stuff is close to being as conducive as 2/0 and 3/0 knukonceptz, raptor, or other overpriced audio wire. Its >99% copper, no aluminum alloys, oil and heat resistant coating, along with thicker stands.

Video showing Big 3 output with engine off and at idle with headlamps on.
Video showing Big 3 output with engine off and at idle with all inside accessories on, and 30watt back up lamps.
NOTE: Meant to say alt. tends to put out 14.4 in a real world. This is a miscue in the video.
https://www.youtube.com/watch?v=xnwS3VbYe08
Voltage drop at the amps.
1AWG welding cable. This stuff is close to being as conducive as 2/0 and 3/0 knukonceptz, raptor, or other overpriced audio wire. Its >99% copper, no aluminum alloys, oil and heat resistant coating, along with thicker stands.
Video showing Big 3 output with engine off and at idle with headlamps on.
Video showing Big 3 output with engine off and at idle with all inside accessories on, and 30watt back up lamps.
NOTE: Meant to say alt. tends to put out 14.4 in a real world. This is a miscue in the video.
https://www.youtube.com/watch?v=xnwS3VbYe08
Voltage drop at the amps.
Last edited by ymeski56; 03-25-2013 at 08:47 PM.
03-31-2013, 10:28 PM
#7
Senior Member
iTrader: (1)
Do you still have the wire for the big three? I would really like to get the length needed if the offer still stands.
Trending Topics
04-01-2013, 02:33 PM
#9
Senior Member
iTrader: (1)
How can I go about getting some of that from you?

