'97-'03 A/T Repair loose gear shift and indicator
 05-06-2013, 10:25 AM
#1
2001 Supercrew, 5.4L, 2WD
Thread Starter

This thread is to show how to repair a loose gear shift lever and reset the needle indicator.
Applies to: '97-'03 Ford F-150 pickups with automatic transmission
Users suffering from this problem may experience the following symptoms:
-Play in the gear shift lever between gears
-Inability to shift into Park
-No engine start when in Park (requires shifting to Neutral)
-Gear indicator needle off by one or more gears
Problem: The adapter plate at the base of the steering column connecting the gear shift lever to the gear shift cable has become loose.
Tools required:
- 7mm Socket or Nut driver
- 8mm Socket or Nut driver
- T30 Torx bit and ratchet wrench
- 3" ratchet extension
- Thread lock
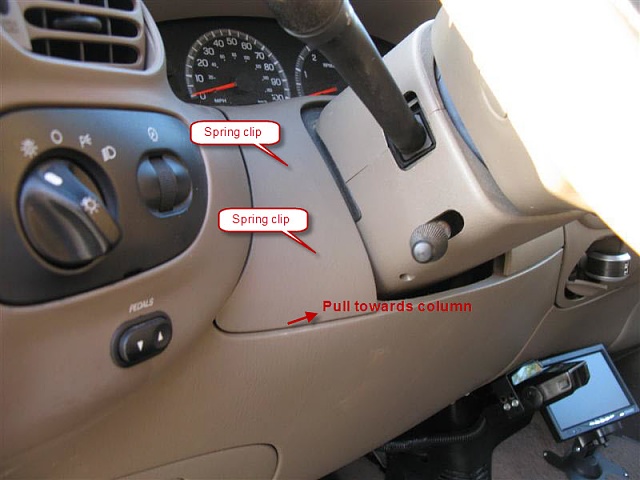
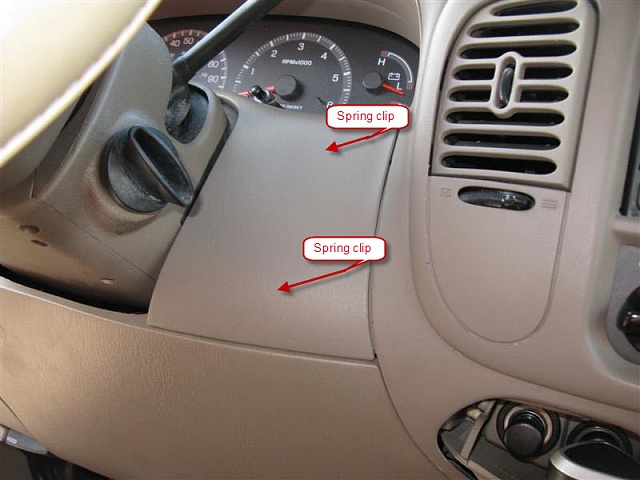
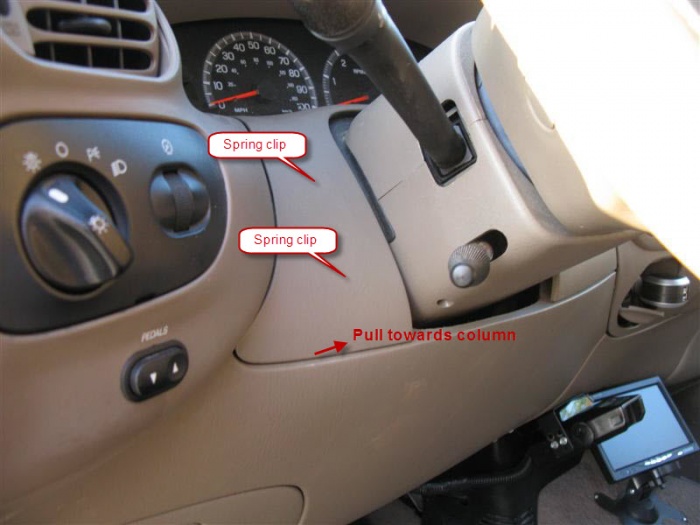
To begin, remove the upper cover around the steering column. The four spring clips will release when pulled away from the dash. Once free, twist the cover up towards the dash, then towards the center of the vehicle (when removed, it will be upside down).
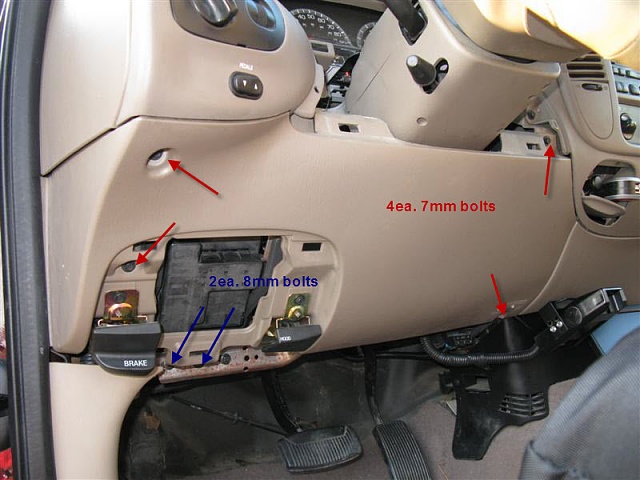
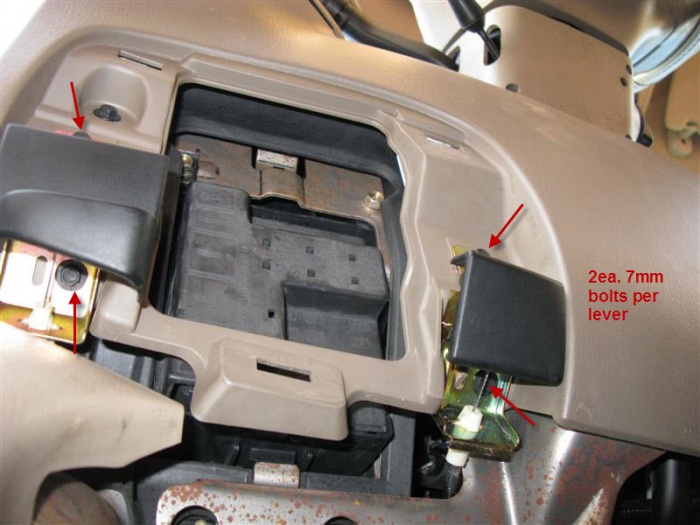
Next remove the hood release and parking brake release levers from the lower dash cover. Each lever uses two 7mm bolts, one on the face of the dash cover and on the bottom, behind the lever.

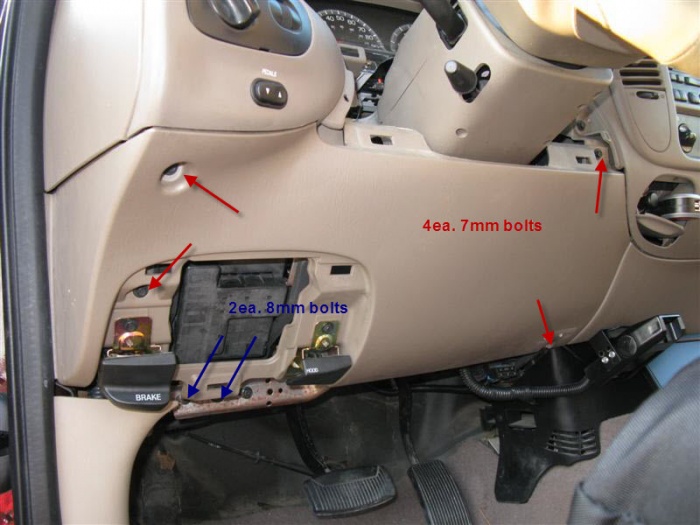
Next remove the lower dash cover by removing the 4 remaining 7mm bolts around the perimeter of the dash cover and the 2 8mm bolts on the lower left dash frame.
The faulty piece is buried behind the steering column.
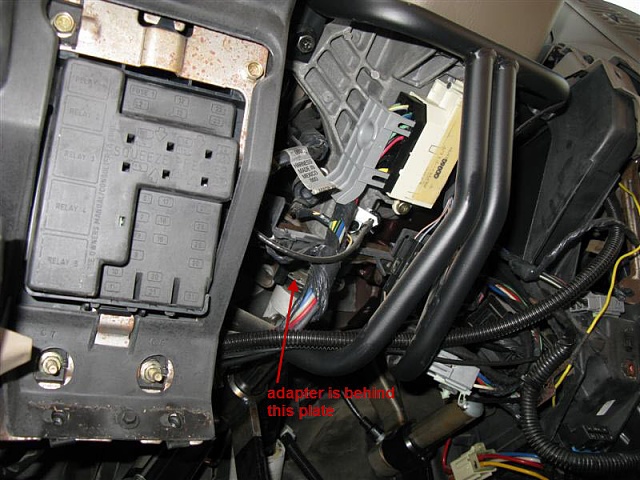
Once removed, you'll look underneath the dash to find the adapter plate on the base of the column. The picture below is taken from above the gas pedal looking towards steering column. The adapter plate has two T30 torx bolts.

Remove only one of the two bolts, apply thread lock compound, replace then tighten the bolt. Once tightened, remove the other bolt, apply thread lock, then replace and tighten to approximately 23-27 ft-lbs.
Once tight, locate the thumb-screw that attaches to the gear shift indicator, located below and to the right of the steering columns universal joint. Adjust the screw until the indicator appears centered around the selected gear.
Once complete, replace the lower dash cover (reverse of removal), then replace the parking brake and hood release levers, then replace the upper column bezel.
Now your gear shifts should be tight and free of play. You indicator should also match the select gear.
Good Luck!
Applies to: '97-'03 Ford F-150 pickups with automatic transmission
Users suffering from this problem may experience the following symptoms:
-Play in the gear shift lever between gears
-Inability to shift into Park
-No engine start when in Park (requires shifting to Neutral)
-Gear indicator needle off by one or more gears
Problem: The adapter plate at the base of the steering column connecting the gear shift lever to the gear shift cable has become loose.
Tools required:
- 7mm Socket or Nut driver
- 8mm Socket or Nut driver
- T30 Torx bit and ratchet wrench
- 3" ratchet extension
- Thread lock
To begin, remove the upper cover around the steering column. The four spring clips will release when pulled away from the dash. Once free, twist the cover up towards the dash, then towards the center of the vehicle (when removed, it will be upside down).

Next remove the hood release and parking brake release levers from the lower dash cover. Each lever uses two 7mm bolts, one on the face of the dash cover and on the bottom, behind the lever.
Next remove the lower dash cover by removing the 4 remaining 7mm bolts around the perimeter of the dash cover and the 2 8mm bolts on the lower left dash frame.
The faulty piece is buried behind the steering column.
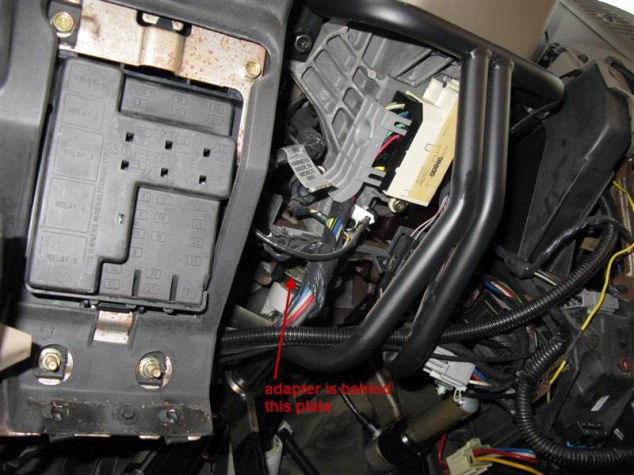
Once removed, you'll look underneath the dash to find the adapter plate on the base of the column. The picture below is taken from above the gas pedal looking towards steering column. The adapter plate has two T30 torx bolts.
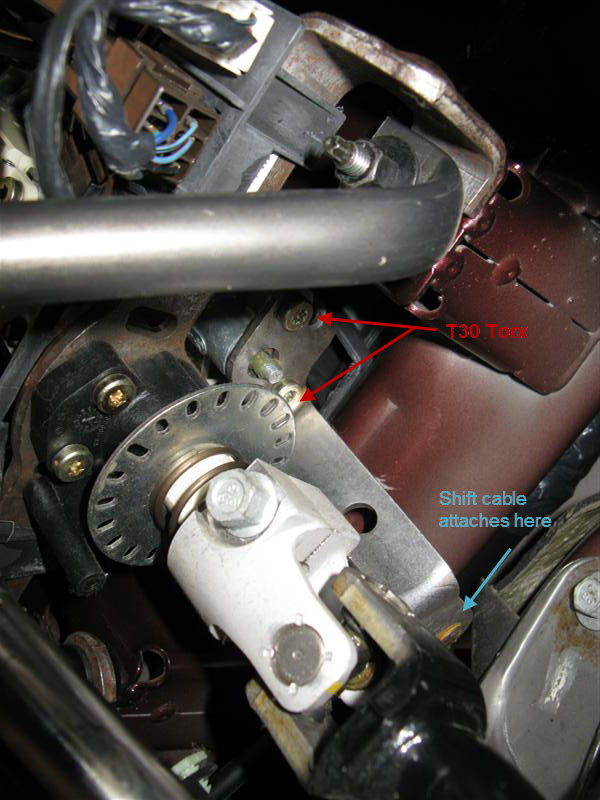
Remove only one of the two bolts, apply thread lock compound, replace then tighten the bolt. Once tightened, remove the other bolt, apply thread lock, then replace and tighten to approximately 23-27 ft-lbs.
Once tight, locate the thumb-screw that attaches to the gear shift indicator, located below and to the right of the steering columns universal joint. Adjust the screw until the indicator appears centered around the selected gear.
Once complete, replace the lower dash cover (reverse of removal), then replace the parking brake and hood release levers, then replace the upper column bezel.
Now your gear shifts should be tight and free of play. You indicator should also match the select gear.
Good Luck!
Last edited by Styx01Sc; 05-06-2013 at 10:35 AM. Reason: modified applied torque

The following 3 users liked this post by Styx01Sc:
08-21-2013, 07:08 AM
#2

Moved and approved
The following users liked this post:
Jmondragon1 (10-21-2023)
 07-30-2015, 03:26 AM
#4
Junior Member

Join Date: Jul 2015
Posts: 7
Likes: 0
Received 0 Likes
on
0 Posts

I crawled under the dash and tightened the two bolts which are usually the culprit. they were definitely loose.
However, now the shifter feels really tight and hard to shift (really have to muscle it). It still doesn't line up right (although it's better than it was) and I still can't shift down into 1st.
Any thoughts on where to look next?
**Edit**
So I pulled everything apart today and took a video of the bushings on the shifter column. I still can't shift into 1st gear. I did adjust the wheel and the needle lines up now.
I don't know what they are supposed to look like, but based on the shavings around them showing wear, I can only assume that they are very worn. Any idea on what the next steps are?
Last edited by liamket; 07-30-2015 at 09:16 PM. Reason: Added info

 03-04-2022, 02:37 AM
#6
Junior Member

Join Date: Mar 2022
Posts: 1
Likes: 0
Received 0 Likes
on
0 Posts
this thread is to show how to repair a loose gear shift lever and reset the needle indicator.
Applies to: '97-'03 ford f-150 pickups with automatic transmission
users suffering from this problem may experience the following symptoms:
-play in the gear shift lever between gears
-inability to shift into park
-no engine start when in park (requires shifting to neutral)
-gear indicator needle off by one or more gears
problem: The adapter plate at the base of the steering column connecting the gear shift lever to the gear shift cable has become loose.
Tools required:
- 7mm socket or nut driver
- 8mm socket or nut driver
- t30 torx bit and ratchet wrench
- 3" ratchet extension
- thread lock
to begin, remove the upper cover around the steering column. The four spring clips will release when pulled away from the dash. Once free, twist the cover up towards the dash, then towards the center of the vehicle (when removed, it will be upside down).
Attachment 219805
Attachment 219806
next remove the hood release and parking brake release levers from the lower dash cover. Each lever uses two 7mm bolts, one on the face of the dash cover and on the bottom, behind the lever.
Attachment 219807
next remove the lower dash cover by removing the 4 remaining 7mm bolts around the perimeter of the dash cover and the 2 8mm bolts on the lower left dash frame.
Attachment 219809
the faulty piece is buried behind the steering column.
Attachment 219812
once removed, you'll look underneath the dash to find the adapter plate on the base of the column. The picture below is taken from above the gas pedal looking towards steering column. The adapter plate has two t30 torx bolts.
Attachment 219813
remove only one of the two bolts, apply thread lock compound, replace then tighten the bolt. Once tightened, remove the other bolt, apply thread lock, then replace and tighten to approximately 23-27 ft-lbs.
Once tight, locate the thumb-screw that attaches to the gear shift indicator, located below and to the right of the steering columns universal joint. Adjust the screw until the indicator appears centered around the selected gear.
Once complete, replace the lower dash cover (reverse of removal), then replace the parking brake and hood release levers, then replace the upper column bezel.
Now your gear shifts should be tight and free of play. You indicator should also match the select gear.
Good luck!
05-18-2022, 04:56 PM
#7
Junior Member

What a great step by step, photo tutorial. I realize the OP is just over nine years old, but I would not know where else to go.
UNFORTUNATELY, (sigh), the repair did not fix things, completely. It seemed to help initially, but about a month or so later, the shift indicator
got sloppy again. Having had my back on the driver's side floorboard before, I was a little more familiar with the situation. No fasteners
were loose. However, it appears that there is no more "play" in the thin cable that can be adjusted with the thumb screw. Is it safe to
assume, that like everything else, the cable has stretched beyond its limit? If this is the case, can anyone point me to a video or another
tutorial as good as the OP's, that will guide an older, semi-disabled individual through the steps?
I cannot say enough good things about the Original Poster's step by step instructions, and visuals.
Thanks to all the respondents, too. You folks helped fine tune the situation.
Trending Topics
12-27-2022, 06:38 PM
#8
Junior Member
Hey thanks, guys and gals! I went ahead and had the whole steering column replaced. I found a reputable reman/rebuild shop in PA. Good price AND GOOD SERVICE. My mechanic was impressed with the quality.
THANKS FOR ALL THE INPUT!
THANKS FOR ALL THE INPUT!

