How to Replace 4.6 Manifold (Passenger's Side)
 04-24-2012, 09:34 AM
#1


I finally got around to changing out my cracked passenger's side manifold on my 1997 4.6 this weekend. I figured I would throw up a thread for future reference for anyone tackling broken studs/manifolds in the future. I mostly followed dart_440's thread on f150online, but most of it is common sense.
If you are planning to do this on the weekend, start soaking everything in PB Blaster throughout the week!
1. Goes without saying. Jack up the truck and remove the passenger's side tire.
2. Remove your inner fender. If you can't do this without pics/instructions there is no way you can tackle this project
3. Soak the exhaust manifold nuts and collector nuts again with PB Blaster. Let it soak while your are...
4. Removing the starter. There is one stud on the bottom of the starter with a 13mm nut that you can get to with a wrench. On top of the starter, there are 2 13mm bolts. You will need a 3/8 ratchet and 6" extension to get these out. I just let in hang down. It makes more room and is a must.
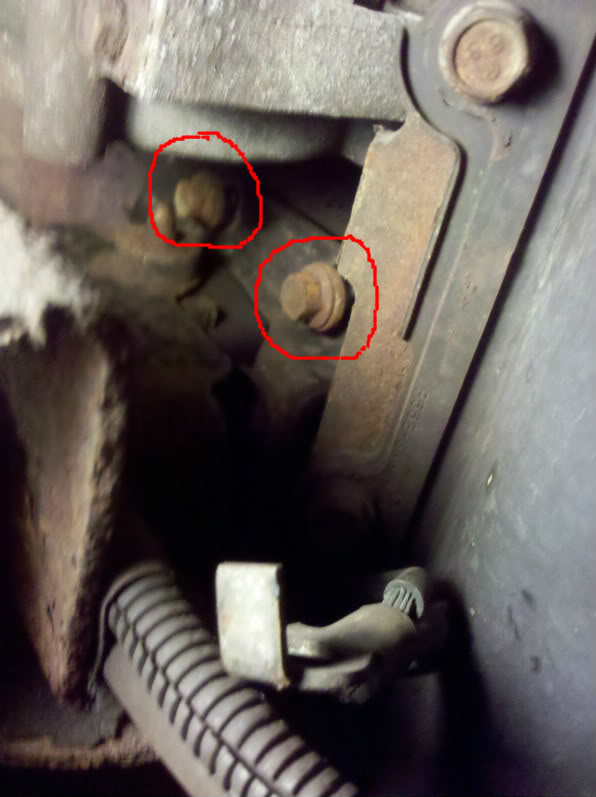
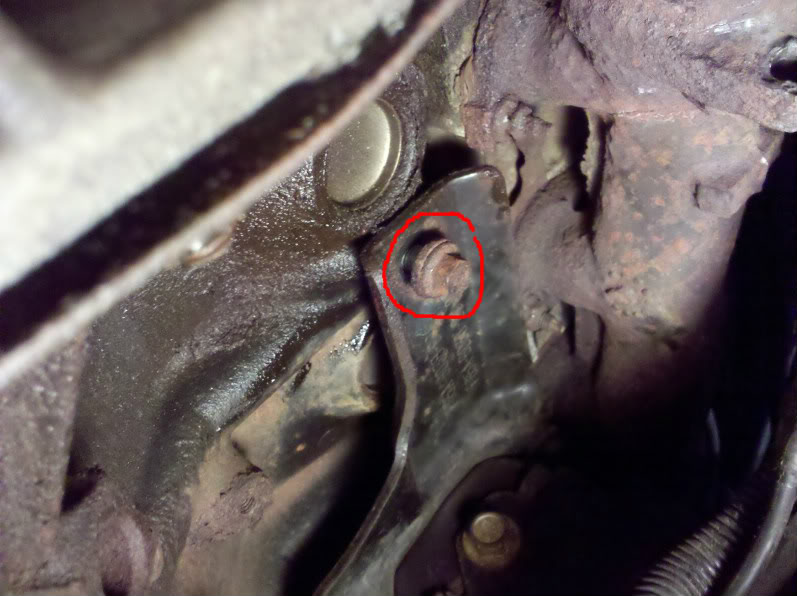
5. Loosen the 3 13mm motor mount bolts, but don't take them all the way out. I backed mine out about 1/4" to 1/2". To get to the 2 toward the front of the engine, you will need at least 2 6" extensions and a swivel adapter. I used a 1/2" ratchet. The 1 toward the back of the engine is easy to get with a 6" extension and swivel adapter.
Front
Rear
6. Use your floor jack with a thick block of wood and put it under the oil pan and lift the engine. You only need to lift it about an inch or so to get a socket on the middle 2 lower exhaust studs. By lifting the engine it gives just enough room to get the deep socket in there.
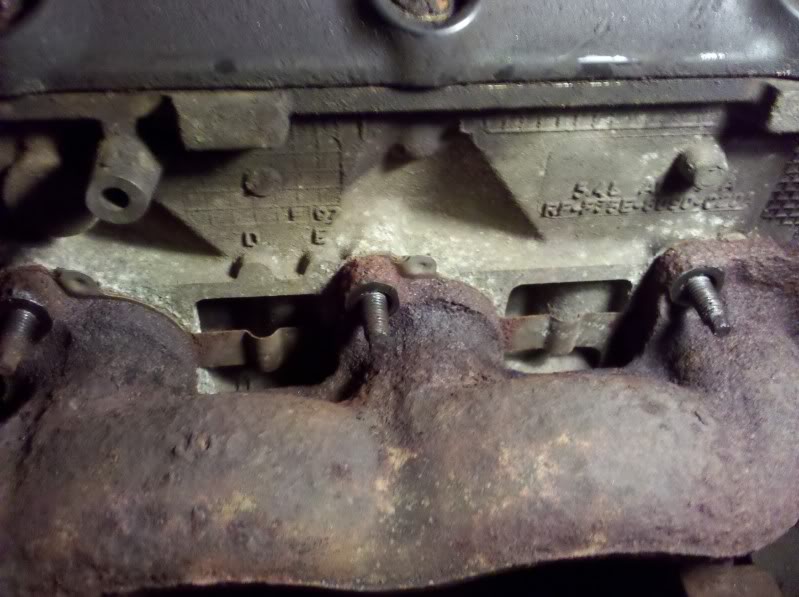
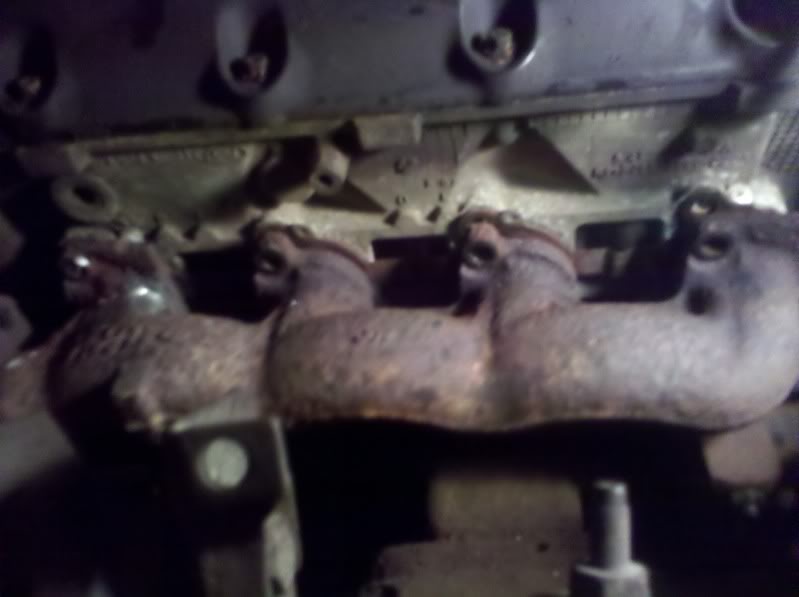
7. Remove all the nuts, which if your lucky if they do break they will break flush with the manifold when they do. I also removed some of the top studs before taking the manifold off. I just tacked the nuts on and they came right out
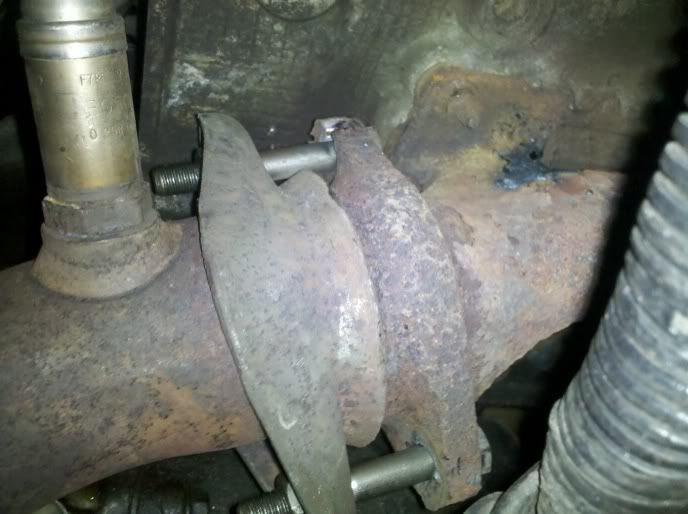
8. Remove the exhaust collector nuts, you might need to cut them. Make sure you cut as close to the nut as possible so you have the most stud to work with. (I replaced mine with stainless bolts.)
9. Pry the exhaust back and pull the manifold off.
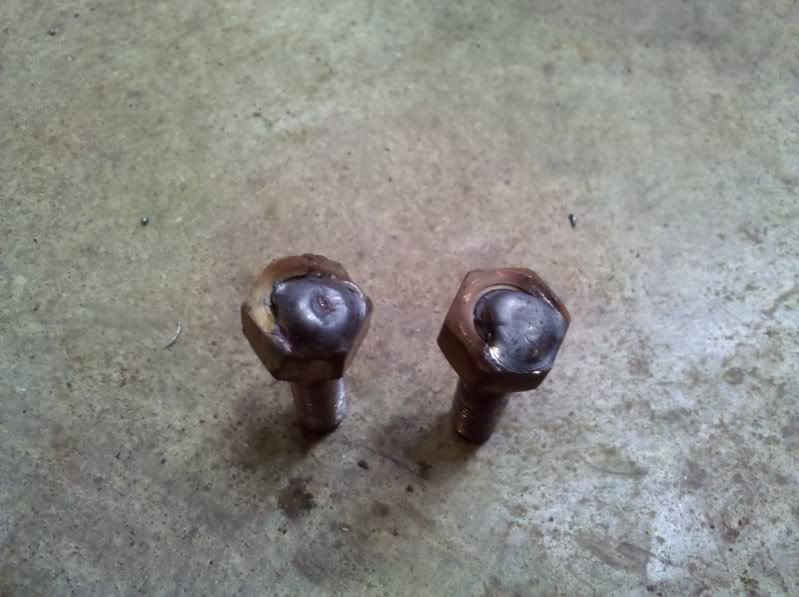
10. Now its time to remove all the old studs. Like I said, I used the old nuts and tacked them on to the stud to back them out. Both studs for the rear cylinder broke, so I welded 3/8" nuts to them to get them out.
All out!
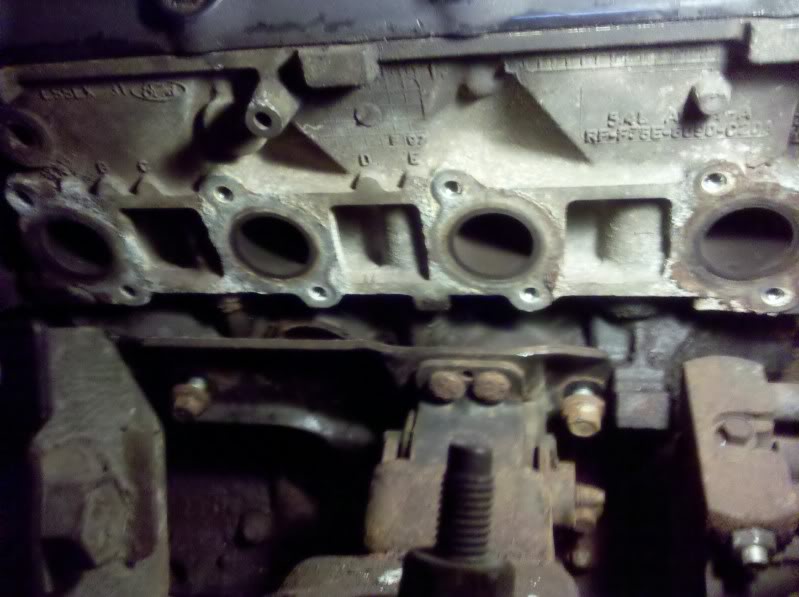
11. Clean the head surface.
12. Grab your new manifold (mine was Dorman, $59.99 on Amazon with free shipping), gasket, and some anti-seeze and get ready to put the new exhaust manifold on. Instead of replacing the studs with new studs, I decided to go with flange bolts and lock washers. Well, I actually decided on stainless bolts and lock washers, but all the hardware stores near me were out. So I used class 12.9 M8-1.25 pitch by 35mm bolts for the manifold. Use a generous amount of anti-seeze on the bolts and start installing the manifold. Make sure you get the gasket lined up!
13. Tighten all the bolts up using common sense/feel. Just take your time and work from top to bottom, inside out.

14. Lower the jack a little then tighten your motor mount bolts then lower the jack all the way.
15. Tighten your collector nuts. Anti-seeze wouldn't hurt here as well.
16. Replace the starter. (anti-seeze here too)
17. Before you put the inner fender back in, start the truck and listen! This step probably isn't required.. but hey if it isn't sealed you will know!
18. Replace your inner fender.
19. Smile, you just saved a ton of money doing this yourself!
Hope this helps anyone in the future!
If you are planning to do this on the weekend, start soaking everything in PB Blaster throughout the week!
1. Goes without saying. Jack up the truck and remove the passenger's side tire.
2. Remove your inner fender. If you can't do this without pics/instructions there is no way you can tackle this project
3. Soak the exhaust manifold nuts and collector nuts again with PB Blaster. Let it soak while your are...
4. Removing the starter. There is one stud on the bottom of the starter with a 13mm nut that you can get to with a wrench. On top of the starter, there are 2 13mm bolts. You will need a 3/8 ratchet and 6" extension to get these out. I just let in hang down. It makes more room and is a must.
5. Loosen the 3 13mm motor mount bolts, but don't take them all the way out. I backed mine out about 1/4" to 1/2". To get to the 2 toward the front of the engine, you will need at least 2 6" extensions and a swivel adapter. I used a 1/2" ratchet. The 1 toward the back of the engine is easy to get with a 6" extension and swivel adapter.
Front
Rear
6. Use your floor jack with a thick block of wood and put it under the oil pan and lift the engine. You only need to lift it about an inch or so to get a socket on the middle 2 lower exhaust studs. By lifting the engine it gives just enough room to get the deep socket in there.
7. Remove all the nuts, which if your lucky if they do break they will break flush with the manifold when they do. I also removed some of the top studs before taking the manifold off. I just tacked the nuts on and they came right out
8. Remove the exhaust collector nuts, you might need to cut them. Make sure you cut as close to the nut as possible so you have the most stud to work with. (I replaced mine with stainless bolts.)
9. Pry the exhaust back and pull the manifold off.
10. Now its time to remove all the old studs. Like I said, I used the old nuts and tacked them on to the stud to back them out. Both studs for the rear cylinder broke, so I welded 3/8" nuts to them to get them out.
All out!
11. Clean the head surface.
12. Grab your new manifold (mine was Dorman, $59.99 on Amazon with free shipping), gasket, and some anti-seeze and get ready to put the new exhaust manifold on. Instead of replacing the studs with new studs, I decided to go with flange bolts and lock washers. Well, I actually decided on stainless bolts and lock washers, but all the hardware stores near me were out. So I used class 12.9 M8-1.25 pitch by 35mm bolts for the manifold. Use a generous amount of anti-seeze on the bolts and start installing the manifold. Make sure you get the gasket lined up!
13. Tighten all the bolts up using common sense/feel. Just take your time and work from top to bottom, inside out.
14. Lower the jack a little then tighten your motor mount bolts then lower the jack all the way.
15. Tighten your collector nuts. Anti-seeze wouldn't hurt here as well.
16. Replace the starter. (anti-seeze here too)
17. Before you put the inner fender back in, start the truck and listen! This step probably isn't required.. but hey if it isn't sealed you will know!
18. Replace your inner fender.
19. Smile, you just saved a ton of money doing this yourself!
Hope this helps anyone in the future!

The following 3 users liked this post by DungBeetle:
07-19-2012, 01:43 AM
#2
Moved into engine HOW TO section 
10-01-2013, 08:36 PM
#4
TruckMaster
I'm doing it for a friend on his 4.6 and this will be helpful:]
 01-15-2014, 11:27 PM
#6
Junior Member

Join Date: Jan 2012
Location: oil springs, ONT.
Posts: 29
Likes: 0
Received 0 Likes
on
0 Posts
i have just tackled mine in my drive in minus 10 weather, no gararge so i read for days on other peoples experience before i jumped into it. 99 f150 4x4 extended cab sport 4.6 auto
here's a few tricks and short cuts i found doing mine,
these Short cuts are only IF your replacing the manifolds with new:
1) use a 4(6 inch works better) inch Grinder and cut the old log into 6 pieces.
2) cut exhaust flange studs i used 2 inch air cut off wheel(torchs are preffered but i was out of gas...dohh!! forgot to shut them off last time used)
3) if manfold to block nuts were rusted down to nothing like mine, grind half nut off and use punch to remove. at this point you have the entire manifold off. this whole process took 37 minutes. trust me at minus ten with wind chills colder i know exactly how long it took.
only on the 4.6, 5.4 apparently have more room because they are taller
1,2, and 3 are semi short cuts that affect nothing if your replacing manifolds so no worries. Now here is Where it got interesting, you can do the install WITHOUT removing Starter or loosening motor mount.
First remove all studs, mine where corroded bad but all came out but one with little effort, the one stud i think i used more cursing in one hour than i do all year but it was removed finally.
here's the trick why you don't have to loosen the motor mount, take a die Grinder and grind out a small semi circle from the mount where the two lower middle studs go (i'm talking less than 1/4 inch) the bolts are only 1/8 to 3/16 from threading on with unmodified mount. thread a stud and nut into those holes and you'll know if you have the room, doesn't affect mount integerity.
and BAM.... install your manifold as normal. no starter to re hook up or motor mount to fight with.
one word of caution.... the ford repair manual states to start torque from back top then back bottom and repeat going forward at 17-19 ft/lbs. not from center out, i don't know if this matters but i always try to follow OEM torque specs and patterns, run 3 heat cycles and retorque after each run.
mine took 8 long hours to complete but mine was the learning curve one lol, i just did my buddies and start to finish(besides hot run cycles) a hair over 3 hrs.
just a few lessons that i learned i thought i'ld share
03-10-2017, 01:25 AM
#7
Junior Member

Join Date: Mar 2017
Posts: 1
Likes: 0
Received 0 Likes
on
0 Posts
Thanks this tutorial it was helpful , only I had to remove the top two motor mount bolts in order for the motor to lift a couple inches for some reason . I did used an angle grinder to slice the lower flange studs cause they are a bitch without a proper deep socket . I considered grinding the motor mount but my grinder is kind of bulky and awkward to get in there but thats a good idea
I used bolts too ,but I may have over torqued a couple of them .I do not plan to remove the starter and jack the motor again just to re-torque .They're holding nicely now time will tell.I do recommend using studs and nuts instead cause the chances of striping threads is too great with bolts. Also the flange nuts didn't require to be tightened that much .
I used bolts too ,but I may have over torqued a couple of them .I do not plan to remove the starter and jack the motor again just to re-torque .They're holding nicely now time will tell.I do recommend using studs and nuts instead cause the chances of striping threads is too great with bolts. Also the flange nuts didn't require to be tightened that much .

