How-to: Build your own Exhaust
 03-16-2011, 08:23 PM
#1
Squishy Heads
Thread Starter
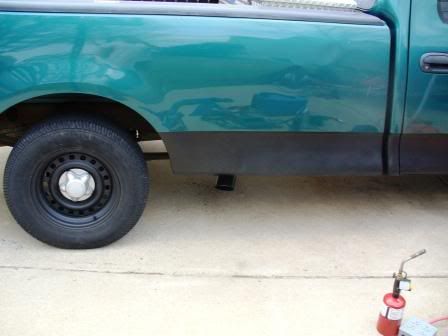
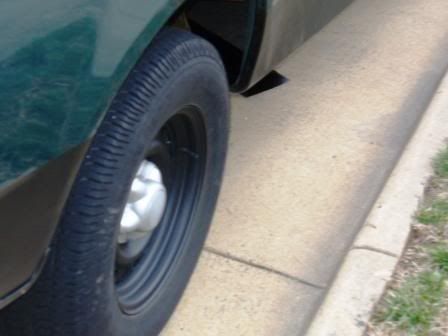
This is for a Side exit before the rear tire.
Okay so I finally got around to putting my Hooker Aerochamber in with my 4in tip. This is how I did it, hopefully it will help some of you that want to do it yourself.
Note: I welded all my pipes but you can use clamps if you don't have a welder. I just prefer welding because it looks better and seals for longer than clamps.
You do this at your own risk, this write up I did is just for ideas and examples in the hope that I can help people think of ideas to do things themselves instead of spending *** loads of money to get it done. All together everything cost me about $140
AeroChamber $71
Black 2.5in tip $31
Miscellaneous exhaust tubing $30
Here is what you will need:
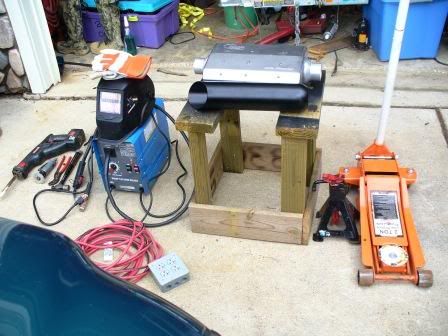
Beer
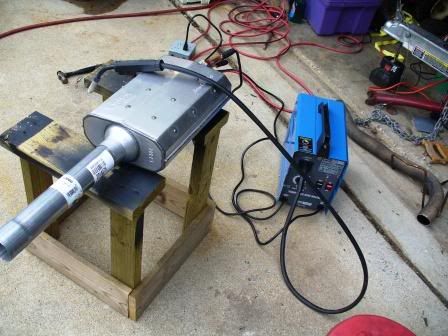
Welder (or clamps)
Welding Helmet
Gloves
Legs off of a pair of old jeans
Heavy Duty Extension Cord
Sawzall (or something similar)
Cut off wheel
Channel Locks
Hammer
Air Compressor
Floor Jack
Jack Stand(s)
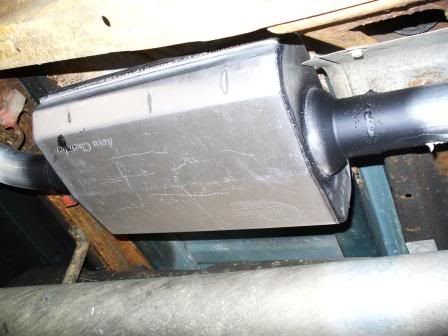
New Muffler (Mine is a Hooker AeroChamber Part number HOK-21516HKR)
Exhaust Tip (Part Number JEX-JAC418-BV)
Other Miscellaneous Exhaust tubing (NAPA and Quest usually have the best stock)
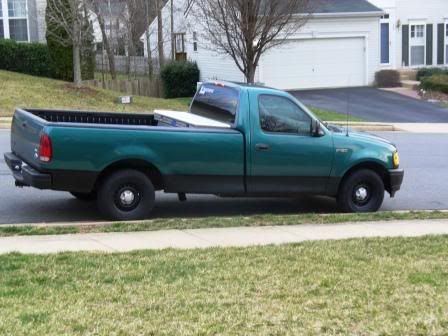
1. First thing you need to do is Drink Beer, then jack up one side (or both) of your truck and put a jack stand under it so you have some room to work. Next disconnect your negative battery terminal for good measure.
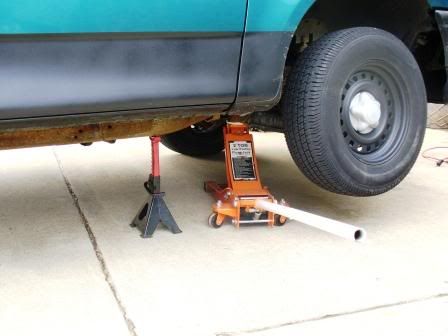
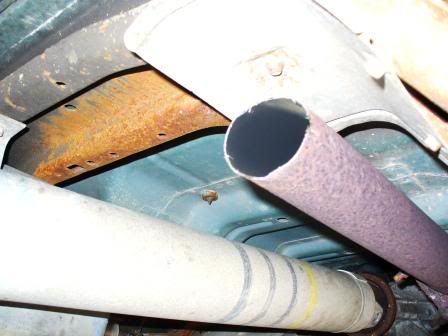
2. What you need to do now is go under the truck and decide where you want to cut first. My truck had the exhaust replaced by the original owner and it came out before the rear wheel. I prefer it like this anyway so it made it easy for me. If you want it after the rear wheel it's basically the same thing except you wont be able to take things in and out to weld them and fit.
I decided to cut mine right in front of the old muffler. Later on I realized this wouldn't work because there is a cross member right above the cut and the new muffler wouldn't fit, so I had to add a length of pipe in to move the muffler back some.
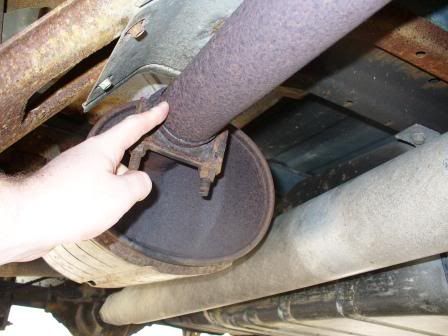
3. After you made your cut now you want to remove your exhaust from it's hangers so you can get it out. It helps to use channel locks for this, put one jaw on the back of the rubber mount and the other jaw over the metal stud that runs through it and SQUEEZE! This will help you get it started so you can get it out. Also WD-40 goes a long way here.
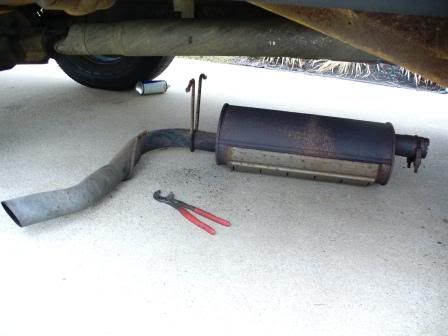
Note: this is only if you want an exhaust before the rear tire, if you want to keep yours behind the tire don't do this step. Just cut your muffler out completely, and then weld or clamp a new one in it's place.
4. Now take your old muffler and tubing and beat small children with it.. or you can just toss it.
Okay so I finally got around to putting my Hooker Aerochamber in with my 4in tip. This is how I did it, hopefully it will help some of you that want to do it yourself.
Note: I welded all my pipes but you can use clamps if you don't have a welder. I just prefer welding because it looks better and seals for longer than clamps.
You do this at your own risk, this write up I did is just for ideas and examples in the hope that I can help people think of ideas to do things themselves instead of spending *** loads of money to get it done. All together everything cost me about $140
AeroChamber $71
Black 2.5in tip $31
Miscellaneous exhaust tubing $30
Here is what you will need:
Beer
Welder (or clamps)
Welding Helmet
Gloves
Legs off of a pair of old jeans
Heavy Duty Extension Cord
Sawzall (or something similar)
Cut off wheel
Channel Locks
Hammer
Air Compressor
Floor Jack
Jack Stand(s)
New Muffler (Mine is a Hooker AeroChamber Part number HOK-21516HKR)
Exhaust Tip (Part Number JEX-JAC418-BV)
Other Miscellaneous Exhaust tubing (NAPA and Quest usually have the best stock)
1. First thing you need to do is Drink Beer, then jack up one side (or both) of your truck and put a jack stand under it so you have some room to work. Next disconnect your negative battery terminal for good measure.
2. What you need to do now is go under the truck and decide where you want to cut first. My truck had the exhaust replaced by the original owner and it came out before the rear wheel. I prefer it like this anyway so it made it easy for me. If you want it after the rear wheel it's basically the same thing except you wont be able to take things in and out to weld them and fit.
I decided to cut mine right in front of the old muffler. Later on I realized this wouldn't work because there is a cross member right above the cut and the new muffler wouldn't fit, so I had to add a length of pipe in to move the muffler back some.
3. After you made your cut now you want to remove your exhaust from it's hangers so you can get it out. It helps to use channel locks for this, put one jaw on the back of the rubber mount and the other jaw over the metal stud that runs through it and SQUEEZE! This will help you get it started so you can get it out. Also WD-40 goes a long way here.
Note: this is only if you want an exhaust before the rear tire, if you want to keep yours behind the tire don't do this step. Just cut your muffler out completely, and then weld or clamp a new one in it's place.
4. Now take your old muffler and tubing and beat small children with it.. or you can just toss it.
Last edited by bradseabridge; 03-21-2011 at 11:23 AM.
 03-16-2011, 08:23 PM
#2
Squishy Heads
Thread Starter
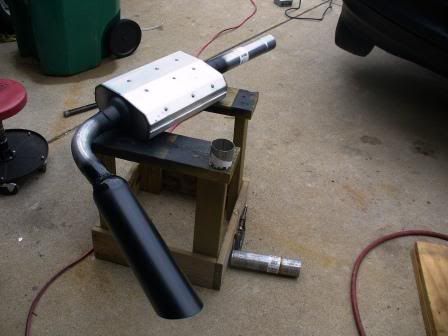
5. Okay the next thing I did was Drink Beer (you should too) and then went under the truck with the new muffler and the piece of pipe extension to figure out where I wanted to mount the muffler. I needed the muffler far enough forward that I would be able to put my 90degree bend on the exit of the muffler and it not hit on my spring perches.
This step takes some time and some thinking, I use makers to mark all the pipes so that when I go to weld I know exactly how to line them up. I also use my floor jack to support my muffler so that I can get the positioning right. The old saying measure twice cut once applies here.
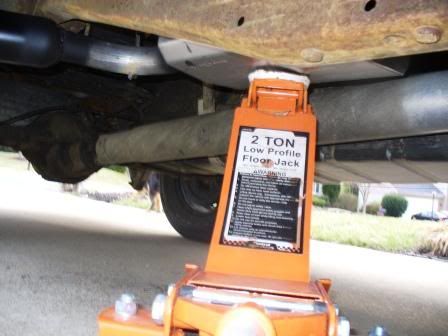
After my measurements this is how long I decided my inlet pipe needed to be to just clear my cross member and give me the perfect amount of room to mount my 90 without any interference.
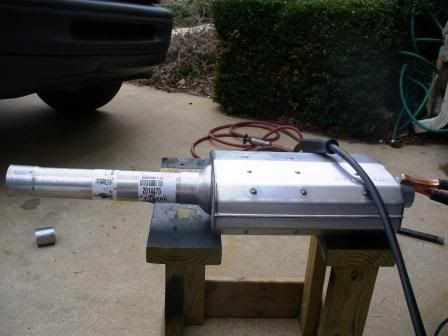
6. Weld or clamp your extension to the inlet of your new muffler.
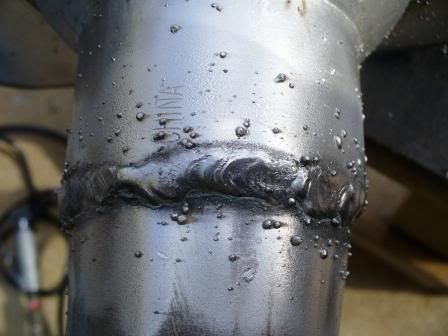
I was using a flux core welder today because I didn't feel like driving to Richmond to use my MIG. So don't mind the splatter, it does the job just not as pretty.
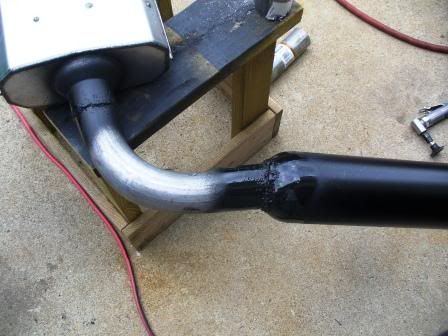
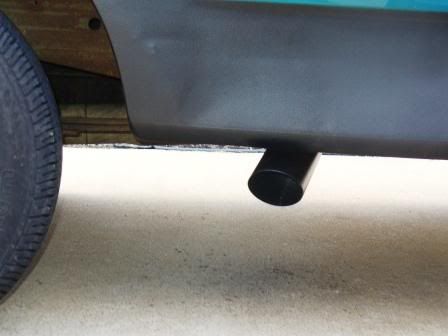
7. Go back under your truck and slide your freshly welded exhaust and extension on to your forward cut exhaust pipe. Use the floor jack to hold the muffler level and insert the 90 degree bend into the exit of the muffler. Cut to length and position how you want it to be so that once you weld your tip on the tip wont touch and vibrate on your rocker panel. After you have it aligned how you want it you can either throw a few tack welds on there like I did, or you can just throw a clamp on your front pipe extension and put a clam on the exit of the muffler to hold your 90 in and be done with it.
In my case I put a few tack welds in to hold it where I wanted it to be and took the whole assembly out again and welded my 90 to the exit flange of the muffler.
8. Skip this step if you aren't using a welder because there is no way to mount your exhaust tip without one.
If you are welding put everything back under the truck again, slide your new muffler and extension on to your existing exhaust pipe that you cut, put the floor jack back underneath the muffler to make it level or at the height you want, this part is crucial for proper tip placement.
After your have your exhaust back in get your tip and put it on the end of your 90 and position it to your liking, I positioned mine so that it is slanting back slightly and the slant edge is pointing up. Once you get this done it is kind of tricky to hold it in place and put a few tacks on it at the same time.
The inlet for the tip is actually a little bigger than my exhaust tubing so it made this hard to get a good tack on both the exhaust pipe and the tip.
Once you get your tacks in take it all back out AGAIN and weld your tip on. This was the hardest part for me because almost half of the tip inlet wasn't touching the exhaust pipe so I had to use a lot of tacks and like build them together. If you are familiar with welding you will know what I'm talking about, it's the same as filling a hole with a welder.
I painted all my joints with black paint to keep them from rusting out on me, there isn't anything I hate more on a vehicle when a friggen exhaust weld fails.
This step takes some time and some thinking, I use makers to mark all the pipes so that when I go to weld I know exactly how to line them up. I also use my floor jack to support my muffler so that I can get the positioning right. The old saying measure twice cut once applies here.
After my measurements this is how long I decided my inlet pipe needed to be to just clear my cross member and give me the perfect amount of room to mount my 90 without any interference.
6. Weld or clamp your extension to the inlet of your new muffler.
I was using a flux core welder today because I didn't feel like driving to Richmond to use my MIG. So don't mind the splatter, it does the job just not as pretty.
7. Go back under your truck and slide your freshly welded exhaust and extension on to your forward cut exhaust pipe. Use the floor jack to hold the muffler level and insert the 90 degree bend into the exit of the muffler. Cut to length and position how you want it to be so that once you weld your tip on the tip wont touch and vibrate on your rocker panel. After you have it aligned how you want it you can either throw a few tack welds on there like I did, or you can just throw a clamp on your front pipe extension and put a clam on the exit of the muffler to hold your 90 in and be done with it.
In my case I put a few tack welds in to hold it where I wanted it to be and took the whole assembly out again and welded my 90 to the exit flange of the muffler.
8. Skip this step if you aren't using a welder because there is no way to mount your exhaust tip without one.
If you are welding put everything back under the truck again, slide your new muffler and extension on to your existing exhaust pipe that you cut, put the floor jack back underneath the muffler to make it level or at the height you want, this part is crucial for proper tip placement.
After your have your exhaust back in get your tip and put it on the end of your 90 and position it to your liking, I positioned mine so that it is slanting back slightly and the slant edge is pointing up. Once you get this done it is kind of tricky to hold it in place and put a few tacks on it at the same time.
The inlet for the tip is actually a little bigger than my exhaust tubing so it made this hard to get a good tack on both the exhaust pipe and the tip.
Once you get your tacks in take it all back out AGAIN and weld your tip on. This was the hardest part for me because almost half of the tip inlet wasn't touching the exhaust pipe so I had to use a lot of tacks and like build them together. If you are familiar with welding you will know what I'm talking about, it's the same as filling a hole with a welder.
I painted all my joints with black paint to keep them from rusting out on me, there isn't anything I hate more on a vehicle when a friggen exhaust weld fails.
Last edited by bradseabridge; 03-16-2011 at 08:42 PM.
03-16-2011, 08:28 PM
#3
Squishy Heads
Thread Starter
9. Okay skip this again if you are using clamps because your exhaust is already in and clamped up.
Now Drink Beer and put your freshly welded and painted exhaust back under the truck hook it up in the front, put your floor jack under it and jack it up to the point your exhaust tip is close to your rocker panel but not close enough to touch.
Then you can either clamp your front joint or you can weld it under the truck. This is what I did, it is a PITA but once you get the hang of it it's not too bad.
10. Now that everything is either welded or clamped it's time to put your exhaust hangers back on, all you none welding people will probably need to go to a shop and have them weld a hanger stud onto your new exhaust that will work with an existing hanger. Or you can get one of those replacement hangers from Autozone that uses an exhaust clamp and a bolt through some structure under the truck to hang the exhaust.
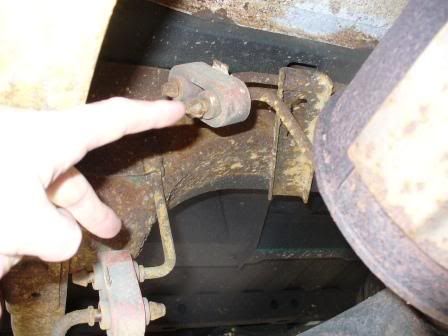
I just used one of the old hanger studs, cut it off with my cut off wheel and welded it to my exhaust right under an existing rubber hanger. I welded it straight then I heated up the hanger stud and bent it around the bottom of the exhaust pipe and then welded that part.
I just cut one of these old hanger studs off and used that.
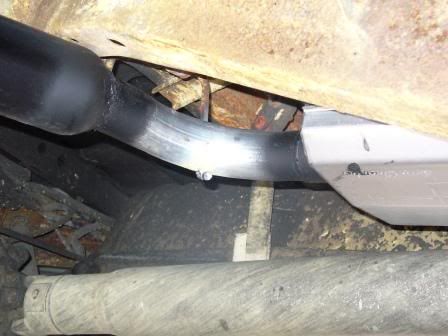

It's hard to see in this pic but it's right between the exhaust tip and the muffler, mounted to the back side of my 90 elbow.
11. Lower truck and clean up tools.
You are now finished, sit back and bask in glory that you saved a lot of money and you have the feeling of accomplishment that you wouldn't have gotten other wise. Now, drink beer.
Also IMHO the Hooker Aerochambers sound way better than the Magnaflows or anything else. This is the 3rd vehicle I have run them and they are great, and they sound AMAZING. There is ZERO drone once your in the cruising range of whatever gear you are in. However if you are on the throttle it opens up and sounds great.
If you have any questions or you would like some more pictures let me know I can do that.
Now Drink Beer and put your freshly welded and painted exhaust back under the truck hook it up in the front, put your floor jack under it and jack it up to the point your exhaust tip is close to your rocker panel but not close enough to touch.
Then you can either clamp your front joint or you can weld it under the truck. This is what I did, it is a PITA but once you get the hang of it it's not too bad.
10. Now that everything is either welded or clamped it's time to put your exhaust hangers back on, all you none welding people will probably need to go to a shop and have them weld a hanger stud onto your new exhaust that will work with an existing hanger. Or you can get one of those replacement hangers from Autozone that uses an exhaust clamp and a bolt through some structure under the truck to hang the exhaust.
I just used one of the old hanger studs, cut it off with my cut off wheel and welded it to my exhaust right under an existing rubber hanger. I welded it straight then I heated up the hanger stud and bent it around the bottom of the exhaust pipe and then welded that part.
I just cut one of these old hanger studs off and used that.
It's hard to see in this pic but it's right between the exhaust tip and the muffler, mounted to the back side of my 90 elbow.
11. Lower truck and clean up tools.
You are now finished, sit back and bask in glory that you saved a lot of money and you have the feeling of accomplishment that you wouldn't have gotten other wise. Now, drink beer.
Also IMHO the Hooker Aerochambers sound way better than the Magnaflows or anything else. This is the 3rd vehicle I have run them and they are great, and they sound AMAZING. There is ZERO drone once your in the cruising range of whatever gear you are in. However if you are on the throttle it opens up and sounds great.
If you have any questions or you would like some more pictures let me know I can do that.
Last edited by bradseabridge; 03-16-2011 at 08:42 PM.
The following users liked this post:
Rvan (11-02-2014)

 03-16-2011, 09:01 PM
#5
Squishy Heads
Thread Starter
Thanks, I'm pretty happy with it. I was gonna put more pics in for the parts that are kind of vague but it would have been way to long at that point.
Did I mention is SOUNDS GREAT?!
Did I mention is SOUNDS GREAT?!


Trending Topics

 08-29-2011, 05:00 PM
#10
Senior Member
Great.... now I have the urge to drink a beer and watch someone weld my exhaust... only because I don't have a welder of my own, oh how I wish I did. Sucks to know how to weld, but not to be able to because you don't have the equipment.... Grrr