Front Bumper Parking Aids
 06-28-2012, 03:39 PM
#1
Senior Member
Thread Starter

The 2012 F150 I just bought is the biggest vehicle I've ever owned. I've been having trouble navigating tight spaces, and pulling in and out of parking spaces. I realized it would be a lot easier if I knew: (1) where the front wheels really were and (2) where the corners of the front bumper were. So here's what I did:
First, I put some suction cups from Harbor Freight on the hood directly above the front tires so that while looking over the top of the hood I can see where the tires are, and hence where the truck will turn.
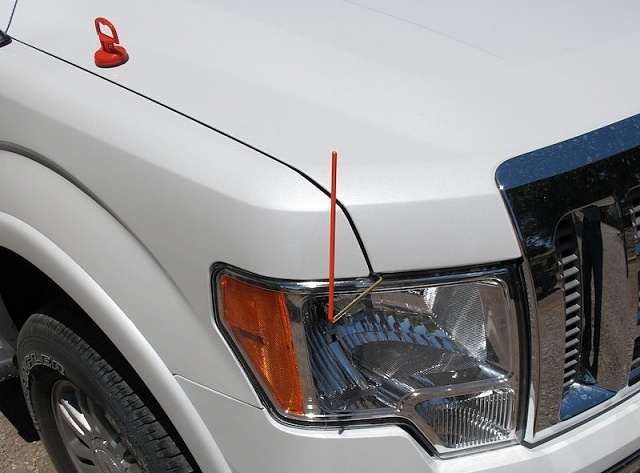
Second, I fabricated some markers that I can see while driving and that show me where the front corners of the front bumper are.
Here's a picture:
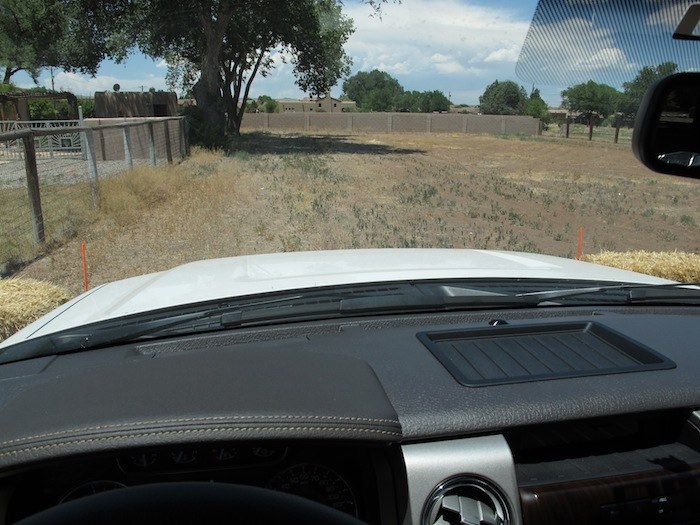
And here's what the bumper markers look like from the driver's seat (with the suction cups removed):

Mounting the suction cups should require no explanation, so I'll concentrate on the bumper markers. Here's a picture showing how they extend out into the air above the corner of each bumper:

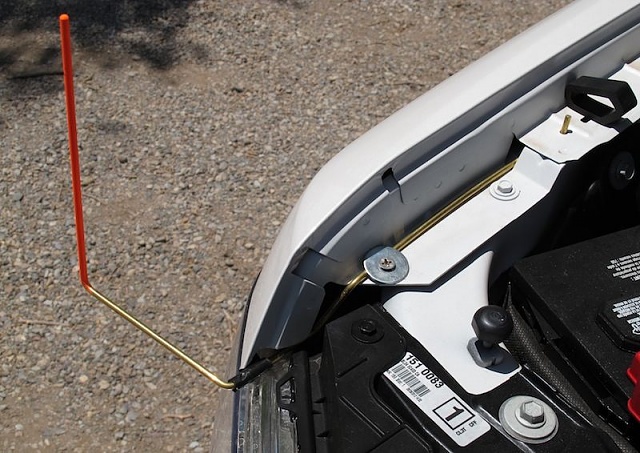
And here's a close look at the installation of one:
Fabrication was straightforward:
(1) I found two pre-existing holes in convenient places, so I didn't have to do any drilling.
(2) I straightened a 3' piece of 12 gauge solid copper wire (the kind used for electrical wiring in houses).
(3) Then I created a model of what I wanted by carefully bending and fitting the copper wire into the somewhat convoluted shape that the marker needed to be. I used long-nose pliers to make sharp bends, and kept re-bending and re-fitting the wire until it fit correctly.
(4) Then I took my model into the workshop and used it to bend a 3' long piece of 3/16" diameter brass rod into the exact same shape. Starting at the outside tip (that sticks up into the air) I held the wire model next to the brass rod, marked the bend spot with a Sharpie, put the rod in my vice and carefully bent the rod in the extact direction and to the exact angle needed to match the model. I repeated this for each segment until all the bends were in place, then cut off the excess length: resulting in the rod being an exact copy of the model.
WARNING: Be careful not to bend the brass rod too far. If you do this then try to bend it back it will break. You can only bend it "forward" to a desired final angle -- there's no going back.
(5) I cut a piece of rubber tubing into a 1" length, slit it lengthwise, then placed it on the rod where the hood would close on it. This helps keep the rod from scraping the paint where it emerges from under the hood.
(6) I sprayed the segment of the rod that would extend into the air with dayglow orange paint. The brightest I've found I got from the local hobby shop. It's from Krylon's "Shortcut" line, which is a series of dinky little cans of spray paint. Then I let it dry.
(7) To install it I jockeyed the tail end of the rod into the pre-existing hole towards the rear (seen in the picture above). Then I laid the rod in place, extending forward towards the front of the truck, flexing it slightly as needed to get it to fit into place and checked for a good fit.
(8) Then I bolted it into place using a second pre-existing hole. I used a large, thick fender washer to clamp the rod down, and used a short 1/4" bolt on top and a nylon filled metal nut from the bottom.
These parking aids have really helped me a lot. I think of them as training wheels that I can take off once I've gained a satisfactory level of proficiency.
First, I put some suction cups from Harbor Freight on the hood directly above the front tires so that while looking over the top of the hood I can see where the tires are, and hence where the truck will turn.
Second, I fabricated some markers that I can see while driving and that show me where the front corners of the front bumper are.
Here's a picture:

And here's what the bumper markers look like from the driver's seat (with the suction cups removed):
Mounting the suction cups should require no explanation, so I'll concentrate on the bumper markers. Here's a picture showing how they extend out into the air above the corner of each bumper:

And here's a close look at the installation of one:

Fabrication was straightforward:
(1) I found two pre-existing holes in convenient places, so I didn't have to do any drilling.
(2) I straightened a 3' piece of 12 gauge solid copper wire (the kind used for electrical wiring in houses).
(3) Then I created a model of what I wanted by carefully bending and fitting the copper wire into the somewhat convoluted shape that the marker needed to be. I used long-nose pliers to make sharp bends, and kept re-bending and re-fitting the wire until it fit correctly.
(4) Then I took my model into the workshop and used it to bend a 3' long piece of 3/16" diameter brass rod into the exact same shape. Starting at the outside tip (that sticks up into the air) I held the wire model next to the brass rod, marked the bend spot with a Sharpie, put the rod in my vice and carefully bent the rod in the extact direction and to the exact angle needed to match the model. I repeated this for each segment until all the bends were in place, then cut off the excess length: resulting in the rod being an exact copy of the model.
WARNING: Be careful not to bend the brass rod too far. If you do this then try to bend it back it will break. You can only bend it "forward" to a desired final angle -- there's no going back.
(5) I cut a piece of rubber tubing into a 1" length, slit it lengthwise, then placed it on the rod where the hood would close on it. This helps keep the rod from scraping the paint where it emerges from under the hood.
(6) I sprayed the segment of the rod that would extend into the air with dayglow orange paint. The brightest I've found I got from the local hobby shop. It's from Krylon's "Shortcut" line, which is a series of dinky little cans of spray paint. Then I let it dry.
(7) To install it I jockeyed the tail end of the rod into the pre-existing hole towards the rear (seen in the picture above). Then I laid the rod in place, extending forward towards the front of the truck, flexing it slightly as needed to get it to fit into place and checked for a good fit.
(8) Then I bolted it into place using a second pre-existing hole. I used a large, thick fender washer to clamp the rod down, and used a short 1/4" bolt on top and a nylon filled metal nut from the bottom.
These parking aids have really helped me a lot. I think of them as training wheels that I can take off once I've gained a satisfactory level of proficiency.
Last edited by billf; 06-28-2012 at 03:41 PM.

The following 3 users liked this post by billf:
The following users liked this post:
FordFrenzy06 (07-02-2018)
02-24-2014, 12:04 PM
#3

The following users liked this post:
Powerlifter405 (07-06-2021)

The following 2 users liked this post by venatic:
Brett2013fx4 (01-03-2016),
devinsdad (07-26-2017)
02-24-2014, 12:25 PM
#5
^^^^YEEESSS haha now I know I'm not the only one that does this on this thread xD ALWAYS PARK IN THE BACK, unless there's a creepy man in the back with a trench coat trying to sell you stuff children
 09-11-2014, 01:43 PM
#7
Member

Join Date: Aug 2014
Location: PA
Posts: 46
Likes: 0
Received 0 Likes
on
0 Posts
You got to park away from all the crazy's in the parking lot.
Heck even in my small Evo I park in the back so I don't get sideswiped from people that don't have these bright orange electrical antenna's to tell them where their front end is.
Heck even in my small Evo I park in the back so I don't get sideswiped from people that don't have these bright orange electrical antenna's to tell them where their front end is.
Trending Topics
 10-12-2015, 11:56 AM
#9

That's a pretty clever setup to train you, hopefully you are able to remove them soon. A less visible but equally effective solution might be to install the front/rear (8 sensor) parking aids which sense the distance and can warn you audibly and visibly with a small indicator you can mount on the dash.
Have to admit that now I'm spoiled now as Ford put these on some of the new F-150s along with a 360 degree camera. Extremely helpful when negotiating tight spots.
Have to admit that now I'm spoiled now as Ford put these on some of the new F-150s along with a 360 degree camera. Extremely helpful when negotiating tight spots.
The following users liked this post:
tbear853 (03-08-2021)
10-15-2015, 05:29 PM
#10

On my new '15 XLT F150 I have the rear back warning, but nothing for the front. Having a hard time getting close to things. Is there anything aftermarket that will integrate with the audio in the trucks?