When you click on links to various merchants on this site and make a purchase, this can result in this site earning a commission. Affiliate programs and affiliations include, but are not limited to, the eBay Partner Network.
I found that the exhaust manifold gasket was blown and the exhaust manifold was warped.
So, I started the job by removing the drivers side tire and the inner fender well. The inner fender well takes 4 bolts and a few plastic clips. I used needle nose to push the clips through for the harness that was mounted on the top side of the inner well..
The next job was to zip tie all of the wires up out of my way so I could work. I removed the connectors and vacuum lines from the turbo. I then removed the stock cai and the pipes going to the turbo. Then I removed the nut for the plunger rod on the wastegate. Be sure you do not move the top nut as that is your adjustment nut. I just put the bottom nut back on and snugged it to lock them in place. I then removed the 3 bolts that hold the wastegate to the turbo.
I had to make a wrench to fit the nut for the coolant line right on top of the turbo. If you are careful you can use an o-ring pick to remove the keeper and the line will just pop out of the connector. If you cant, I used the closed end of a 3/4" 6 point wrench and just notched the left side of it so the line would slip through the notch.
Next you can disconnect your down pipe and get it out of the way if possible. Then, also from the bottom side, there are 2 bolts holding the oil feed to the bottom of the turbo, they take a torx socket, I don't remember the size. Remove those 2 bolts. There will also be a bolt holding the turbo to the block, it is just above the oil feed, remove it from the bottom next.
Next, there is the coolant in feed line. Follow it up to where it bolts to the block. There is a bracket coming off of the line, remove the bolt holding it in (another torx). After that, remove the 3 torx bolts holding the turbo to the manifold. When you do that, give the coolant in feed line a little wiggle and it should pull out. You should be able to remove the turbo then.
After that I would give the exhaust manifold studs a good coating of pb blaster and let it sit. Then remove them with a ratchet or impact.
I decided to replace the manifold and gasket before I ever pulled it off because you might as well replace the manifold while you are in there as they are only $60 or so. I cleaned the head up next.
I did not do this but I think it would have been easier If I had, next you need to take the nuts off of the exhaust studs and put the studs in the head. This allows you to slide the gasket on and it will hold it in place for you. Then put your manifold back on. I used a cross torque pattern to tighten the nuts down which I feel is very necessary to compress the gasket correctly.
After that you can put the turbo back in. I also replaced the gasket between the turbo and the manifold ($9). It is a bit aggravating to get the turbo back in place with the coolant line still attached but believe me, it is easier than trying to get the line back connected to the turbo once its in place. You should be able to align the coolant tube with the connector in the block easily. Put the 3 bolts in the turbo flange and start easing it into place.
Once you get it close you should be able to push the coolant tube all the way back into the connector in the block and put the bolt back in the bracket. You will need to make a few rounds on the bolts on the turbo flange to make sure you compress the gasket. After that it should be pretty self explanatory.
I just wanted to give a first hand opinion on the order things could be done to make it easier.
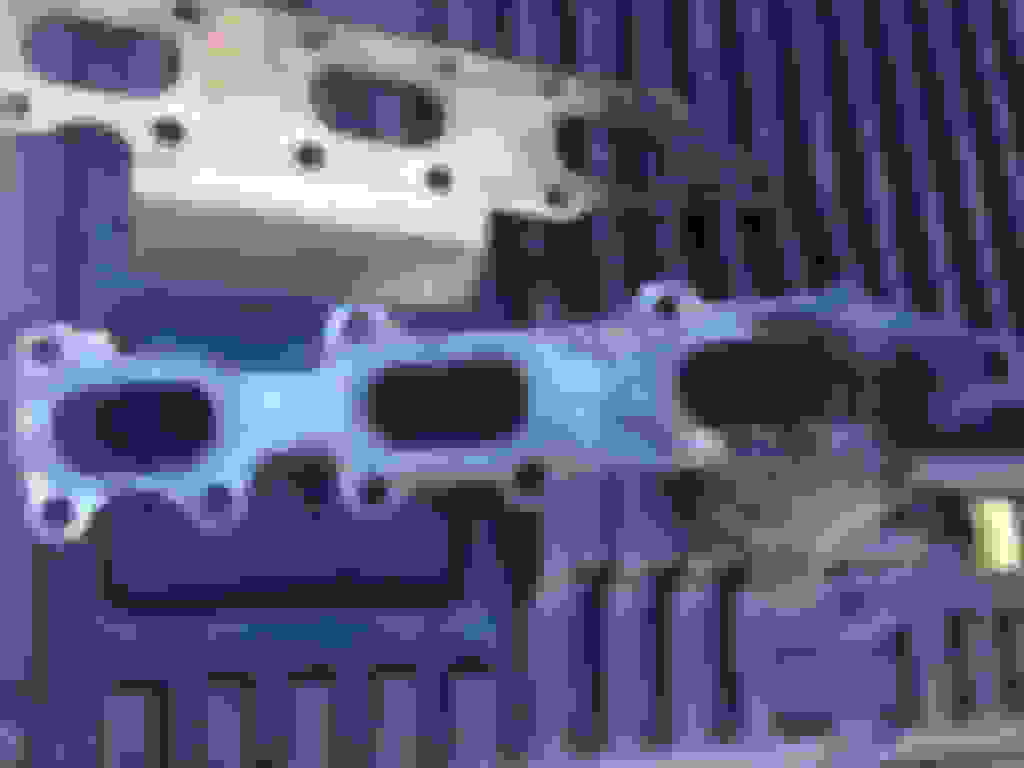
Here are the pics of my manifold and gasket. The design is terrible on the manifolds and it is easy to see why they blow out and warp because they have NO support over a very large area.
You are right. That manifold should have had 4 bolts around each exhaust port. I suspect that will be a routine repair for boost owners. Great write up to help other owners out. Thanks!!
Excellent job of descriptive analysis and repairs. I would suspect that manifold was defective from the git-go. Possibly the last nut never secured/torqued properly.
Looks like Ford already figured this out - comparing the two manifolds in the pics, the edge leading to the last port on the new manifold looks significantly thicker than your factory log.
The markings also changed...FoMoCo NY2 to NYF? Just a build date stamp, or something else?
What year is your truck? I'm curious if this was part of the refresh; if not, I'm gonna snag new ones for my '13 the next time my lift is open.
I think it is just camera angle that makes it look thicker.
Look at the mount on the right. You can see where the metal is thinner on the old one, then thickening up to the mounting locations. The new one appears to be thicker metal leading to the outside mount. It does appear to be a more solid piece. Hopefully this one lasts you quite a while.
Would be nice if this could be made a sticky or something seeing as how others have had the same issue. It may save someone a lot of time and effort of searching for answers like I did. It basically took me 5 months to come up with any kind of reasonable answer and I just took the chance by diving in and trying it.
 10-25-2014, 05:44 PM