Lightning Headlight MH1 Projector Retrofit guide!!!
 02-17-2013, 04:18 PM
#1
Resident light whore
Thread Starter

I know you guys have been waiting for this for a while, so here we go. First off all, I'm going to answer a few common questions.
Why retrofit? A retrofit allow you to have a more useable set of HID's that do not blind oncoming traffic or scatter the light. And also by using a factory style light they will fit better(and IMO look better) than any of the 1 piece projectors they make for our trucks.
Why use the Morimoto Mini H1 kit? This kit uses a projector design that requires NO CUTTING, thats right, no cutting. They aim themselves when installed correctly(you have to fine tune with the actual housing) and they still perform as well as the FX-R. Its a simple install for the beginer or somebody who wants to do it in one day.
Now to begin, you will need several supplies
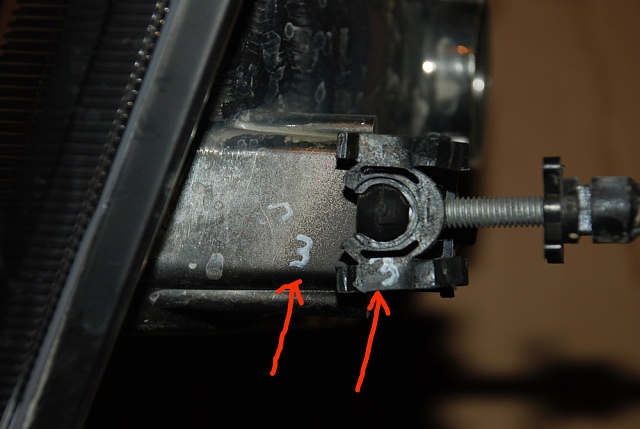
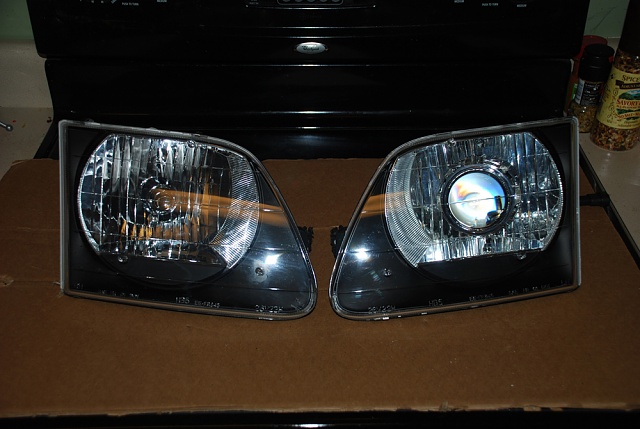
Now mark which side the aiming brackets on the rear attatch to with the paint pen, marking them 1, 2, 3 so they go back to their proper location
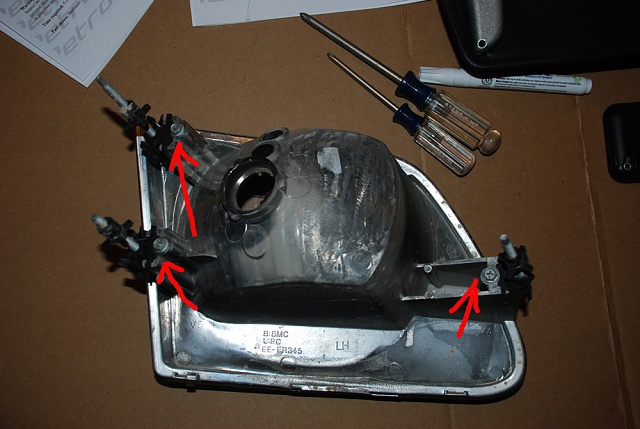
now take them off using a screw driver
Preheat your oven to 200 and place a piece of cardboard on the rack to help protect the light and bake for 10 minutes
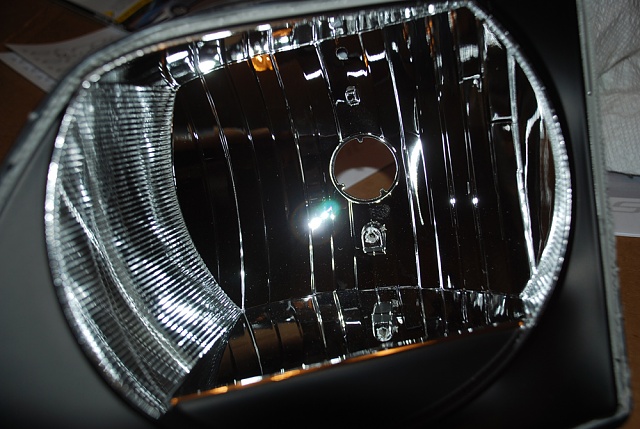
after it bakes you'll pull it our quickly, and start on a corner prying your lens off, it will be hard at first but once it starts to open, work down the joint and then the lense will just pop off. If the glue quits stretching stop and bake it again for like 5 min to re soften it and try again
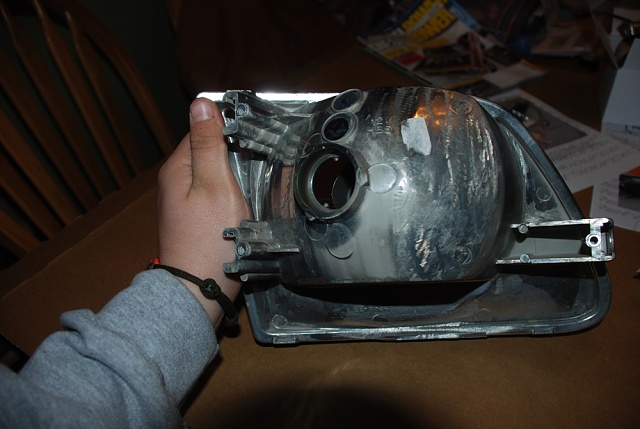
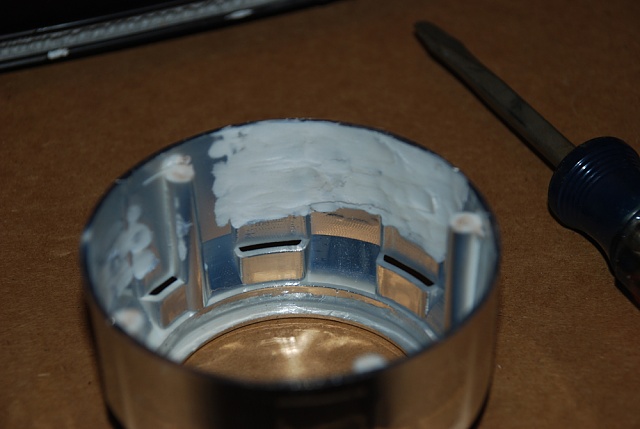
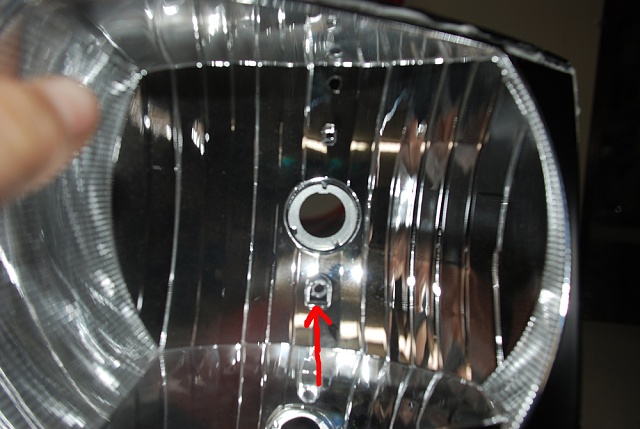
once you get the lense off you have to remove your glare cap, it will just be screwed on, once you unscrew it you can pull out on it and it will come free, looking like this
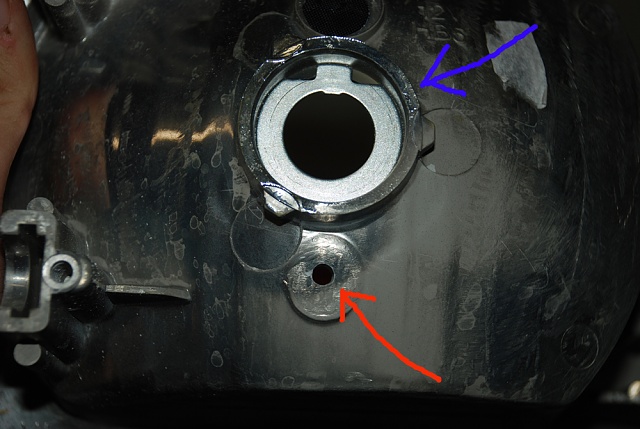
then you will place the alignment plate in the bulb opening, use a square to make certain the alignment notches are vertical and at 90 degrees, this makes sure that your cutoff will be level when you have them mounted (blue arrow, red comes in later)
since its limiting my attachments I have to brake my post, hold off on posts till I finish please
Why retrofit? A retrofit allow you to have a more useable set of HID's that do not blind oncoming traffic or scatter the light. And also by using a factory style light they will fit better(and IMO look better) than any of the 1 piece projectors they make for our trucks.
Why use the Morimoto Mini H1 kit? This kit uses a projector design that requires NO CUTTING, thats right, no cutting. They aim themselves when installed correctly(you have to fine tune with the actual housing) and they still perform as well as the FX-R. Its a simple install for the beginer or somebody who wants to do it in one day.
Now to begin, you will need several supplies
- Morimoto MH1 projector kit from theretrofitsource.com. I used the 5k bulbs(ultra white, supposed to be the most practical color bulb), Mini Gatling Gun shrouds(you can not go any bigger because they will not fit in the housing), 9007 harness, resealing glue, and the 3Five ballasts http://www.theretrofitsource.com/pro...roducts_id=227
- JB kwick epoxy since it sets fast
- assorted screwdrivers
- small pry bar or flathead screwdriver
- a sets of needlenose pliers, ase of the bent 90 degree ones if you have them
- oven
- oven timer or your phone
- gloves
- some glass cleaner wipes
- big pieces of cardboard and a big towel or something to cover your work space and save your lenses
- bowl, or bag to save your hardware
- a paint pen
- paint of your color choice if you want to go custom, its plastic so youll want to spray some adhesion promoter first so it'll stick
- dremel tool with a cutoff wheel and grinding drum
- drill and small drill bits
- a 9V battery to test your cutoff shields(AKA high beams)
- some silicon or lithium grease
- lots of your favorite cold beverage, and a big bowl of patience

Now mark which side the aiming brackets on the rear attatch to with the paint pen, marking them 1, 2, 3 so they go back to their proper location


now take them off using a screw driver

Preheat your oven to 200 and place a piece of cardboard on the rack to help protect the light and bake for 10 minutes
after it bakes you'll pull it our quickly, and start on a corner prying your lens off, it will be hard at first but once it starts to open, work down the joint and then the lense will just pop off. If the glue quits stretching stop and bake it again for like 5 min to re soften it and try again
once you get the lense off you have to remove your glare cap, it will just be screwed on, once you unscrew it you can pull out on it and it will come free, looking like this

then you will place the alignment plate in the bulb opening, use a square to make certain the alignment notches are vertical and at 90 degrees, this makes sure that your cutoff will be level when you have them mounted (blue arrow, red comes in later)

since its limiting my attachments I have to brake my post, hold off on posts till I finish please
Last edited by BrowningSCrew; 02-17-2013 at 09:52 PM.

The following 3 users liked this post by BrowningSCrew:
02-17-2013, 04:57 PM
#2
Resident light whore
Thread Starter
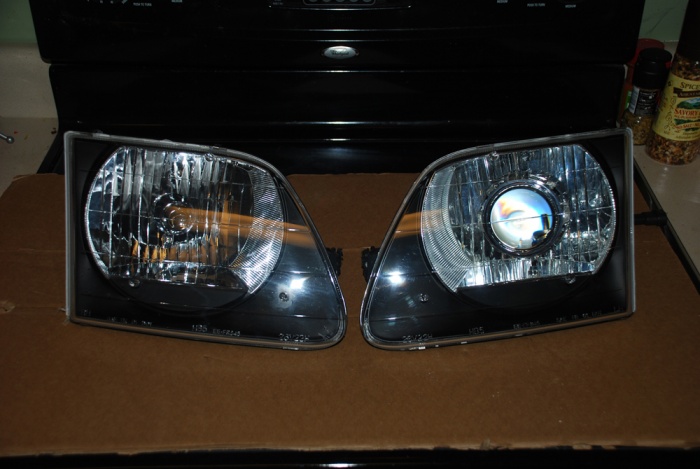
Now, since there is a limited amount of space in the housing you'll have to trim the shrouds so they will sit flush on the projector

before, red line is pointing to the ridge in the shroud, I cut the screw tabs off down to there
this shows were I trimmed them, and I also nocked down a little ridge that wouldn't let the shroud seat flush to the projector (paint the shrouds now if youre wanting something custom)
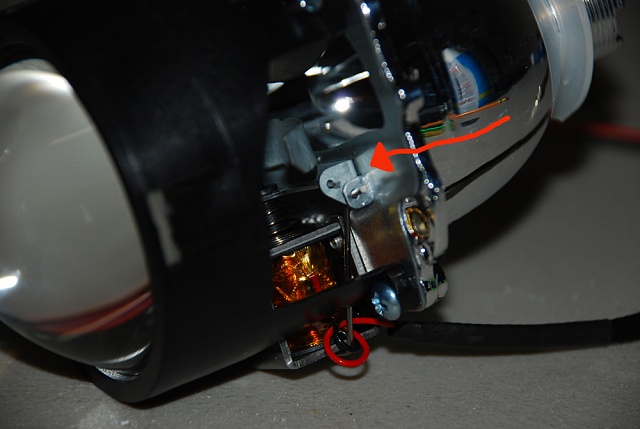
At this point you want to oil your cutoff shield whih will ensure that they dont stick down the road. I used WD-40 Silicon grease, then I used the 9v battery to cycle my shield 15x simulating use to make sure they worked good and would not seize. make sure you dont get lube on the projector glass. The red arrow points to the joint you want.
Now using your glass cleaning wipes, make sure there is no lint or smudges on your projector lense, wipe the inside and out thuroughly.
Next align the screw holes on the projector up with the shrouds (note that they only go on ONE way) and use the small screws povided and set the whole thing aside in safe place for now.
Now you will take your drill bit and(careful not to scratch the chrome) drill out the existing hole in the back of the shrouds to run your cutoff control wires through, just test fit until they go through. Red arrow in both pics

at this point if you want your housing painted black or a custom color, get it done and let it dry before you proceed
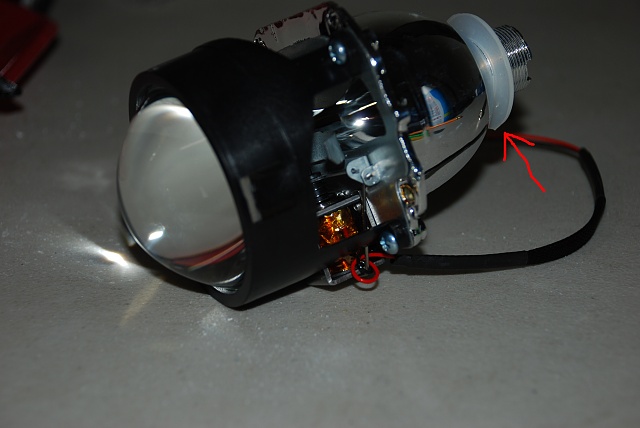
Now place the smaller rubber washer onto the shaft of the projector, this helps it stay put and not vibrate around
keep scrolling its getting good

before, red line is pointing to the ridge in the shroud, I cut the screw tabs off down to there

this shows were I trimmed them, and I also nocked down a little ridge that wouldn't let the shroud seat flush to the projector (paint the shrouds now if youre wanting something custom)
At this point you want to oil your cutoff shield whih will ensure that they dont stick down the road. I used WD-40 Silicon grease, then I used the 9v battery to cycle my shield 15x simulating use to make sure they worked good and would not seize. make sure you dont get lube on the projector glass. The red arrow points to the joint you want.

Now using your glass cleaning wipes, make sure there is no lint or smudges on your projector lense, wipe the inside and out thuroughly.
Next align the screw holes on the projector up with the shrouds (note that they only go on ONE way) and use the small screws povided and set the whole thing aside in safe place for now.
Now you will take your drill bit and(careful not to scratch the chrome) drill out the existing hole in the back of the shrouds to run your cutoff control wires through, just test fit until they go through. Red arrow in both pics


at this point if you want your housing painted black or a custom color, get it done and let it dry before you proceed
Now place the smaller rubber washer onto the shaft of the projector, this helps it stay put and not vibrate around

keep scrolling its getting good
02-17-2013, 05:25 PM
#3
Resident light whore
Thread Starter
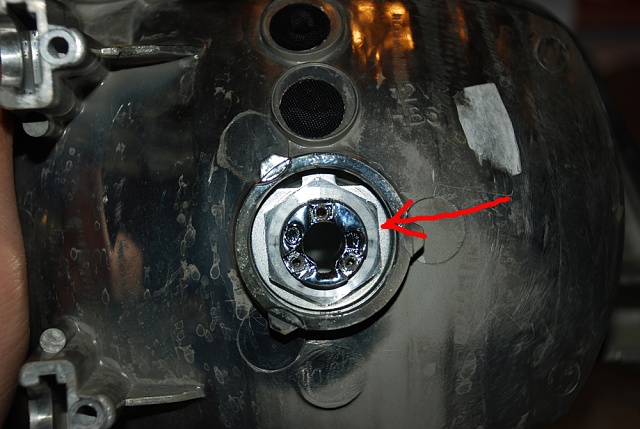
Now, mount the projector in the housing, the alignment plate will align it correctly, then you will feed through the wires for the cutoff. then put on your retaining nut (red arrow) and tighten up the nut so the projector doesnt move, all the while making sure that the tab stays vertical and square
put a blob of JB weld over the hole where the wires come through the housing to seal it
After you have it mounted up you will want to scrape the existing glue out of the joint where the lens goes on the housing and put a bead of the supplied glue in there to make sure it reseals and doesnt get a ton of water in the lense. from what I've seen on Billinvic's build thread they will still get a little condensation on cold wet days, and I can attest to this.
Now you will preheat the oven back to 200, put the lens back onto the housing, bake for 10 minutes, and press the lens down to make sure it seats in the glue. And put the clips that hold the lense on to hold it down.
After the light cools, you need to remount your adjustment hardware to the back, and place the bulb retainer onto the housing.
Next clean off your bulbs using the supplied wipes, DO NOT TOUCH THEM WITH YOUR FINGERS. then flip down the little clip that holds them.
Next you will wire up and mount the MOTOCONTROL box and ballasts which is pretty self explanatory with the labels on the harness.
You may have to switch the white and blue wire on the input plug so the high beams will work.
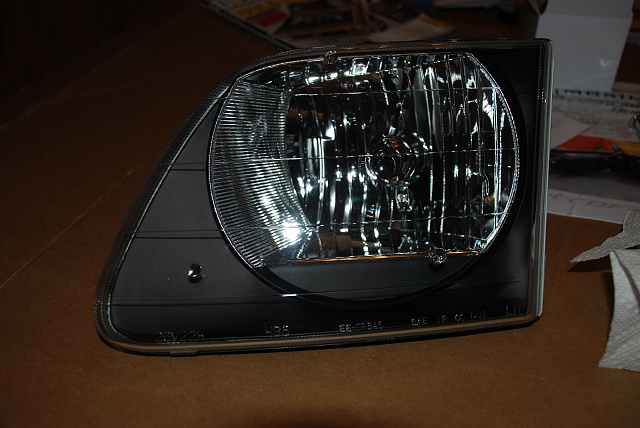
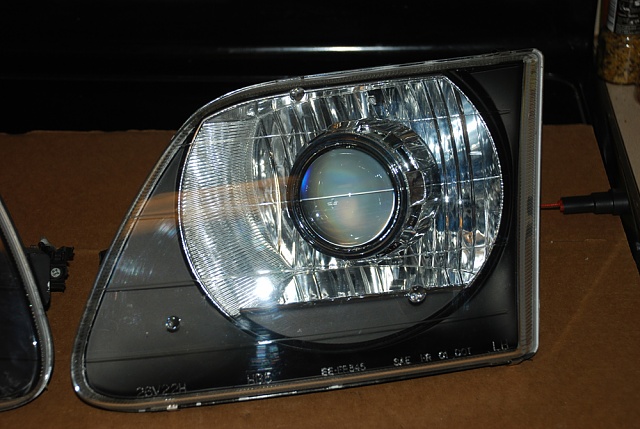
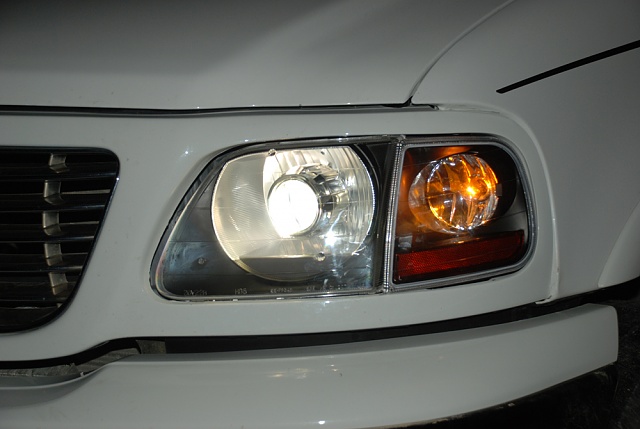
Here's how the finished product should look
I'm sure I've missed somthing somewhere, so if you guys have and questions, comments, or imput just let me know, Im'm glad to help!!

put a blob of JB weld over the hole where the wires come through the housing to seal it
After you have it mounted up you will want to scrape the existing glue out of the joint where the lens goes on the housing and put a bead of the supplied glue in there to make sure it reseals and doesnt get a ton of water in the lense. from what I've seen on Billinvic's build thread they will still get a little condensation on cold wet days, and I can attest to this.
Now you will preheat the oven back to 200, put the lens back onto the housing, bake for 10 minutes, and press the lens down to make sure it seats in the glue. And put the clips that hold the lense on to hold it down.
After the light cools, you need to remount your adjustment hardware to the back, and place the bulb retainer onto the housing.
Next clean off your bulbs using the supplied wipes, DO NOT TOUCH THEM WITH YOUR FINGERS. then flip down the little clip that holds them.
Next you will wire up and mount the MOTOCONTROL box and ballasts which is pretty self explanatory with the labels on the harness.
You may have to switch the white and blue wire on the input plug so the high beams will work.
Here's how the finished product should look


I'm sure I've missed somthing somewhere, so if you guys have and questions, comments, or imput just let me know, Im'm glad to help!!
 02-17-2013, 05:44 PM
#5
Resident light whore
Thread Starter


The following users liked this post:
dmanns67 (07-14-2015)
02-17-2013, 06:06 PM
#7
Resident light whore
Thread Starter