The inevitable ABS Bypass
 09-22-2016, 12:12 AM
#11

I didn't mean to imply you weren't thankful. It just seemed you had chosen the more difficult route. I know it is your truck, and I, too, have been driving long enough to have had vehicles without ABS. I know that it can, sometimes, be just as much a pain in the ***, and no more safe, than traditional brakes. I was just inquiring.
Don't mind me.
After I fix this, my plan is to love my F150.

The following users liked this post:
Rockjock3 (09-29-2016)
09-22-2016, 02:56 AM
#12

I purchased a used 2008 Altima coupe 3.5 v6 (awesome car) 56000 miles for my 17 yr old son a year ago. I purchased from a Toyota dealer, it was taken on trade. I bought it before they had even processed it.
When they went thru it and did safety check....it had a bad ABS module or something like that . Had to wait a few days for them to get and replace, (had a sister Nissan dealership)they absolutely could not sell a vehicle with known safety defect. They ate the cost.
Took my wife's pilot in for timing belt . Had a safety recall it needed. Took over a week to get part in high demand. They would not even under threat return vehicle to us until the safety recall had been addressed.
Last edited by mbb; 09-22-2016 at 03:01 AM.
 09-22-2016, 12:21 PM
#13
I purchased a used 2008 Altima coupe 3.5 v6 (awesome car) 56000 miles for my 17 yr old son a year ago. I purchased from a Toyota dealer, it was taken on trade. I bought it before they had even processed it.
When they went thru it and did safety check....it had a bad ABS module or something like that . Had to wait a few days for them to get and replace, (had a sister Nissan dealership)they absolutely could not sell a vehicle with known safety defect. They ate the cost.
Took my wife's pilot in for timing belt . Had a safety recall it needed. Took over a week to get part in high demand. They would not even under threat return vehicle to us until the safety recall had been addressed.
When they went thru it and did safety check....it had a bad ABS module or something like that . Had to wait a few days for them to get and replace, (had a sister Nissan dealership)they absolutely could not sell a vehicle with known safety defect. They ate the cost.
Took my wife's pilot in for timing belt . Had a safety recall it needed. Took over a week to get part in high demand. They would not even under threat return vehicle to us until the safety recall had been addressed.
I know very few shops with that amount of integrity, and those I have known are retired, out of business or moved away.
My E150 -- that I tow with (!) was at the Ford dealership for 2 weeks and they handed the keys back and invoiced me for the guesswork. My E150 ABS does not work to this very day.
The only failure is that I didn't take responsibility for repairing my truck myself. I won't make that mistake again.
Thanks for this forum.
09-29-2016, 05:09 PM
#14
An update:
I've completed the analysis, identified the needed parts, bought them and will be installing this weekend.
Not including the brake fluid (bleeding is of course needed), it cost me $91. And, I used premium stainless braided hose and the hoses were pressure tested by a local hydraulics supply house.
I don't want to jinx the effort (I have not installed yet), but knowing what is needed -- especially the fitting sizes, it should take a good backyard mechanic less time than it takes to replace the front brake pads. It's not that hard.
Also: My Ford dealership parts people were helpful. One of them mentioned that they do sell a lot of HCUs. Also: I am told by brake supply experts that this is not some new thing. Others have done it.
The following users liked this post:
Josue Frutos (07-27-2020)
 09-30-2016, 09:19 PM
#16
Senior Member

I took the ABS off my '03 Harley years back. Had a sensor on the rear end go out so I yanked it, with the front sensors, box under the hood and control box under the dash.
Didn't want the weight of it, drives fine with out it.
Parts needed are minimum.
Didn't want the weight of it, drives fine with out it.

Parts needed are minimum.
The following users liked this post:
biggandyy (12-27-2021)
10-01-2016, 03:52 PM
#17
Senior Member

Definitely haven't heard a whole lot of ABS issues w/10th gens. I'm game for something new. 
The following users liked this post:
akdoggie (04-14-2021)
10-14-2016, 10:38 PM
#18
Last report � for anyone in the same situation that I used to be in:
The bypass was installed 3 weeks ago. I�ve driven about 700 miles on the truck since installing it � in stop and go traffic, freeway driving and with lane jumpers. I can report the following:
The braking performance is outstanding. I have difficulty getting an F150 to skid in any case, but with the ABS bypass, my truck is solid. There should be no surprise. ABS is designed to remove brake application authority � not to add it. The requirement for me as a driver is to use intelligent braking (pulsing) when in skidding scenarios. Just like my 1976 F100 and every other non-ABS car on the road.
Also, I do not encourage installing a bypass. People should make every reasonable effort to maintain ABS functionality.
I will describe how to do it for a 2001 F150. Before doing so, I will say that an enterprising company could manufacture a kit and make a huge profit.
The steps as follows:
ACTUAL WORK: 1-2 hours if you follow the procedure.
TIME SPENT BUYING PARTS: 1-2 days (all of it lead-time to deliver)
COST: $50-100
REMOVE THE HYDRAULIC CONTROL UNIT
1. Open the hood.
2. Remove the air intake plenum. Replace the air filter while you�re at it (when you reassemble -- if it needs it).
3. Look down.
4. The hydraulic control unit is the monstrosity under the plenum. It has 5 brake lines connected to it. It has two electrical connectors.
5. Make sure the ignition is off. If you�re ****, disconnect the battery.
6. Read: There will be no need to mark the hoses.
7. Put a large piece of plastic or catch basin under the truck. You WILL leak brake fluid on the ground and it is a bitch to clean up.
8. Grab two wrenches. 7/16 and 1/2 inch
9. Put mechanics nitrile gloves on. I pity you if you work on cars without them.
10. Look at the HCU.
11. Disconnect every line connected to it using the two wrenches
12. Find the master cylinder. Two of the HCU lines you disconnected go to the master cylinder.
13. Disconnect those lines at the master cylinder.
The Ford master cylinder feeds brake fluid to two independent braking circuits. One to the front brakes. The other to the rear brakes. THE CIRCUIT THAT FEEDS THE REAR BRAKES IS CLOSEST TO THE FIREWALL. THE FRONT BRAKES ARE FEED BY THE PORT CLOSEST TO THE FRON BUMPER. Important: you�ll notice a cylindrical object on the rear brake port. That is the proportioning valve. Leave it alone! You need it. The valve is designed to reduce the braking action of the rear wheels; to prevent the rear wheels from locking up (skidding). For several reasons, not the least of which is that the rear tires have less weight (normal force), in a strong braking scenario, if equal brake fluid pressure was applied to the front and rear wheels, the rear wheels would want to skid first (even with ABS!). The valve redistributes braking force. Keep that valve!
14. Look at the HCU. Disconnect the two electrical connectors to the HCU. A standard screwdriver will help you. It will be obvious how to disconnect them. The large connector is for �data.� The smaller one is power. Don�t force them off.
15. Grab a 9/16 socket with the longest extension you have. Mine is 18 inches. (do not go there) Also grab a 9/16 combination wrench.
16. Look at the wrenches. They are all you need to remove the HCU. Thank them.
17. Remove the 3 bolts and lift out the HCU.
18. Save the bolts and the HCU. You will reinstall it with all of the ports plugged (to prevent brake fluid spillage). You will reconnect the electrical connectors. You will do this to make the truck think the ABS is connected. Why? TO EXTINGUISH THE ABS PANEL IDIOT LIGHT. Also, at some point you may wish to sell the truck or remove the bypass. Reinstalling it will prevent searching for where you left the damn HCU, or trips to the hardware store to find bolts that fit. If someday you�re wealthy enough to buy a new HCU, you will be charged a core charge. Your core is on the truck! It will also help to make sure you match up the correct replacement HCU part number.
So far, you should have spent no more than 30 minutes working on the bypass. Last, clean, clean, CLEAN! Brake fluid is nasty on paint. Wipe that off! Cleanliness is next to Godliness in my book. I like my vehicles to be as clean under the hood as anywhere else.
Go have a beer. You�ve done enough work for the day. Thirty minutes is pushing it.
10-14-2016, 10:39 PM
#19
HAVE THREE COMPONENTS FABRICATED
In this series, you will have three things made or purchased.
A hose to feed the rear brakes.
A hose to feed the front brakes.
A hose combiner, aka a �T�
Listen: When you removed the HCU, and you looked at what remained, you saw three brake lines. One is obviously slightly larger than the other two. That feeds the rear brakes. Got it? That line wants to talk to the proportioning valve. The other two lines feed the front brakes. All of these lines use inverted flare fittings.
Why two lines?
Your ABS system is designed to individually control how much brake pressure is applied to EITHER front wheel. Hence, two lines. Those two smaller lines look the same don�t they? Really listen: THEY�RE different size fittings. The wheel on the driver side (the side you�re on since you�re looking where the HCU used to be) uses a slightly smaller fitting. The smaller fitting is to balance the pressure to the passenger and driver wheel. The driver side front wheel is closer to the HCU. If you look closely, the orifice for the closer (driver side) wheel is smaller. Shorter path length compensated by smaller orifice size. (it�s that, or Ford sought to murphy-proof the connections to the HCU).
Your mission is to get a coupler that joins the two front lines, then to marry that to a hose that connects to the front port of the master cylinder. Step on the brakes and fluid goes to both front wheels equally. At the same time, the rear brakes are fed by the other circuit (via the proportioning valve).
Pretty simple.
Fabricating the lines
It took me weeks to figure out how to do this. The best method to get these components is to Google/find a local store that specializes in hose and hydraulic fittings. Google �Parker Store.� They have them in many cities and are an excellent resource. In your search results, you�ll find out there are other businesses that do nothing but sell and fabricate hoses and other components for hydraulic applications. That is where you will have the hoses made. My local store could make the hoses while I waited. But, for me, it was more comfortable to come back the next day or so.
Here�s what will be a waste of time: Going to an auto parts store. Or any hardware store. Don�t even try it! The further benefit of using an outfit like a Parker Store is that they will fabricate the hoses and will pressure test them. Do not mickey-mouse it by kludging up something using NAPA Auto brake line.
Rear Brake Line
Type: Stainless steel braided (flexible � you can bend it!) with tube flared fitting ends (terminations).
Length: 24 inches (end to end). If for some reason you want to go much longer, beware: longer runs could result in a spongy pedal.
Termination (at the proportioning valve): 7/16 inch inverted flare -24 thread per inch. If possible, the lines coming out of the master cylinder should be bent downward 45 degrees. It looks nicer.
Termination (at the rear brake line): � inch inverted flare � 20 thread per inch
Front Brake Line
Type: Stainless steel braided (flexible � you can bend it!) with tube flared fitting ends (terminations).
Termination (at the master cylinder): 7/16 inch inverted flare -24 thread per inch. Another note: If possible, the lines coming out of the master cylinder should be bent downward 45 degrees. It looks nicer.
Coupler
Type: Brass with inverted flare fittings. For equal pressure distribution use a symmetrical T. I used 1/8 inch NPT fittings that screwed into the T, with flare fitting sizes below to connect to the brake lines. The fittings should be torqued (clocked) to both point in the same direction toward the brake lines.
Input (connects to master cylinder line above): 7/16 inch inverted flare -24 thread per inch
Output (driver wheel � the smaller fitting!): 3/8 inch inverted flare � 24 thread per inch
Output (passenger wheel): 7/16 inch inverted flare -24 thread per inch
INSTALL AND BLEED BRAKES
19. Install the lines. It�s easy and obvious how they connect. Be careful torqueing flare fittings. They should be snug, then � wrench turn. That�s important regardless of ABS.
With 24 inch lines, routing should be easy without excess line. I recommend using hose retainers available at NAPA and elsewhere to secure the lines. Needless to say, make sure you keep them away from hot parts. With a 24 inch length, that should be very hard to get wrong�..if you chose to go longer (not recommended) pay special attention to routing.
Installing the lines should take no more than 15 minutes.
20. Bleed the brakes. If you do not know how to bleed brakes (=you�re not qualified to do this bypass in the first place), call a tow company, take your truck to a mechanic and have them do it. Have them check your work � a good idea in any case.
Clean, clean, clean! I washed and waxed where brake fluid got on parts.
FINISH
21. Buy plugs to seal the HCU. (take it to your Parker store and get plugs � or order them online since you have the fitting sizes above)
22. Reinstall the HCU and reconnect the electrical connectors.
23. While you�re at it, replace the air filter and reinstall the plenum.
24. Test your brakes and enjoy!
Mine work perfectly and I will never be held hostage to ABS failures, parts prices, dealership special bleeding, spongy pedal for some mysterious reason, and off-road (mine is a 4X4) I will have more braking control. The ABS bypass is done! I repeat, an enterprising company could easily make a kit. $15 (or less) worth of brake line and fittings could sell for $100 or more. A kit could use hard brake line bent to shape. I found it easier to write text than to take pictures. I may post those later. I hope this helps someone else. And to be clear: I do not encourage people to run this bypass and I include this description only as an illustration (or opinion of) how it could be done. I don�t represent this as an endorsement or error-free method to do this. In fact, don�t do this. Ever.
10-14-2016, 10:54 PM
#20
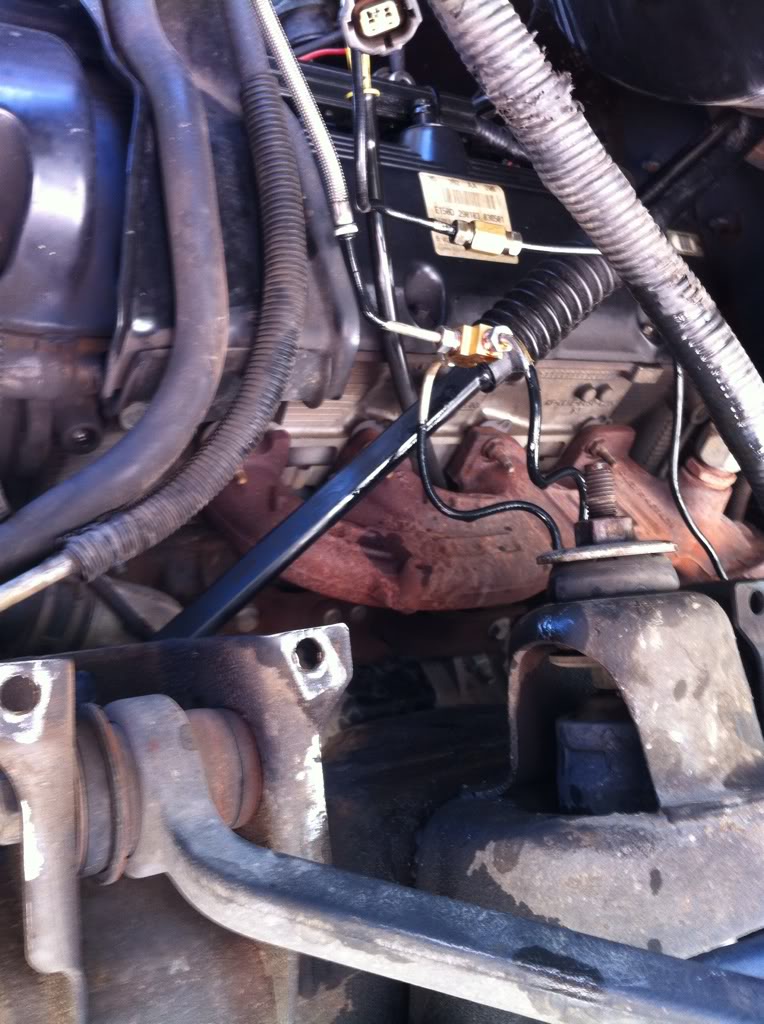
That's some good looking work. In my case, I faced the fittings on my coupler toward the rear bumper. I see you formed yours at 90 degrees. That tells me that the orientation may not be as important as I thought it was. It's a great feeling making something like this work because the brakes work perfectly well and it saves so much money and hassle. In engineering simplicity matters.
The following users liked this post:
biggandyy (12-27-2021)