[TIP GUIDE] [5.4 3v] Timing System/Cam Phasers Installation
 03-22-2015, 03:55 PM
#1
Senior Member
Thread Starter

I see alot of you guys still on the other thread asking the same questions over and over, or how do i do this when i get to this point. Here are some simple tips to prevent anything going wrong before you start the engine, and making sure everything is tight.
I still recommend this Guide if you have no found it by now
https://www.f150forum.com/f4/final-r...-sound-141266/
This guide is solely to help answer some questions that have been asked a million times.
Printable PDF Link Here: [CLICK HERE LINK]
Printable Word Link Here: [CLICK HERE LINK]
Or Continue Reading Below
For those in need of Buying Parts, But low on cash:
If you are in a bind and low on cash like i am, i recommend to get a Paypal Credit or Amazon store card if you have good credit.
Get approved then you can buy the parts and pay them off for a year with no interest for anything over 599 dollars.
Very helpful for those who dont have alot of cash and need parts asap, just be smart and make sure you can do this...
I did it this way and all was well. Paid off and i am happy.
Install Time: Around 8-10 Hours if you have all the tools.
Can stressfully but successfully be done in a weekend.
Section 1: Getting Yourself Ready
BEFORE YOU BEGIN, GET A GOOD RATCHET WRENCH SET!!!
I used a Gear Wrench Stubby Metric Ratchet Wrench Set
[*] You will need a 8mm for the valve cover
[*] Then a Shorty 10mm (for power steering pump) up to a 18mm kit!
[*] Will for sure need a 15mm, 17mm, 18mm, and if i recall correctly
a 20 or 22 for the bottom studs on the timing cover.
[*] Many Ziplock Baggies to put bolts and pulleys in
[*] A Sharpie to label the bags
[*] Red High Temp Silicon for the Timing Cover
[*]Torque Wrench
Dont forget to ask to Rent these tools below!
You have 24 hours to return to O'reillys
[*] Power Steering Pulley puller / Part #: Evertough 67010
[*] Harmonic balancer puller / Part # N/A
(just a 3 claw with rod in middle)
Section 2: Parts Needed for Ordering
*You will need to Buy The following parts Listed*
DO NOT Buy Dorman Phasers or OEM BrandedKnockoff
FoMoCo OEM Kit
PS: The kit comes with all gaskets and seals necessary
Part # 3R2Z-6A257-DA
Link: (May be Expired): http://ebay.to/17oetgX
Variable Cam Timing Solenoids (Buy 2 Of them)
Link: Motorcraft Solenoid: http://amzn.to/1MXImof
Part # 8L3Z-6M280-B
Link: Dorman Solenoid: http://amzn.to/1CzW0Lc
Part # 917-200
If you remove the Driver side valve cover, and You have a nice gritty layer of sludgy burnt feeling material, it may be best to just order a new valve Cover. These Valve covers have the PCV valve built into them as a 1 piece design, If they clog you will have oil burning issues.
OEM Driver Side Valve Cover w/Internal PCV + VCT Gasket
Part #: 9L1Z-6582-C
Link: http://ebay.to/1CAaxGB
Have that High RPM Tweety bird chirp on Gear changes? This is a sign that you may also need a new belt.
I recommend GatorBack belts, it won't squeek.
GoodYear Gatorback Belt
Part #: 4061025
Link: http://amzn.to/1GRxzYV
New Kit, Still low Oil Pressure? This is a Sign of a Weak Oil Pump
Melling High Performance Oil Pump
Part #: 10340
Link: http://amzn.to/1IsBH2A
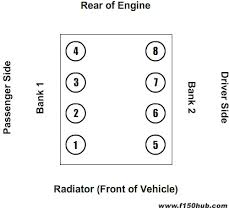
Section3: Top Dead Center (DO THIS BEFORE BEGINNING WORK)
Attachment 570162
INSERT A LONG SCREWDRIVER INTO CYLINDER 1 TO MAKE SURE YOU ARE TDC
Section 4: General Install Tips
1: VCT SOLENOIDS: DIP THEM IN OIL BEFORE INSTALLING!!
(Keep the original's screws, then insert them into the new one and squeeze the metal together with some pliers to hold them in by the threads!
2: Do not pull TENSIONER CLIPS until chains are set and in time!
[*] Install Chain Guides First
[*] Tensioner Guide with the Notch goes on Driver Side
[*] Install Tensioners, Leave the clips in!
[----->] Continue to Section 4 #6
3: Torque Tightening Specs
[*] Tensioners are Hand tight and a Quarter Turn Tight Tight
[*] Chain Guides are Hand Tight and a Quarter Turn Tight Tight
[*] Cam phaser bolts should be tightened to 89ft lbs.
--DO NOT REUSE OLD ONES!
[*] Use Vise grips to hold the cams in place, grip behind cam phaser
4: Installing Harmonic Balancer (Non Recommended, No tools way)
[*] Get a Flat bar crowbar lay flat against harmonic balancer
[*] Tap Harmonic balancer on with a hammer, Insert bolt and tighten up
[*] Get about EIGHT 3/8x16x4 Grade 6 or Higher Bolts
[*] Insert the bolts into the harmonic balancer
[*] Put crowbar against the frame in-between bolts
[*] Turn crankshaft by Bolt until tight
[*] Tighten to 110 Ft LBS, The Lowes Bolts will bend, But will come out!
5: Organization
[*] Keep up with your timing cover bolts in a piece of cardboard mocking the design of the timing cover to know where they go
[*] Keep the old components far away from new ones!
[*] Have plenty of workspace!
6: Setting Time and installing Phasers+Chains
[*]Key should be at TDC (12 o clock)
[-]Chain has blue marked timing links, Install new sprocket onto camshaft
[-]Install the 2 Blue links onto the crankshaft sprocket with the marked Key Dot being dead center in between links.
[-]Pull chain upwards, Insert Cam Phaser carefully (DO NOT DROP IT!!)
[-] Single blue lines up with Cam Phaser R or Arrow depending on camside
[-] Cam Phaser will snap in groove on the cam, if timing is off by a little, simply rotate cam with vice grip until phaser lines up with the key pin.
[-] Insert Phasers Bolt and get hand tight, Then Continue to Other Side.
[--->] Repeat Above Steps for Driver Side Install
[-] Inserted Phaser Bolts, tighten to 89ft LBS
Help: : Use Vise Grip to hold cam against engine casing while you tighten with torque wrench.
[------>] Now you may pull the tensioner clips
7: Starting Truck After Install
[*]Build oil pressure before the first start with the
tensioners or you WILL jump time!
[-]How you may ask?
[--]Unplug the first plug on the computer closest to battery,
[---]plugs 2 and 3 can remain plugged in.
[----]This will make the engine roll over but not fire!
[-----]Depress Ignition TWO intervals for about 2 good seconds
[------]Plug Computer Plug back in, Crank the Vehicle up
8: What oil to run after the Job (20-25PSI is good Hot idle)
[*] If truck is using a little oil in between changes, Use Full Syn HM 5w 30
[*] If truck is not holding at least 20 PSI Hot Idle, Use Full Syn HM 5w 30
[*] If Phaser ticking begins shortly after rebuild, Use Full Syn 5w 30
[*] If truck just had premature tensioner failure and has good pressure, Use OEM Spec Motorcraft Synthetic Blend 5w20
If 5w30 oil does not help Low Oil Pressure Symtoms, Could be a weak and/or clogged Oil Pump
\\\\\\\\\\\\\\\\\\\\\\\\\\\\\\\\\\\\\\\\\\\\\\
End Of Document
Pics OF Install
![[TIP GUIDE] [5.4 3v] Timing System/Cam Phasers Installation-kpm3a7g.jpg](https://www.f150forum.com/attachments/f4/570165d1683217176t-tip-guide-5-4-3v-timing-system-cam-phasers-installation-kpm3a7g.jpg)
Attachment 570166
Attachment 570167
Attachment 570168
Attachment 570169
I still recommend this Guide if you have no found it by now
https://www.f150forum.com/f4/final-r...-sound-141266/
This guide is solely to help answer some questions that have been asked a million times.
Printable PDF Link Here: [CLICK HERE LINK]
Printable Word Link Here: [CLICK HERE LINK]
Or Continue Reading Below
USEFUL GUIDE TO FIXING THE
CAM PHASERS/TIMING SYSTEM ON 5.4 3-valve Engine
CAM PHASERS/TIMING SYSTEM ON 5.4 3-valve Engine
For those in need of Buying Parts, But low on cash:
If you are in a bind and low on cash like i am, i recommend to get a Paypal Credit or Amazon store card if you have good credit.
Get approved then you can buy the parts and pay them off for a year with no interest for anything over 599 dollars.
Very helpful for those who dont have alot of cash and need parts asap, just be smart and make sure you can do this...
I did it this way and all was well. Paid off and i am happy.
Install Time: Around 8-10 Hours if you have all the tools.
Can stressfully but successfully be done in a weekend.
Section 1: Getting Yourself Ready
BEFORE YOU BEGIN, GET A GOOD RATCHET WRENCH SET!!!
I used a Gear Wrench Stubby Metric Ratchet Wrench Set
[*] You will need a 8mm for the valve cover
[*] Then a Shorty 10mm (for power steering pump) up to a 18mm kit!
[*] Will for sure need a 15mm, 17mm, 18mm, and if i recall correctly
a 20 or 22 for the bottom studs on the timing cover.
[*] Many Ziplock Baggies to put bolts and pulleys in
[*] A Sharpie to label the bags
[*] Red High Temp Silicon for the Timing Cover
[*]Torque Wrench
Dont forget to ask to Rent these tools below!
You have 24 hours to return to O'reillys
[*] Power Steering Pulley puller / Part #: Evertough 67010
[*] Harmonic balancer puller / Part # N/A
(just a 3 claw with rod in middle)
Section 2: Parts Needed for Ordering
*You will need to Buy The following parts Listed*
DO NOT Buy Dorman Phasers or OEM BrandedKnockoff
FoMoCo OEM Kit
PS: The kit comes with all gaskets and seals necessary
Part # 3R2Z-6A257-DA
Link: (May be Expired): http://ebay.to/17oetgX
Variable Cam Timing Solenoids (Buy 2 Of them)
Link: Motorcraft Solenoid: http://amzn.to/1MXImof
Part # 8L3Z-6M280-B
Link: Dorman Solenoid: http://amzn.to/1CzW0Lc
Part # 917-200
If you remove the Driver side valve cover, and You have a nice gritty layer of sludgy burnt feeling material, it may be best to just order a new valve Cover. These Valve covers have the PCV valve built into them as a 1 piece design, If they clog you will have oil burning issues.
OEM Driver Side Valve Cover w/Internal PCV + VCT Gasket
Part #: 9L1Z-6582-C
Link: http://ebay.to/1CAaxGB
Have that High RPM Tweety bird chirp on Gear changes? This is a sign that you may also need a new belt.
I recommend GatorBack belts, it won't squeek.
GoodYear Gatorback Belt
Part #: 4061025
Link: http://amzn.to/1GRxzYV
New Kit, Still low Oil Pressure? This is a Sign of a Weak Oil Pump
Melling High Performance Oil Pump
Part #: 10340
Link: http://amzn.to/1IsBH2A
Section3: Top Dead Center (DO THIS BEFORE BEGINNING WORK)
Attachment 570162
INSERT A LONG SCREWDRIVER INTO CYLINDER 1 TO MAKE SURE YOU ARE TDC
Section 4: General Install Tips
1: VCT SOLENOIDS: DIP THEM IN OIL BEFORE INSTALLING!!
(Keep the original's screws, then insert them into the new one and squeeze the metal together with some pliers to hold them in by the threads!
2: Do not pull TENSIONER CLIPS until chains are set and in time!
[*] Install Chain Guides First
[*] Tensioner Guide with the Notch goes on Driver Side
[*] Install Tensioners, Leave the clips in!
[----->] Continue to Section 4 #6
3: Torque Tightening Specs
[*] Tensioners are Hand tight and a Quarter Turn Tight Tight
[*] Chain Guides are Hand Tight and a Quarter Turn Tight Tight
[*] Cam phaser bolts should be tightened to 89ft lbs.
--DO NOT REUSE OLD ONES!
[*] Use Vise grips to hold the cams in place, grip behind cam phaser
4: Installing Harmonic Balancer (Non Recommended, No tools way)
[*] Get a Flat bar crowbar lay flat against harmonic balancer
[*] Tap Harmonic balancer on with a hammer, Insert bolt and tighten up
[*] Get about EIGHT 3/8x16x4 Grade 6 or Higher Bolts
[*] Insert the bolts into the harmonic balancer
[*] Put crowbar against the frame in-between bolts
[*] Turn crankshaft by Bolt until tight
[*] Tighten to 110 Ft LBS, The Lowes Bolts will bend, But will come out!
5: Organization
[*] Keep up with your timing cover bolts in a piece of cardboard mocking the design of the timing cover to know where they go
[*] Keep the old components far away from new ones!
[*] Have plenty of workspace!
6: Setting Time and installing Phasers+Chains
[*]Key should be at TDC (12 o clock)
[-]Chain has blue marked timing links, Install new sprocket onto camshaft
[-]Install the 2 Blue links onto the crankshaft sprocket with the marked Key Dot being dead center in between links.
[-]Pull chain upwards, Insert Cam Phaser carefully (DO NOT DROP IT!!)
[-] Single blue lines up with Cam Phaser R or Arrow depending on camside
[-] Cam Phaser will snap in groove on the cam, if timing is off by a little, simply rotate cam with vice grip until phaser lines up with the key pin.
[-] Insert Phasers Bolt and get hand tight, Then Continue to Other Side.
[--->] Repeat Above Steps for Driver Side Install
[-] Inserted Phaser Bolts, tighten to 89ft LBS
Help: : Use Vise Grip to hold cam against engine casing while you tighten with torque wrench.
[------>] Now you may pull the tensioner clips
7: Starting Truck After Install
[*]Build oil pressure before the first start with the
tensioners or you WILL jump time!
[-]How you may ask?
[--]Unplug the first plug on the computer closest to battery,
[---]plugs 2 and 3 can remain plugged in.
[----]This will make the engine roll over but not fire!
[-----]Depress Ignition TWO intervals for about 2 good seconds
[------]Plug Computer Plug back in, Crank the Vehicle up
8: What oil to run after the Job (20-25PSI is good Hot idle)
[*] If truck is using a little oil in between changes, Use Full Syn HM 5w 30
[*] If truck is not holding at least 20 PSI Hot Idle, Use Full Syn HM 5w 30
[*] If Phaser ticking begins shortly after rebuild, Use Full Syn 5w 30
[*] If truck just had premature tensioner failure and has good pressure, Use OEM Spec Motorcraft Synthetic Blend 5w20
If 5w30 oil does not help Low Oil Pressure Symtoms, Could be a weak and/or clogged Oil Pump
\\\\\\\\\\\\\\\\\\\\\\\\\\\\\\\\\\\\\\\\\\\\\\
End Of Document
Pics OF Install
![[TIP GUIDE] [5.4 3v] Timing System/Cam Phasers Installation-kpm3a7g.jpg](https://www.f150forum.com/attachments/f4/570165d1683217176-tip-guide-5-4-3v-timing-system-cam-phasers-installation-kpm3a7g.jpg)
Attachment 570166
Attachment 570167
Attachment 570168
Attachment 570169
Last edited by MHOWELL34; 03-24-2015 at 09:38 PM.

The following 3 users liked this post by MHOWELL34:
03-22-2015, 05:15 PM
#2
Senior Member
Thread Starter
Fixed a Cam Phaser install step.
And yes one of my pics shows the double blue markings on the Phaser... Was easier to get a visual and do it the other way when i had to redo it cause of jumping time...
And yes one of my pics shows the double blue markings on the Phaser... Was easier to get a visual and do it the other way when i had to redo it cause of jumping time...
Last edited by MHOWELL34; 03-22-2015 at 05:25 PM.
The following users liked this post:
air_cooled (03-29-2015)
03-24-2015, 09:23 PM
#3
Senior Member
Thread Starter
-Corrected Goodyear Gatorback Belt Part #
-Changed some Oil recommendations
-Added a picture for guidance
-Added Melling High Perf Oil Pump to Parts list
-Changed some Oil recommendations
-Added a picture for guidance
-Added Melling High Perf Oil Pump to Parts list
Last edited by MHOWELL34; 03-24-2015 at 09:39 PM.
04-03-2015, 02:25 AM
#4
Senior Member
Thread Starter
Hope you guys keep tabs on this guide as well if you are diving in for parts and tools. Also i recently ordered the Gatorback belt on this guide for my 04, fits fine. Really quiet now no squeek on high rpm shifts.
They really should sticky these guides
They really should sticky these guides
Last edited by MHOWELL34; 04-03-2015 at 02:28 AM.
04-03-2015, 08:28 AM
#5
You don't have to unplug the computer to get the engine to turn without firing. Just hold the gas to the floor. On DBW Fords, this is a strategy to clear a flooded engine. Holding the gas to the floor while cranking shuts off the fuel injectors and opens the throttle plate. I use this same technique for every oil change to ensure that the oil filter is full and the system pressurized before I fire the engine.
The following 2 users liked this post by VTX1800N1:
F150Torqued (04-11-2015),
white22 (02-01-2022)
04-03-2015, 12:49 PM
#6
Senior Member
Thread Starter
You don't have to unplug the computer to get the engine to turn without firing. Just hold the gas to the floor. On DBW Fords, this is a strategy to clear a flooded engine. Holding the gas to the floor while cranking shuts off the fuel injectors and opens the throttle plate. I use this same technique for every oil change to ensure that the oil filter is full and the system pressurized before I fire the engine.
04-03-2015, 01:54 PM
#7
JMO, but unplugging the computer has a greater potential to cause problems. You take the risk of bending one of the pins. Another method would be to find the fuse for the fuel pump and pull it.
Trending Topics
04-10-2015, 03:08 PM
#8
Junior Member

Join Date: Apr 2015
Posts: 1
Likes: 0
Received 0 Likes
on
0 Posts
I don't believe this is correct:
"[-] Inserted Phaser Bolts, tighten to 89ft LBS"
It should be:
Stage 1: Tighten to 40 Nm (30 ft. lbs.).
Stage 2: Tighten an additional 90 degrees.
I followed this guide last night and the bolt would not even tighten to 89 ft lbs... it kept stretching (or crushing the phaser?) at less than 89 ft lbs. I bought a new bolt today to put in, does anyone know if over torqueing the bolt damages the phaser? or torqued to 89 ft lbs and had any issues?
I appreciate the thorough guide and I hate to be picky, but I feel I need to warn anyone else following this moving forward.
04-10-2015, 03:42 PM
#9
You don't have to unplug the computer to get the engine to turn without firing. Just hold the gas to the floor. On DBW Fords, this is a strategy to clear a flooded engine. Holding the gas to the floor while cranking shuts off the fuel injectors and opens the throttle plate. I use this same technique for every oil change to ensure that the oil filter is full and the system pressurized before I fire the engine.
04-10-2015, 11:49 PM
#10

I don't believe this is correct:
"[-] Inserted Phaser Bolts, tighten to 89ft LBS"
It should be:
Stage 1: Tighten to 40 Nm (30 ft. lbs.).
Stage 2: Tighten an additional 90 degrees.
I followed this guide last night and the bolt would not even tighten to 89 ft lbs... it kept stretching (or crushing the phaser?) at less than 89 ft lbs. I bought a new bolt today to put in, does anyone know if over torqueing the bolt damages the phaser? or torqued to 89 ft lbs and had any issues?
I appreciate the thorough guide and I hate to be picky, but I feel I need to warn anyone else following this moving forward.
"[-] Inserted Phaser Bolts, tighten to 89ft LBS"
It should be:
Stage 1: Tighten to 40 Nm (30 ft. lbs.).
Stage 2: Tighten an additional 90 degrees.
I followed this guide last night and the bolt would not even tighten to 89 ft lbs... it kept stretching (or crushing the phaser?) at less than 89 ft lbs. I bought a new bolt today to put in, does anyone know if over torqueing the bolt damages the phaser? or torqued to 89 ft lbs and had any issues?
I appreciate the thorough guide and I hate to be picky, but I feel I need to warn anyone else following this moving forward.
9. Once all the bolts have been tightened take the larger torque wrench and tighten the phaser bolt to 30ftlbs.
Be careful not to turn the engine or pull the timing chain wedge further into
the engine.
After the bolt has been torqued to 30ftlbs turn the bolt an additional 90 degrees
Mark the socket and the sprocket with a line.
Then mark the sprocket an additional 90
degrees.
Turn the socket until the marks meet this 90 degree mark.
If needed use a breaker bar to turn the 90 degrees.
I think your phaser would be fine (I just looked at 1 I had removed from my truck).
The center of the phasor looks to be pretty stout with only oil feed holes.
BUT your the 1 that has to live it.
.