Going, going, gone... Supercharged!


 07-06-2014, 11:51 AM
#22

Finally got the bearing!!
The whipple manual belt tensioner is a double bearing, it is also held in with a snap ring..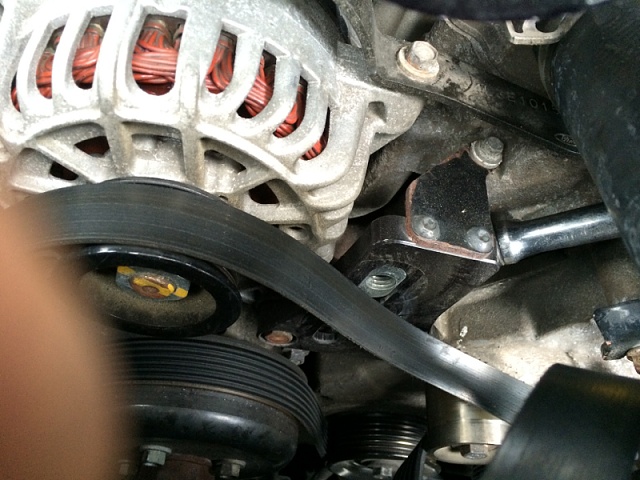
I used an extra 1/2 inch drive ratchet to hold the sliding/retainer nut that accepts the pulley bolt, and allows belt tension adjustability... You want to pin the nut in to the bracket with a wrench or something similar, so it does not fall off and get trapped under the intake manifold...
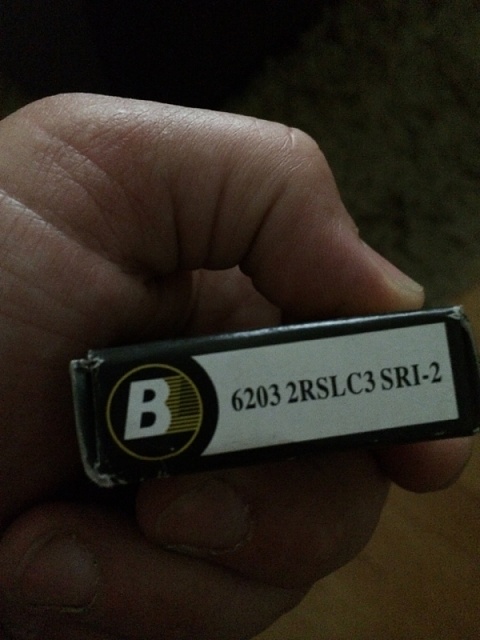
Its a nachi 6203 2rs (double sealed)
This bearing also fits in the ford factory automatic belt tensioner on all F150's. I found the bearing in stock at fastenal for $1.79 each!
Hopefully this helps others looking to find this bearing...
Install went smooth, but I discovered a hair bit of squeal in one of my other whipple idler bearings. I will be fixing this next, and I'm likely going to change out the remainder of my factory bearings while I'm at it..
The whipple manual belt tensioner is a double bearing, it is also held in with a snap ring..

I used an extra 1/2 inch drive ratchet to hold the sliding/retainer nut that accepts the pulley bolt, and allows belt tension adjustability... You want to pin the nut in to the bracket with a wrench or something similar, so it does not fall off and get trapped under the intake manifold...
Its a nachi 6203 2rs (double sealed)
This bearing also fits in the ford factory automatic belt tensioner on all F150's. I found the bearing in stock at fastenal for $1.79 each!

Hopefully this helps others looking to find this bearing...
Install went smooth, but I discovered a hair bit of squeal in one of my other whipple idler bearings. I will be fixing this next, and I'm likely going to change out the remainder of my factory bearings while I'm at it..
Last edited by Especial86; 07-06-2014 at 12:09 PM.
07-08-2014, 09:33 PM
#23
Senior Member
Whats the final all-up cost of this job. You really got me thinking about doing this to my '05.
07-08-2014, 10:53 PM
#24
The only parts I "really" needed to REPLACE on the kit were the injectors (too small) and the bosch pump relay (fried). I also "needed" the tune and tuner, and 1 idler pulley (missing)..
Otherwise, I could have just bolted the kit right in.. I elected to do the extra mods and work to ensure a safe and reliable FI experience. But they also netted me some more power too

You can expect to pay around 3k-5.5k for a used and maybe even a new kit.... But you may even get luckier then I did...
Keep your eyes on the forums and Craigslist. I've seen them pop up here and there.. Dollar for dollar the whipple is most definitely the best bang for the buck. If you factor in what most mods cost for the power they yield, supercharging, or turbocharging is the only way to go..
I was considering a turbo setup before I found this kit. But reliability with a turbo system via remote mount was not looking too legit.. You can turbo in the engine bay, but its going to take a LOT of work, time and money... Even then, you still would not have the street-ability you can get with a blower.. If your truck is a daily driver, or a weekend beast, I highly recommend a supercharger...
08-14-2014, 08:23 PM
#25
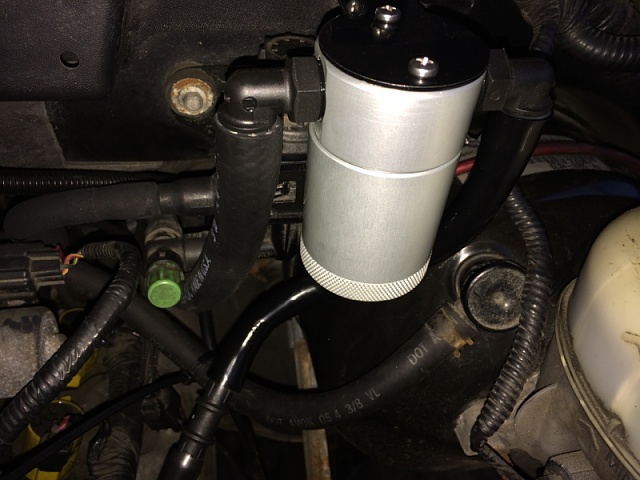
Catch can install...
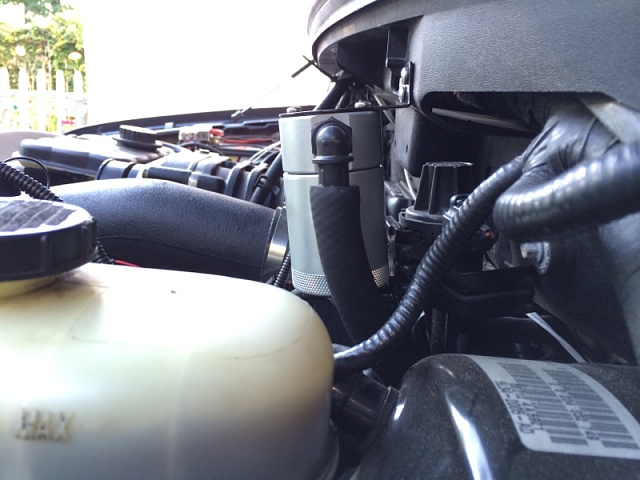
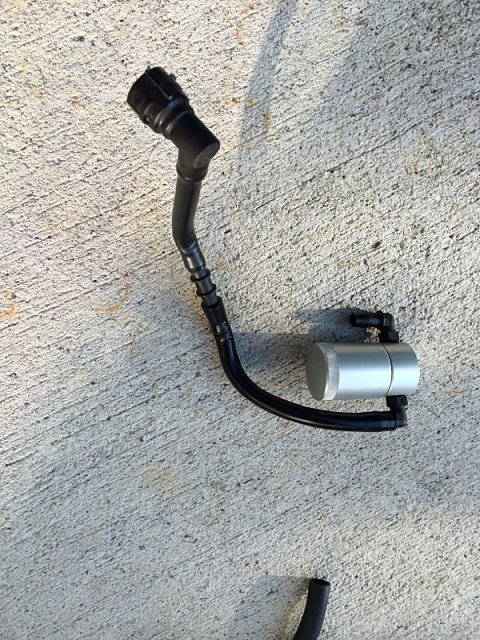
I ordered an oil catch can from JLT. It's the catch can kit they make for the whipple and Roush charged raptors.. I chose this kit due to the fact that it uses OEM connectors, and includes everything necessary.. $119 shipped..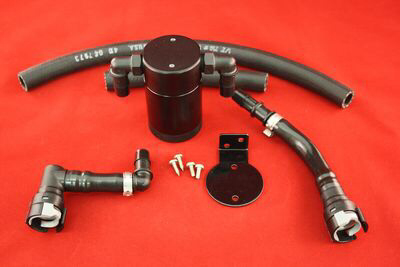
Most of these bends and connectors did work for me. But I was forced to modify my original line because the 45 degree JLT raptor connector was prone to kinking (because of the power steering reservoir bracket) at the valve cover connection.. The hoses and 90 degree connector with the S bend was used directly on the PCV.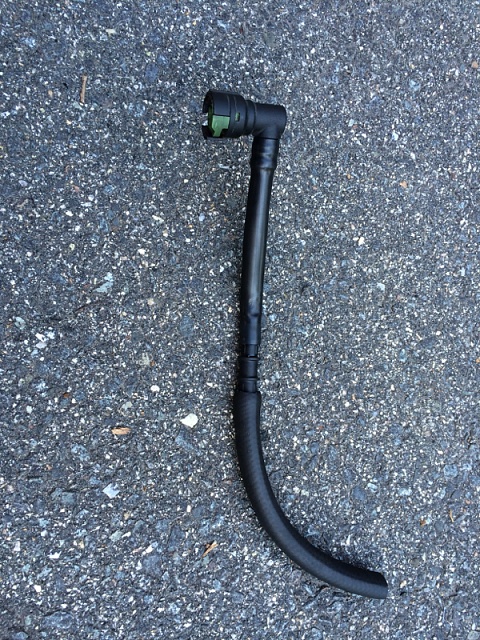 Modified factory hose..
 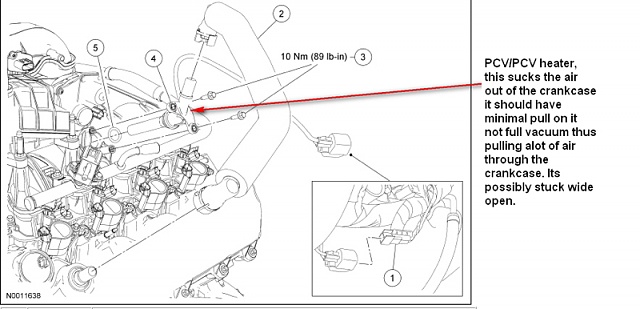 How the factory hose is used on a stock truck..
 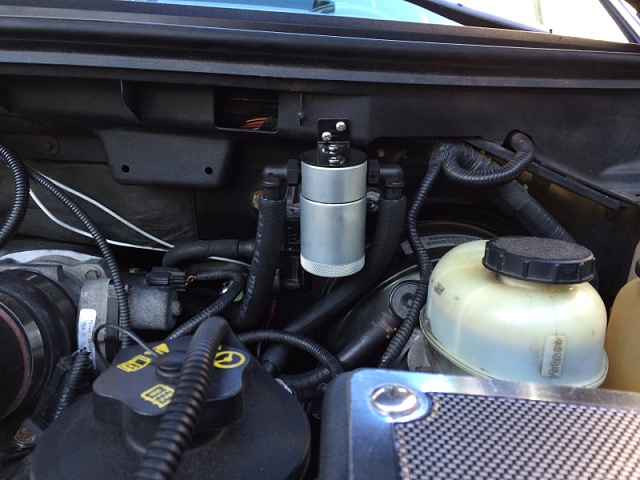 The catch can finished.. The left side flows out of the catch can towards the PCV valve that's mounted on the whipple intake snout.. The right of the catch can is the inlet. This is the line coming from the valve cover (driver side).
 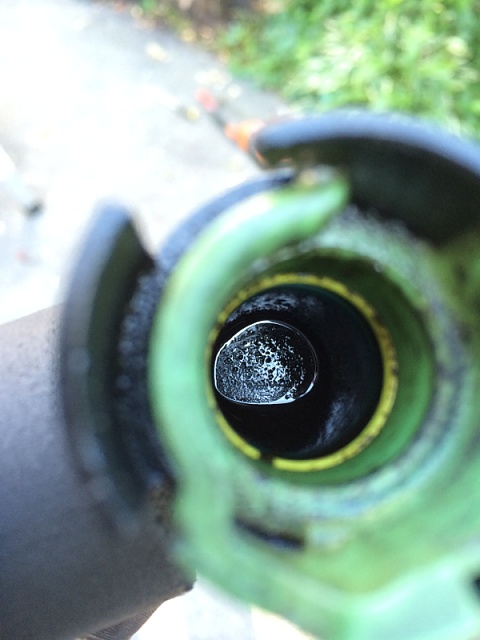 Reason for a catch can.. Being supercharged also mean high crankcase pressures. The venting of this pressure tends to produce oil mist. Oil mist is now collected by the catch can before the vented crankcase air and vapors are sent to the PCV valve.. The PCV sits right behind the throttle body, and the air and gasses get sent through the intake manifold to be burned..
 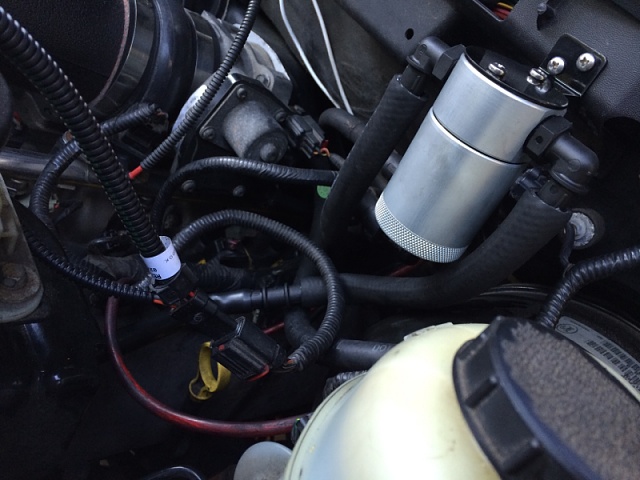 It's hard to see the connection points to the valve cover and whipple in this crowded area. So far I've got like 10 miles on this catch can, and its still empty. I'm going to check it in 100 miles and see how much oil it catches. All the oil this can catches is oil that doesn't get in my blower screws, and on innercooler.. Oil coating these parts will cause dirt to stick, and air charge temps to rise.. So supercharged vehicles have a big incentive to run one. NA motors can still benefit from them with cleaner intake manifold runners and valves..
 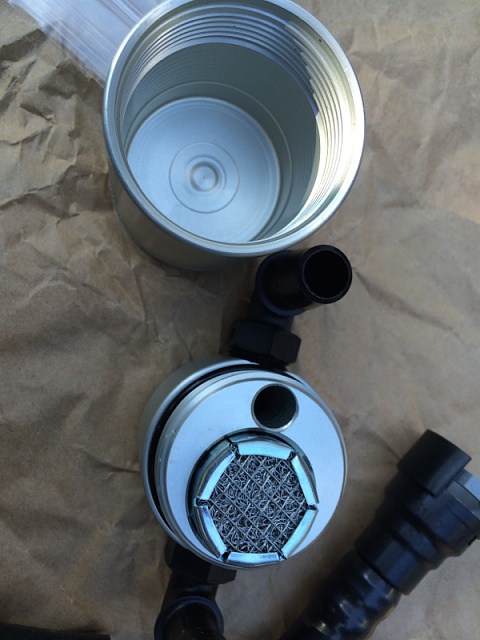 flow is in on the filter side, and out on the unfiltered side..
I might bend the bracket up a little bit to level off the catch can..
I ordered an oil catch can from JLT. It's the catch can kit they make for the whipple and Roush charged raptors.. I chose this kit due to the fact that it uses OEM connectors, and includes everything necessary.. $119 shipped..
Most of these bends and connectors did work for me. But I was forced to modify my original line because the 45 degree JLT raptor connector was prone to kinking (because of the power steering reservoir bracket) at the valve cover connection.. The hoses and 90 degree connector with the S bend was used directly on the PCV.
 Modified factory hose..
  How the factory hose is used on a stock truck..
  The catch can finished.. The left side flows out of the catch can towards the PCV valve that's mounted on the whipple intake snout.. The right of the catch can is the inlet. This is the line coming from the valve cover (driver side).
  Reason for a catch can.. Being supercharged also mean high crankcase pressures. The venting of this pressure tends to produce oil mist. Oil mist is now collected by the catch can before the vented crankcase air and vapors are sent to the PCV valve.. The PCV sits right behind the throttle body, and the air and gasses get sent through the intake manifold to be burned..
  It's hard to see the connection points to the valve cover and whipple in this crowded area. So far I've got like 10 miles on this catch can, and its still empty. I'm going to check it in 100 miles and see how much oil it catches. All the oil this can catches is oil that doesn't get in my blower screws, and on innercooler.. Oil coating these parts will cause dirt to stick, and air charge temps to rise.. So supercharged vehicles have a big incentive to run one. NA motors can still benefit from them with cleaner intake manifold runners and valves..
  flow is in on the filter side, and out on the unfiltered side..
I might bend the bracket up a little bit to level off the catch can..
Last edited by Especial86; 08-14-2014 at 08:59 PM.
The following users liked this post:
Especial86 (08-15-2014)
08-17-2014, 11:02 PM
#27
402 RWHP on Mustang Dyno
Join Date: Jan 2013
Location: Nebraska
Posts: 8
Likes: 0
Received 0 Likes
on
0 Posts
Great thread, definitely helpful. I have plans in the near future to put a whipple on my 07 FX4. I'm just waiting for the right deal. Stage 3 has a great kit but it's a little steep for me now.
08-18-2014, 08:42 PM
#28
12 Second Truck
Nice work! Have you noticed the hoses for the catch can being sucked into a colapse condition. Mine did this after a short time. I went and bought a short piece of pex pipe from Lowe's and shoved inside them to prevent the colapse. Worked great. My catch can has been keeping things clean for nearly 4 years now.
08-18-2014, 09:17 PM
#29
Thanks!
I haven't noticed yet, but it is a concern of mine.. I want to find the same pipe that ford and JLT used on the PCV system and custom bend my own 1 piece hard lines.. I can't seem to find out what kind of pipe it is though..
How much oil do you see usually? I haven't seen a drop yet in 150 miles..
I pulled the JLT filter out and did feel a very small amount of oil coating the inlet. But I'm starting to wonder if the JLT filter is a bit restrictive. The do have a revised screen type filter I might pick up if I don't see any oil....
Finally got around to cleaning up some of the wires and vac lines this weekend..
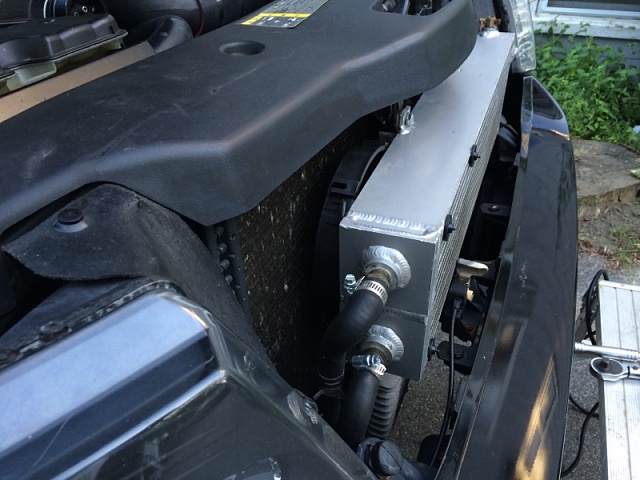
I also didn't get around to showing how I added a SPAL 7.5" puller fan to my Heat exchanger.. I wired it from a relay, then to a switch in the cab to turn it on and off.. I usually just leave it on
I haven't noticed yet, but it is a concern of mine.. I want to find the same pipe that ford and JLT used on the PCV system and custom bend my own 1 piece hard lines.. I can't seem to find out what kind of pipe it is though..
How much oil do you see usually? I haven't seen a drop yet in 150 miles..
I pulled the JLT filter out and did feel a very small amount of oil coating the inlet. But I'm starting to wonder if the JLT filter is a bit restrictive. The do have a revised screen type filter I might pick up if I don't see any oil....


Finally got around to cleaning up some of the wires and vac lines this weekend..
I also didn't get around to showing how I added a SPAL 7.5" puller fan to my Heat exchanger.. I wired it from a relay, then to a switch in the cab to turn it on and off.. I usually just leave it on

Last edited by Especial86; 08-18-2014 at 09:32 PM.
09-14-2014, 04:52 PM
#30
Catch can update..
So my catch can wasn't catching squat for oil.. The container was hardly coated in a film..
So I decided to do some modding to the catch can..
Attachment 341811
First I modified my inlet line to the catch can with nylon tubing and put some custom bends onto it with a heat gun..
Almost exactly like factory pipe.
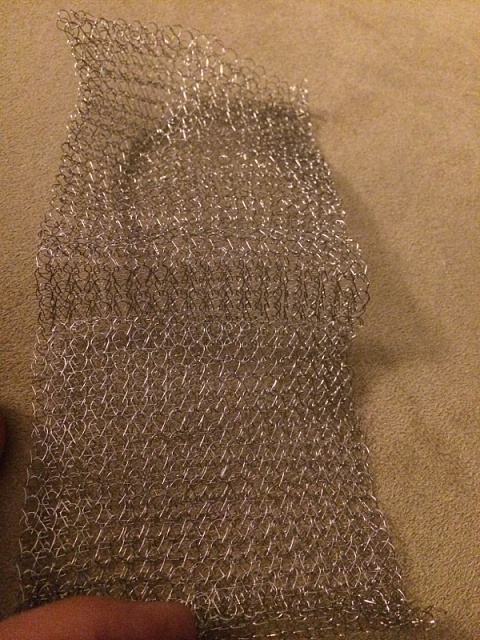
Then used some stainless steel lint trap filtering I picked up at Wal-mart. I trimmed it, rolled it up pushed it into the small hole on the JLT oil catch can.
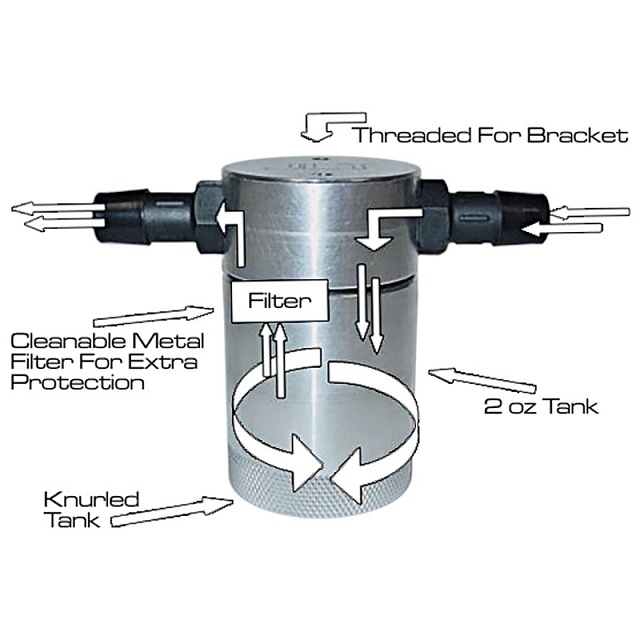
I then flipped the catch can around, and used the small hole (with the lint trap filter) as the "new" inlet to the catch can..
The other larger filter is now on the outlet.
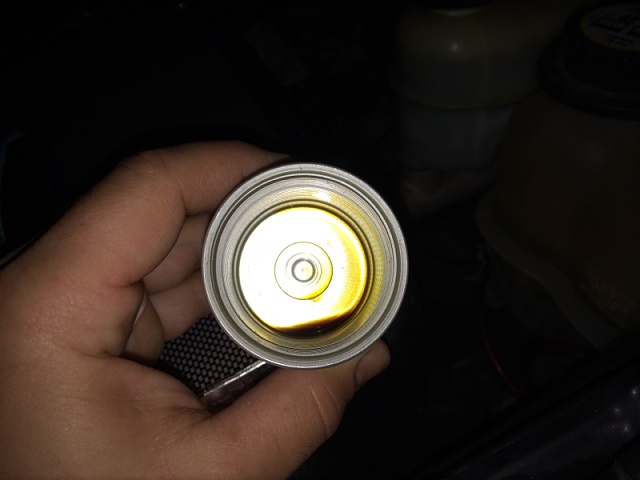
My results went from this^^
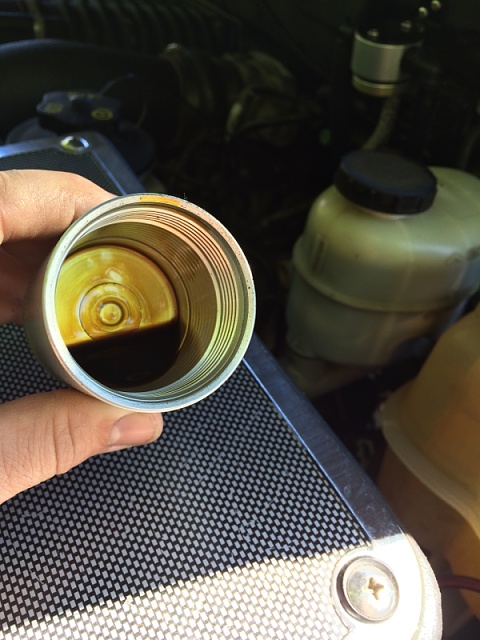
To this ^^^ with the addition of the "coalesce" filter.. Just flipping the can was not enough.. The extra filter was needed to keep the oil in the can.. The oil was passing through the big filter on the outlet side without the stainless steel mesh..
Now this catch can works great!
I caught all that oil pictured in about 750 miles of mostly highway driving....
Also..
(I'm going to be replacing the catch can outlet line with nylon pipe when I get the chance..)
So my catch can wasn't catching squat for oil.. The container was hardly coated in a film..
So I decided to do some modding to the catch can..
Attachment 341811
First I modified my inlet line to the catch can with nylon tubing and put some custom bends onto it with a heat gun..

Almost exactly like factory pipe.

Then used some stainless steel lint trap filtering I picked up at Wal-mart. I trimmed it, rolled it up pushed it into the small hole on the JLT oil catch can.

I then flipped the catch can around, and used the small hole (with the lint trap filter) as the "new" inlet to the catch can..
The other larger filter is now on the outlet.

My results went from this^^

To this ^^^ with the addition of the "coalesce" filter.. Just flipping the can was not enough.. The extra filter was needed to keep the oil in the can.. The oil was passing through the big filter on the outlet side without the stainless steel mesh..

Now this catch can works great!
I caught all that oil pictured in about 750 miles of mostly highway driving....
Also..
(I'm going to be replacing the catch can outlet line with nylon pipe when I get the chance..)
Last edited by Especial86; 09-14-2014 at 05:03 PM.

