Edlebrock/Saleen F150 Exhaust help
 04-16-2009, 05:30 PM
#1
Member
Thread Starter
Join Date: Apr 2009
Posts: 46
Likes: 0
Received 0 Likes
on
0 Posts
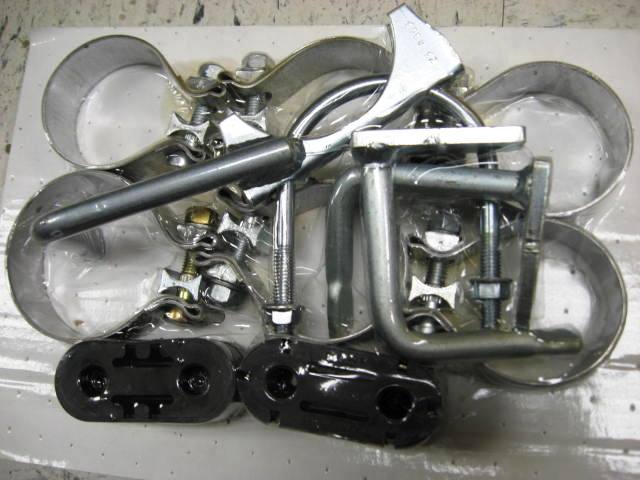
I just got my exhaust kit, cat back Edlebrock system, that is the dual exits for the 08 F150. I have laid it out and I have several questions.
I can tell where MOST parts go; however, there are some hangers in the parts that I am not too sure about.
There are 2 hangers and 2 rubber female unions for a hanger to insert into. I am assuming that these are for the rear exit pipes to hang from? Am I correct?
Also, with the 2 hangers, there is 1 hole in them. Do I have to bolt that up somewhere up high and put the rubber female union on it and hang the pipe on it? If so, does someone have pics of this from underneath their truck so that I may see it? Do I need to drill something and purchase some bolts??
Any help is appreciated.

 04-16-2009, 08:44 PM
#4
Senior Member
here are some pics of my saleen exhaust install
as they are in here
muffler rear hanger
how the extension pipe runs (angles up)
@ 10 inches of stock pipe used in the install (slides into the saleen pipe)
routing over the rear axle (4 parts total)
driver side tail pipe hangar ( I heated mine and bent them some to install stainless tips)
pass side tail pipe hanger (heated and bent some, was a lil long so I cut some off to clear the spring, and welded a washer to keep the rubber from sliding off)
hope these help....OH I also didn't use the big 3" clamp/mount at the front of the muffler. you may want to.
Last edited by FOMOCO466; 04-16-2009 at 08:51 PM.
04-16-2009, 09:19 PM
#5
Senior Member

Join Date: Jan 2008
Location: nj
Posts: 127
Likes: 0
Received 0 Likes
on
0 Posts
fomoco how does it sound? i have the gibson dual system where the pipes exit out the back on an angle on each side.. just interested saw the saleen exhaust on a couple forums..
thanks
thanks
04-16-2009, 09:30 PM
#6
Senior Member
here's a link to another post with vids I made of the truck.
https://www.f150forum.com/f19/2004-08-f150-saleen-cat-back-system-17623/
https://www.f150forum.com/f19/2004-08-f150-saleen-cat-back-system-17623/
04-17-2009, 06:45 AM
#7
Member
Thread Starter
Join Date: Apr 2009
Posts: 46
Likes: 0
Received 0 Likes
on
0 Posts
Thanks for all your help. I got it installed in about 1.5 hours, flying solo.
My question still lies here...where the exhaust exits, the passenger side is touching the metal and it is apparent that I would have to weld an extension to the hanger in order to accommodate this. On the driver's side, I think that the hanger bracket and the exit hanger are dangerously close to the leaf springs. Is this the case on yours too. I do not see a way around it and I do not think that anything will ever get crushed, but won't it clatter over my Chicago potholes?
My question still lies here...where the exhaust exits, the passenger side is touching the metal and it is apparent that I would have to weld an extension to the hanger in order to accommodate this. On the driver's side, I think that the hanger bracket and the exit hanger are dangerously close to the leaf springs. Is this the case on yours too. I do not see a way around it and I do not think that anything will ever get crushed, but won't it clatter over my Chicago potholes?
Trending Topics
04-17-2009, 08:30 AM
#8


Thanks for all your help. I got it installed in about 1.5 hours, flying solo.
My question still lies here...where the exhaust exits, the passenger side is touching the metal and it is apparent that I would have to weld an extension to the hanger in order to accommodate this. On the driver's side, I think that the hanger bracket and the exit hanger are dangerously close to the leaf springs. Is this the case on yours too. I do not see a way around it and I do not think that anything will ever get crushed, but won't it clatter over my Chicago potholes?
My question still lies here...where the exhaust exits, the passenger side is touching the metal and it is apparent that I would have to weld an extension to the hanger in order to accommodate this. On the driver's side, I think that the hanger bracket and the exit hanger are dangerously close to the leaf springs. Is this the case on yours too. I do not see a way around it and I do not think that anything will ever get crushed, but won't it clatter over my Chicago potholes?
the only problem I now have with mine is that my driver's side hangs lower than my passenger side (I think we stretched the rubber hangar when installing) so I will probably end up welding something in place eventually but for now it's great, neither side hits anything and it sounds awesome.
04-17-2009, 09:11 AM
#9
Member
Thread Starter
Join Date: Apr 2009
Posts: 46
Likes: 0
Received 0 Likes
on
0 Posts
I agree, it does sound awesome. For the cost, I do not think that you can beat it. Do you have any excess vibration in the cabin as I now have? It is from the throaty exhaust, but not nearly as bad as my Jeep was with a full Magnaflow system.
I did not stretch any rubber because when I put the rubber unions on, I placed them first on the exhaust hanger and on the frame hanger and then I bolted the hanger to the frame. This was the easiest because I felt that it would be very difficult to press it in there if it was first bolted to the frame. Those holes are so small and the the eyelit must pass...so my experience was pleasurable done that way.
I did not stretch any rubber because when I put the rubber unions on, I placed them first on the exhaust hanger and on the frame hanger and then I bolted the hanger to the frame. This was the easiest because I felt that it would be very difficult to press it in there if it was first bolted to the frame. Those holes are so small and the the eyelit must pass...so my experience was pleasurable done that way.
04-17-2009, 01:14 PM
#10
Senior Member
like you can see in the vids where mine comes out, I heated and bent the hangaers to give mine a lil drop to clear the 3 1/2 stainless tips. You could just put a open end wrench on it and pull down to bend the hangars without heating it, or install a washer or two under the hanger where it mounts to the frame....just install a locknut on it to keep it from getting loose.