Calling All Paint Pro's!!!!
 12-27-2012, 03:01 PM
#1
Senior Member
Thread Starter
I'm wanting to do some painting on my truck to make it look better. I've got plasti-dipped rims that are starting to look like crap, and I'm getting ready to peel the dip off and paint them. I'm also wanting to paint some other things while I'm at it. Does anyone have an idea on what I should use to paint these things and how? I'm wanting it to be glossy black.
Things to paint...
1. Rims
2. Fender Flares
3. Door Handles
4. Mirrors
5. The piece by the wipers
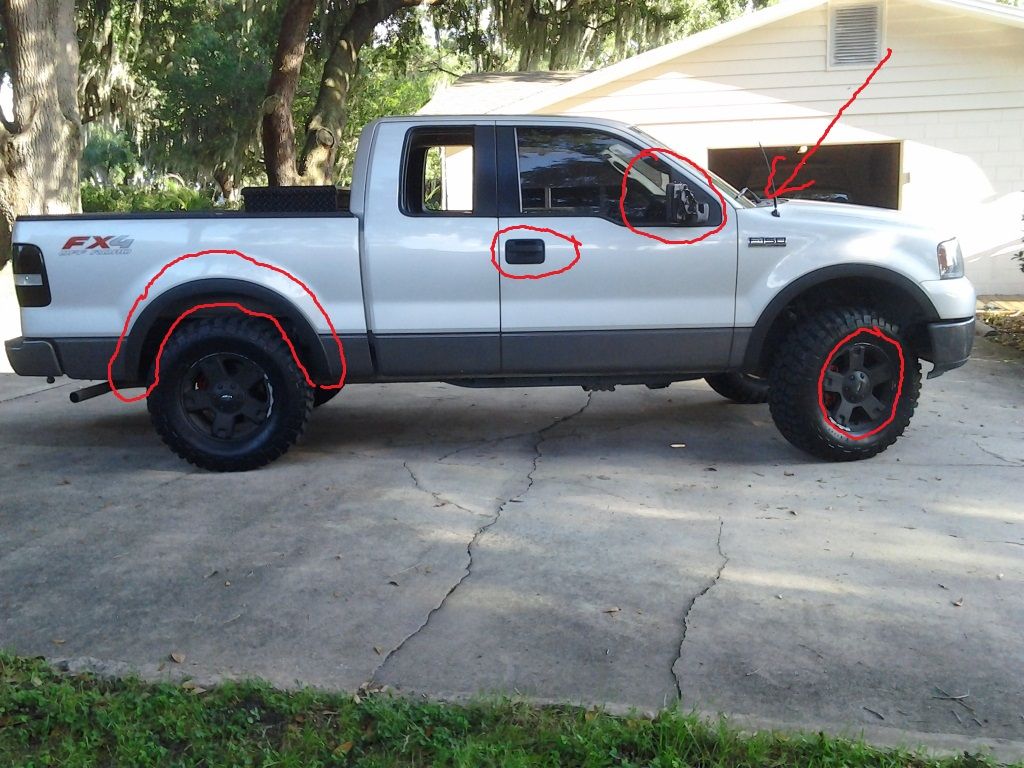
6. Bed Railing
7. Part of the bumper
8. Tailgate door handle

Oh, and don't worry about the tail lights. I took those things off my truck a long time ago. Went with the night shade instead. If anyone wants to buy these tail lights, i'll let them go for super cheap. Still got them in the box.
Things to paint...
1. Rims
2. Fender Flares
3. Door Handles
4. Mirrors
5. The piece by the wipers
6. Bed Railing
7. Part of the bumper
8. Tailgate door handle
Oh, and don't worry about the tail lights. I took those things off my truck a long time ago. Went with the night shade instead. If anyone wants to buy these tail lights, i'll let them go for super cheap. Still got them in the box.
 12-27-2012, 03:30 PM
#2
Senior Member
Thread Starter
I'm thinking I can just get some cans of spray paint and painters tape and garbage bags. Use the tape and bags to mask everything off real good. Sand it all down real good. Spray some primer on it, then paint it black, then top it all off with clear coat. The only problem is, I have no idea what kind of paint or primer or clear coat. I don't even know the difference between lacquer, enamel, satin, rustoleoum, or whatever the different labels are on the spray cans. Any help is greatly appreciated!
12-27-2012, 03:55 PM
#3
Go to an auto body supply shop. They make high grade spray paint that when used right looks like it came from a paint booth. They have videos on YouTube of people doing touch ups on their cars like this.
12-27-2012, 04:00 PM
#4

How does this look to you? I did this with some black satin rusto paint. Took my time and did it right after taking off all of the plasti dip mess that I did the first time.
Last edited by 80575; 09-23-2020 at 08:36 AM.
12-27-2012, 04:17 PM
#5
Senior Member
Thread Starter
12-27-2012, 04:19 PM
#6
Senior Member
Thread Starter
 12-27-2012, 04:21 PM
#7
Senior Member
The plastic pieces like the wiper cowl and the fender flares you could use a paint designed for exterior plastic. I've done quite a few plastic pieces with that type of spray paint and it worked out just fine. Just make sure to start with light coats to not get any runs and try to do it in a controlled environment like a garage. I would recommend taking off anything you can because taping and covering will take a lot of time imo. As for the wheels they make a wire brush that attaches to a drill and I've used to sand the wheels to a coarse surface before and have successfully painted a few sets of wheels and really turned out well with just some black metal spray paint I bought at Lowe's. If you can I would take the truck to a tire shop and take the outside wheel weights off and get them re balanced with weights on the inside of the wheel. I'm no pro but hopefully this helps you out a little. Please not I used primer, 2-3 coats of paint, and a couple coats of clear on all applications.
Trending Topics
12-27-2012, 04:26 PM
#8
No, I wasn't worried about them at the time because I plan on getting some aftermarket ones. Granted they are faded, but they will do for now. When and if you decide to do it, just remember to take your time, and PREP IS KEY! The better you prep it, the better it will turn out. I took my time and roughed up the paint, primed and then painted. Turned out much better than I even expected. Good luck when you decide to do it!
The following users liked this post:
FL0rida CrAcK3r (12-28-2012)
12-27-2012, 04:50 PM
#9
Senior Member
The whole painting process is a slow one. As Fugzz said, prep is key. Metal body parts need to be sanded and primed with 2+ thin coats of an etching primer...a high build primer is not necessary unles you have a lot of pitting in the metal. I like to sand between every 2 coats of primer until it is perfectly smooth. With newer trucks, you can usually spray 2 coats, wet sand with some 220grit, spray more light coats, and do a final sand. Next step is paint. Where primer is pretty forgiving of you get heavy handed, paint is not. Heavy layers of paint make for drips, runs, and lots of orange peel. Spray 3-4 super thin coats of paint, 30 min apart assuming temps between 60 and 80. This wil help the layers bond to each other. Wait 12-24 hours before sanding, but wet sand with 400 grit to start. Next, spray a couple more thin coats 30 min apart and let fully cure again before sanding. This time the surface should be pretty good. Wet sand with 800 grit, then 1000 grit until it is smooth. Last step is to spray 2 more super light coats and let dry. Sand with 1000 grit again. Now its on to a clear coat. Purchase the best clear that you can afford. I spray the clear just like paint, but I start with 1000 grit and work my way up to 2000 grit for the final wet sand. After that, I rinse the fresh paint with purified water and let this cure for 7 days if I can. Finally, I apply a nice coat of liquid wax to protect the new piece and then go show it off. This basic process will give you the best results from a rattle can.
The following users liked this post:
FL0rida CrAcK3r (12-28-2012)