
Roadmaster Active Suspension (RAS) install and review (long post - pic heavy)
 10-19-2014, 03:15 PM
#1

The truck:
2013 Platinum 4wd 7200lb GVWR 3.31 axle EcoBoost
Payload sticker of 1170lbs
I've always liked the way the Platinum rode, until I added some weight and she settled way down on the overloads. It didn't take much weight, as 3-4 adults in the cab would typically put me on the overloads.
I'd had my eye on the Roadmaster Active Suspension for a while, but I was unable to pull the trigger on it for a number of reasons (I won't bore you with those details). I was able, through the graces of this forum, to pick up a very gently pre-owned RAS #3611-Y (Model MK3-XXY) just last week. Needless to say I was very excited to get this installed due to the numerous pages of threads that I've read on the product.
I will start by saying that I have NOT been noticing a shudder issue or much of an axle wrap issue...at least nothing that was 100% noticeable. I bought this product to prevent the amount of sag my truck exhibits and to improve upon the "twitchy-ness" the truck exhibits while unloaded on choppy roads.
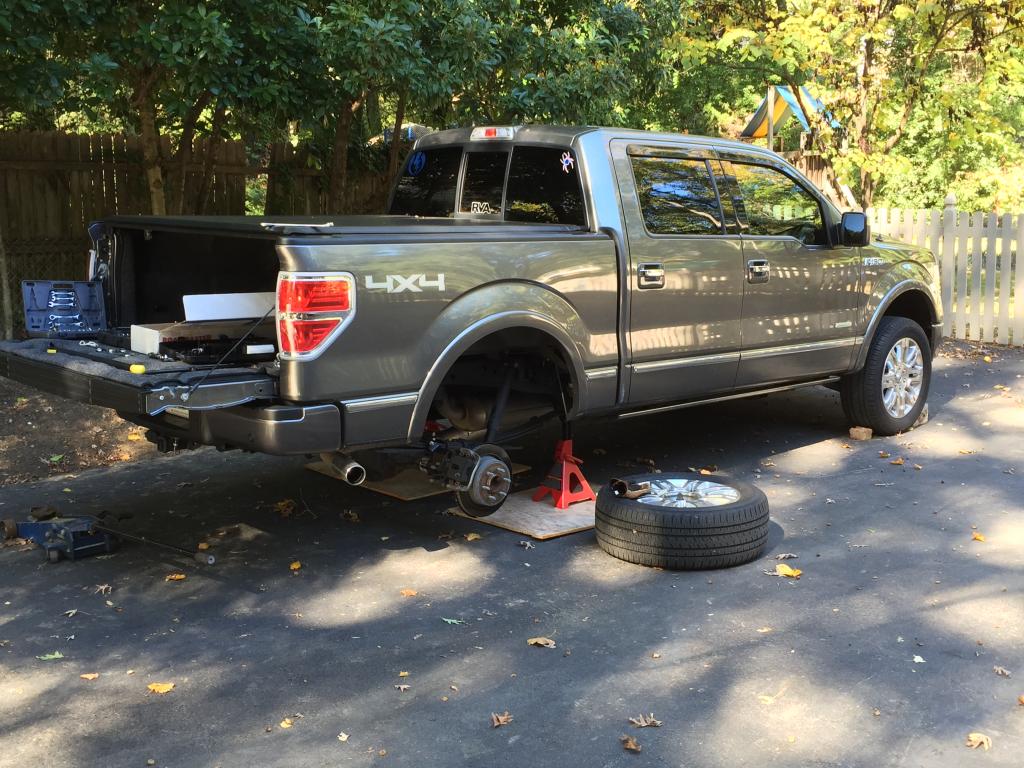
Install (pictures below):
The install was simple and easy. It took me about 2 hours, by myself, at my buddies house (level driveway and access to large jackstands). It would have taken less time had we not been talking and watching his 3 year old triplets run around. I followed the Youtube install as a guide.
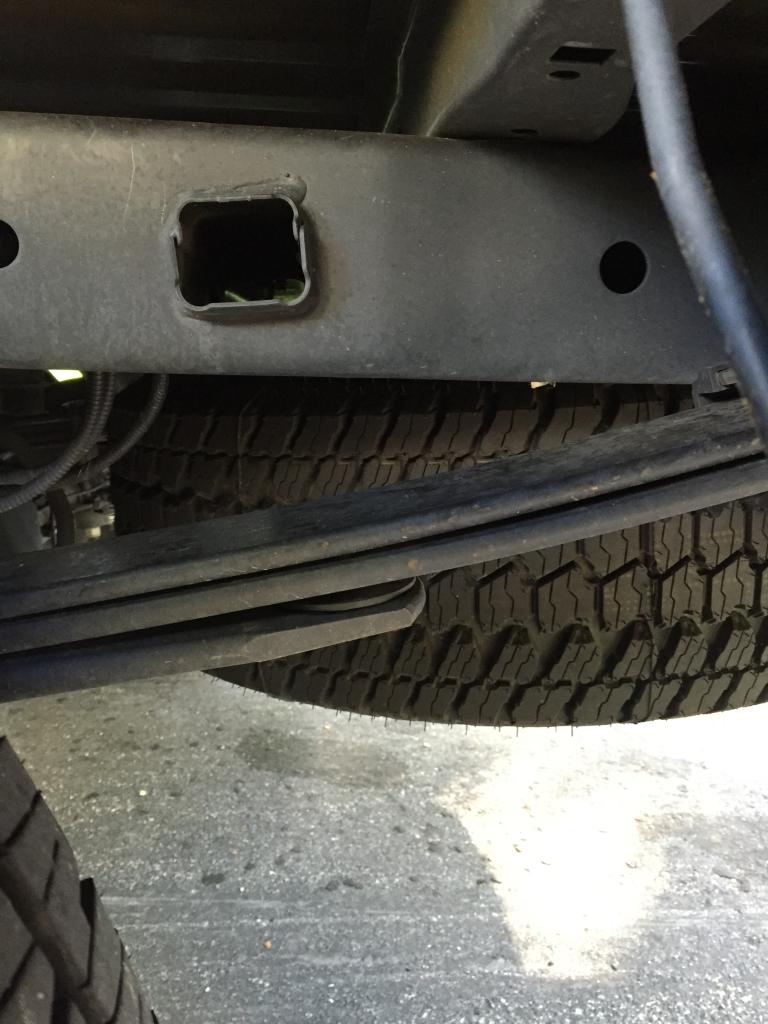
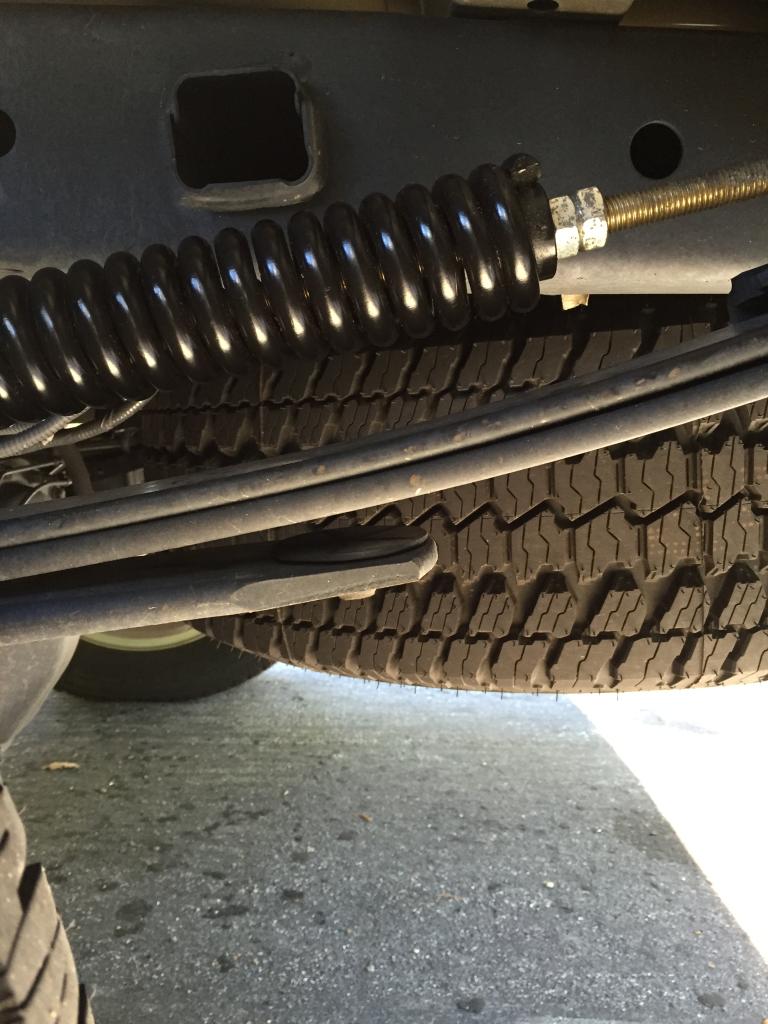
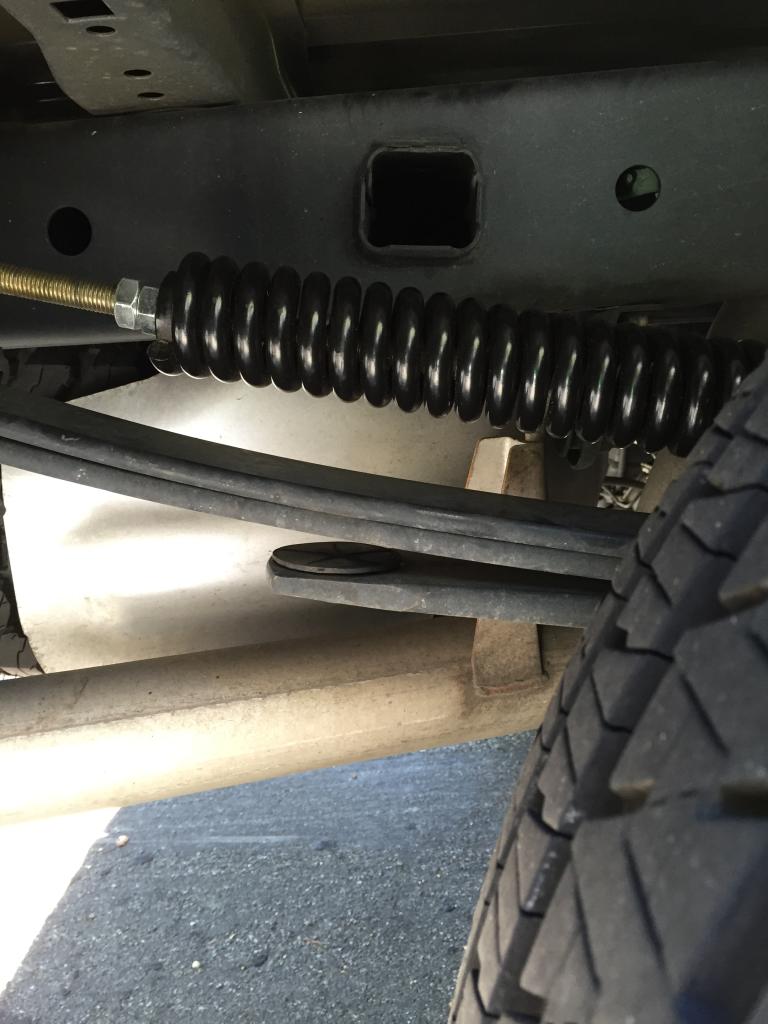
Started on the passenger's side. Bolted the spacer in front of the spring perch/block/u-bolt and snugged it down. Hand tightened the spring assembly to pull out the slack, centered the hanger of the RAS over the rear of the leaf eyelet and began setting tension into the spring. I decided that since I don't haul & tow heavy that I'd go with the white disc. This is the 1mm gap setting. I set the tension so that the disc would tightly slide through over 80% of the gaps on the spring. This tight white setting was going to be perfect for my needs based upon my reading. Snugged the two lock nuts against the backside of the spring and moved over to the driver's side...rinse and repeat.
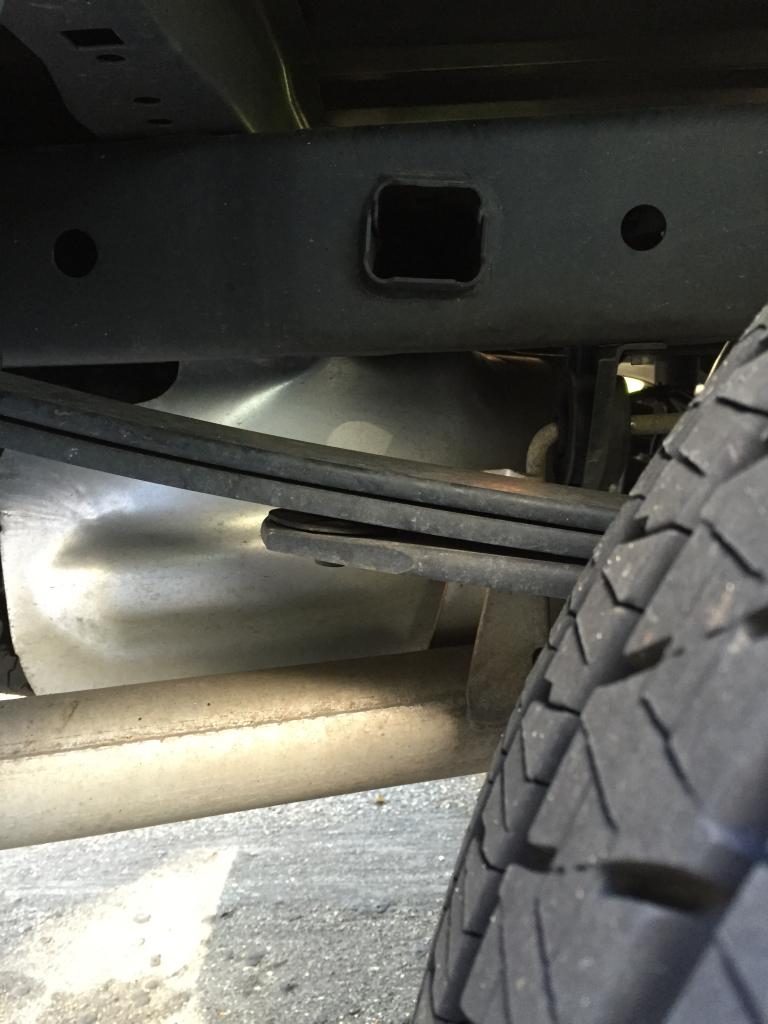
Install was almost too easy. Bolted the wheels back on. Lowered the truck back to the earth. Rechecked everything for tightness (lugs mainly) and headed back to the house. I rechecked lug torque after the 15mile trip back home just for good measure. I was pleased to see how the RAS begins to engage the springs once the truck is back on the ground. You'll see in the after pics below as compared to the before pics that the two springs retain some arch and are much further away from the overload spring now. This was exactly what I was in search of.
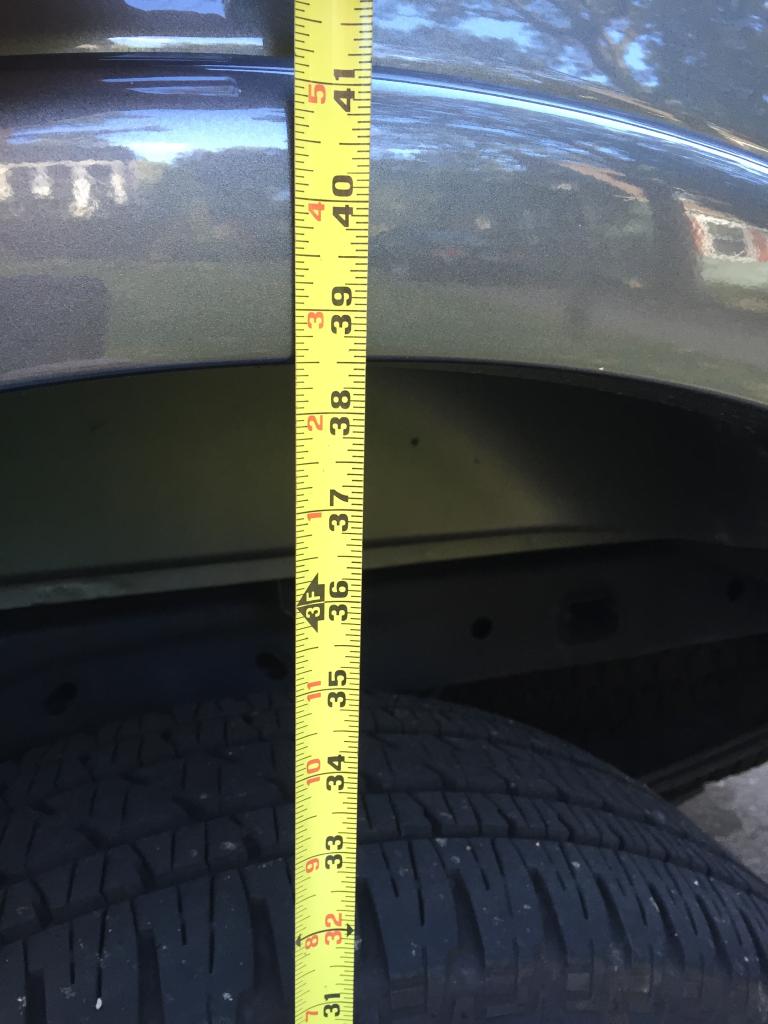
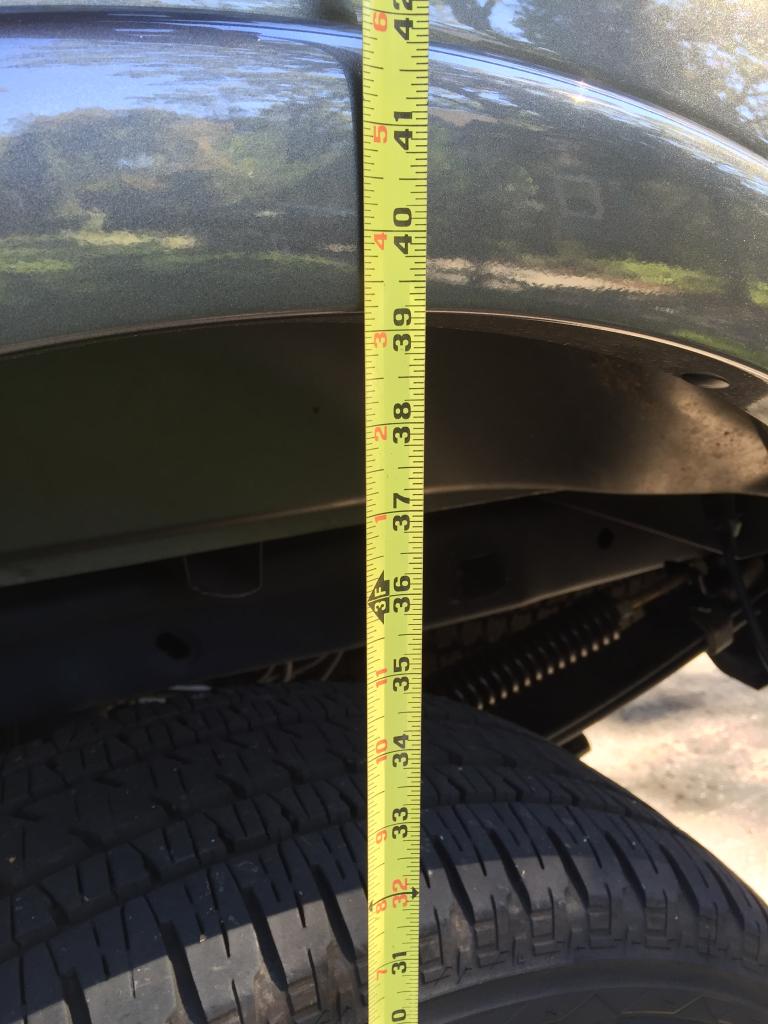
Before the install my rear fender lip height was:
Driver's = 38.5"
Passenger's = 38.5"
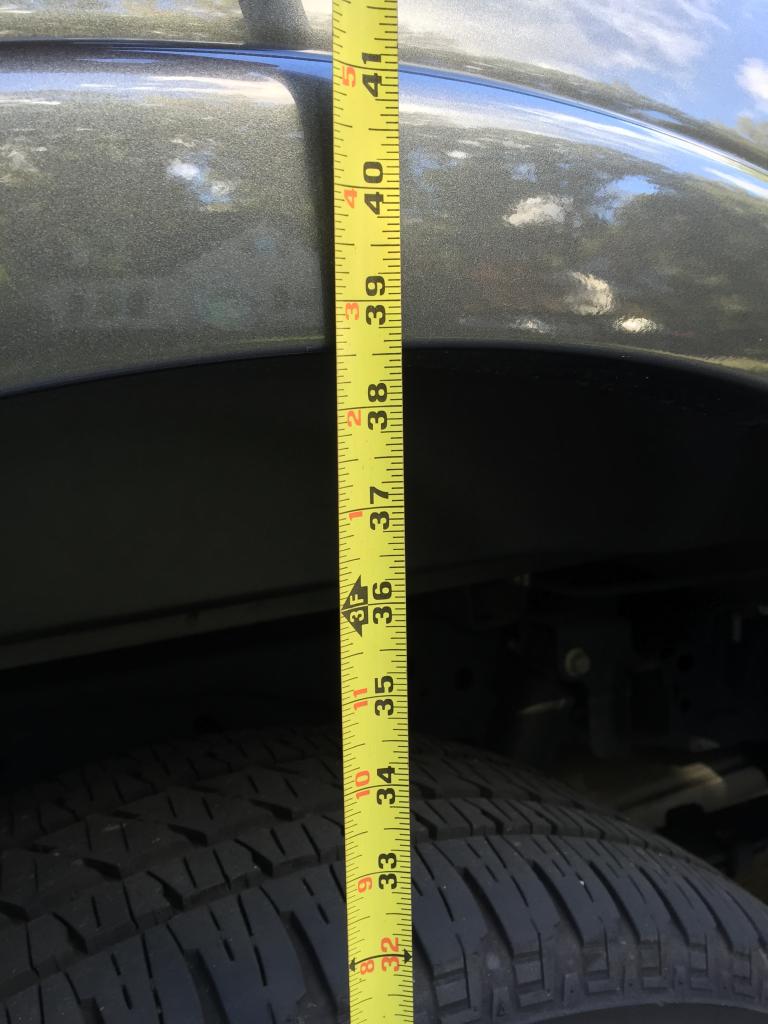
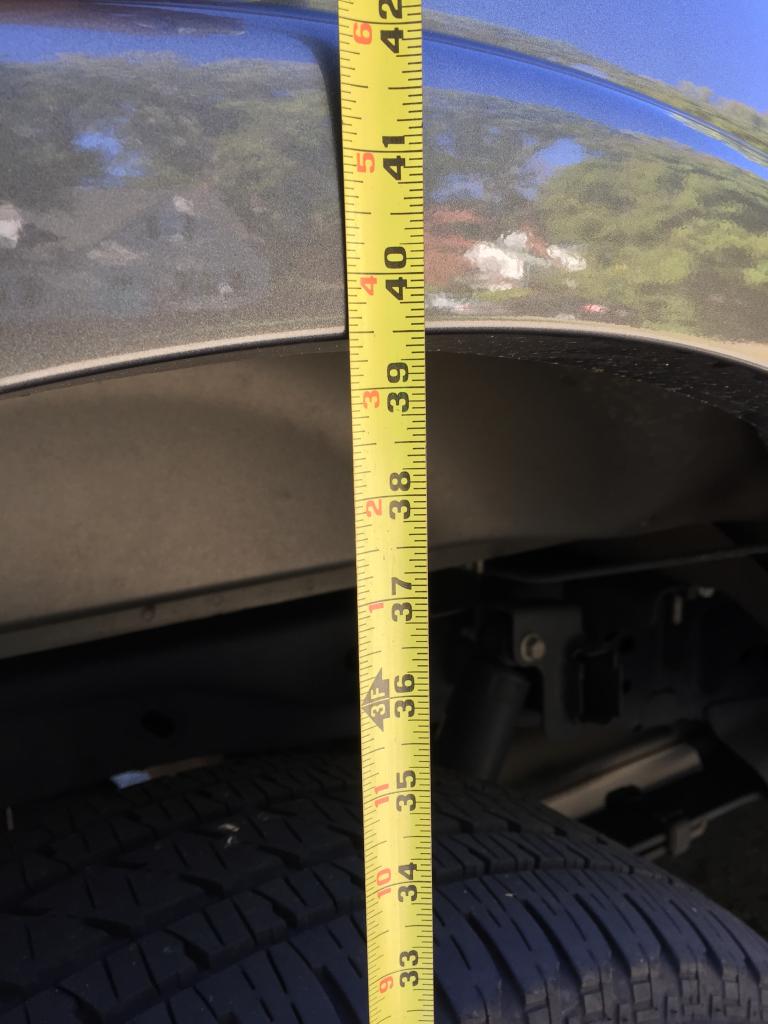
After the install my rear fender lip height was:
Driver's = 39.25"
Passenger's = 39.5"
I tried to park in the exact position in front of my house. I'm not too concerned about a 0.25" difference, especially with an almost full tank of fuel on board (36 gallon tank).
The ride:
WOW, the difference in unloaded ride is immediately noticeable. The stretch of highway I took on the return home is full of choppy concrete, aged asphalt and uneven bridge/overpasses. The truck is drastically less unsettled over this stretch at 60-70mph. The rear of the truck is less jittery and twitchy and just feels more planted. A couple of spirited launches at stop lights revealed that I may have been feeling some axle wrap previously, as the truck just smoothly and quickly accelerates...while trying to break traction in the meantime.
I won't have the truck loaded heavy for at least a few more weeks (hunting trips and a T'giving trip with 4 adults and luggage) but I'm curious to see how the loaded ride will be. Maybe I'll have to find an excuse to get some mulch for the rental property
Overall...I'm glad I purchased this product and I'll be excited to see how it continues to be beneficial loaded and unloaded.
Here are the pics:
Driver's side before install:
Passenger's side before install:
During install:

Driver's side after install:
Passenger's side after install:
2013 Platinum 4wd 7200lb GVWR 3.31 axle EcoBoost
Payload sticker of 1170lbs
I've always liked the way the Platinum rode, until I added some weight and she settled way down on the overloads. It didn't take much weight, as 3-4 adults in the cab would typically put me on the overloads.
I'd had my eye on the Roadmaster Active Suspension for a while, but I was unable to pull the trigger on it for a number of reasons (I won't bore you with those details). I was able, through the graces of this forum, to pick up a very gently pre-owned RAS #3611-Y (Model MK3-XXY) just last week. Needless to say I was very excited to get this installed due to the numerous pages of threads that I've read on the product.
I will start by saying that I have NOT been noticing a shudder issue or much of an axle wrap issue...at least nothing that was 100% noticeable. I bought this product to prevent the amount of sag my truck exhibits and to improve upon the "twitchy-ness" the truck exhibits while unloaded on choppy roads.
Install (pictures below):
The install was simple and easy. It took me about 2 hours, by myself, at my buddies house (level driveway and access to large jackstands). It would have taken less time had we not been talking and watching his 3 year old triplets run around. I followed the Youtube install as a guide.
Started on the passenger's side. Bolted the spacer in front of the spring perch/block/u-bolt and snugged it down. Hand tightened the spring assembly to pull out the slack, centered the hanger of the RAS over the rear of the leaf eyelet and began setting tension into the spring. I decided that since I don't haul & tow heavy that I'd go with the white disc. This is the 1mm gap setting. I set the tension so that the disc would tightly slide through over 80% of the gaps on the spring. This tight white setting was going to be perfect for my needs based upon my reading. Snugged the two lock nuts against the backside of the spring and moved over to the driver's side...rinse and repeat.
Install was almost too easy. Bolted the wheels back on. Lowered the truck back to the earth. Rechecked everything for tightness (lugs mainly) and headed back to the house. I rechecked lug torque after the 15mile trip back home just for good measure. I was pleased to see how the RAS begins to engage the springs once the truck is back on the ground. You'll see in the after pics below as compared to the before pics that the two springs retain some arch and are much further away from the overload spring now. This was exactly what I was in search of.
Before the install my rear fender lip height was:
Driver's = 38.5"
Passenger's = 38.5"
After the install my rear fender lip height was:
Driver's = 39.25"
Passenger's = 39.5"
I tried to park in the exact position in front of my house. I'm not too concerned about a 0.25" difference, especially with an almost full tank of fuel on board (36 gallon tank).
The ride:
WOW, the difference in unloaded ride is immediately noticeable. The stretch of highway I took on the return home is full of choppy concrete, aged asphalt and uneven bridge/overpasses. The truck is drastically less unsettled over this stretch at 60-70mph. The rear of the truck is less jittery and twitchy and just feels more planted. A couple of spirited launches at stop lights revealed that I may have been feeling some axle wrap previously, as the truck just smoothly and quickly accelerates...while trying to break traction in the meantime.
I won't have the truck loaded heavy for at least a few more weeks (hunting trips and a T'giving trip with 4 adults and luggage) but I'm curious to see how the loaded ride will be. Maybe I'll have to find an excuse to get some mulch for the rental property
Overall...I'm glad I purchased this product and I'll be excited to see how it continues to be beneficial loaded and unloaded.
Here are the pics:
Driver's side before install:


Passenger's side before install:


During install:


Driver's side after install:


Passenger's side after install:


Last edited by MCDavis; 10-19-2014 at 04:56 PM.

The following 2 users liked this post by MCDavis:
BMWBig6 (10-21-2014),
vodkarocks (10-19-2014)
10-19-2014, 06:03 PM
#2

They are a good product for sure. I put a set on my wife's truck, and she noticed an immediate improvement over expansion joints.
One note on the install for those of you considering them: it can be done without removing the wheels. Tons of space in the wheel well, even for a gravity-enhanced person such as myself.
One note on the install for those of you considering them: it can be done without removing the wheels. Tons of space in the wheel well, even for a gravity-enhanced person such as myself.
The following users liked this post:
MCDavis (10-19-2014)
10-19-2014, 08:23 PM
#3
I think that if I'd done this on a two post lift that the install could be done more easily with the wheels on. For the 5 or so minutes it took to remove the wheels it was well worth it though.
The open wheel well also gave me a place to hide my head when the neighbor's tree unloaded a few hundred acorns during the install. Took at least a dozen of them on my back. Feels like getting hit with a paint ball.
Just took the truck for a spin on the way to the PO Box. The ride is far more controlled than without the RAS installed. The unloaded ride now feels like the loaded ride before and there is lots less aftershock vibration after hitting potholes and separations.
10-20-2014, 02:14 PM
#4

I think that if I'd done this on a two post lift that the install could be done more easily with the wheels on. For the 5 or so minutes it took to remove the wheels it was well worth it though.
The open wheel well also gave me a place to hide my head when the neighbor's tree unloaded a few hundred acorns during the install. Took at least a dozen of them on my back. Feels like getting hit with a paint ball.
Just took the truck for a spin on the way to the PO Box. The ride is far more controlled than without the RAS installed. The unloaded ride now feels like the loaded ride before and there is lots less aftershock vibration after hitting potholes and separations.
The open wheel well also gave me a place to hide my head when the neighbor's tree unloaded a few hundred acorns during the install. Took at least a dozen of them on my back. Feels like getting hit with a paint ball.
Just took the truck for a spin on the way to the PO Box. The ride is far more controlled than without the RAS installed. The unloaded ride now feels like the loaded ride before and there is lots less aftershock vibration after hitting potholes and separations.

The following users liked this post:
MCDavis (10-20-2014)
10-21-2014, 11:47 AM
#5
Senior Member
Great post with before/after pictures! Thanks for sharing your impressions! Is there a way to install or adjust the RAS without increasing ride height (preserving factory height when unloaded)?
The following users liked this post:
MCDavis (10-21-2014)
10-21-2014, 12:02 PM
#6
My research says yes, you can. If you were to set the tension, at full suspension droop, with just the tiniest bit of gap between the coils then you should not see much, if any, increase in unloaded height. Less tension means less interaction from the RAS though, so the benefits might not be as noticeable.
I think that Nolan could likely weigh in with more info.
I've also seen in a few places that some people have removed the factory block and gone with the black disc setting to give them back the ride height after the block removal. If I were looking to keep ride height and add the RAS, then I think this would be my course of action.
The following users liked this post:
BMWBig6 (10-23-2014)
10-22-2014, 11:02 AM
#7
Great post with before/after pictures! Thanks for sharing your impressions! Is there a way to install or adjust the RAS without increasing ride height (preserving factory height when unloaded)?
Thanks.
My research says yes, you can. If you were to set the tension, at full suspension droop, with just the tiniest bit of gap between the coils then you should not see much, if any, increase in unloaded height. Less tension means less interaction from the RAS though, so the benefits might not be as noticeable.
I think that Nolan could likely weigh in with more info.
I've also seen in a few places that some people have removed the factory block and gone with the black disc setting to give them back the ride height after the block removal. If I were looking to keep ride height and add the RAS, then I think this would be my course of action.
MCdavis, you are pretty much right on. You can go a bit less on the tension setting using the 1mm white setting instead, this would give you roughly 1/2 inch raise(max) in the rear when not loaded down. With this setting, you would still notice a fairly substantial difference in the way the truck handles heavier type loads and reducing any rear sag.
I can confirm that some wanting to maintain a certain look while gaining the heavy loading leveling/handling benefits,have removed the rear blocks while setting the tension higher.
My recommendation: If you are towing something that squats you substantially and are looking to maintain that exact stock ride height, going with the heavier 2-2.5mm setting while removing the block is an option. If you are towing something that is squatting you an inch or two, the 1mm setting should be fine.
Last edited by Roadmaster; 10-22-2014 at 11:03 AM. Reason: Clarification
The following users liked this post:
MCDavis (10-22-2014)
Trending Topics
10-22-2014, 04:19 PM
#8

Hey Nolan
I love the platinum ride I have with my RAS set at the white disc
But when I load 800lbs in the bed it has a pretty good squat.
Enough so that at night I will get oncoming cars flashing me because of the headlights.
I havent tried the black disc yet mainly because I dont want to give up the soft ride and dont want anymore rake then I already have. I will give it a shot before I try the next option. Which is airbags..my question is ,,,do you know if Firestone or ride rite airbags are compatible with RAS
Can
10-22-2014, 08:30 PM
#10
how many miles do you figure you had before your tires went?