
This is that retrofit thread we talked about!


 03-29-2013, 12:08 PM
#102
Huge Member
Thread Starter
I decided to put some switchbacks in my turn signal. Ordering them now, with load resistors.
 03-29-2013, 10:29 PM
#104
Senior Member
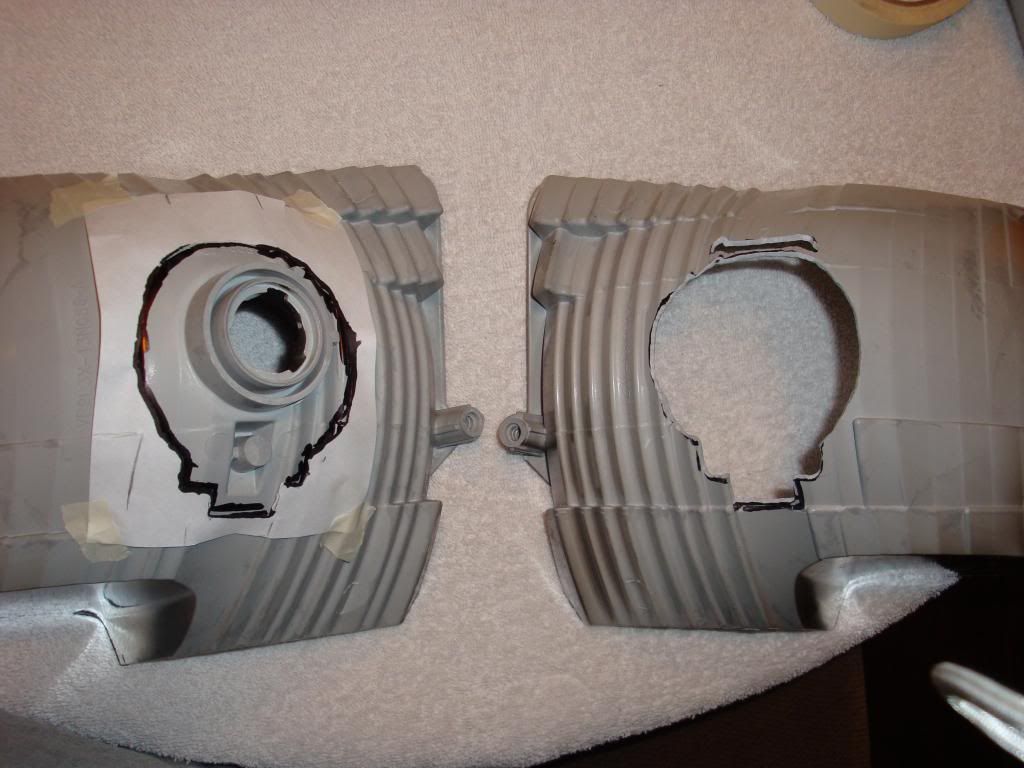
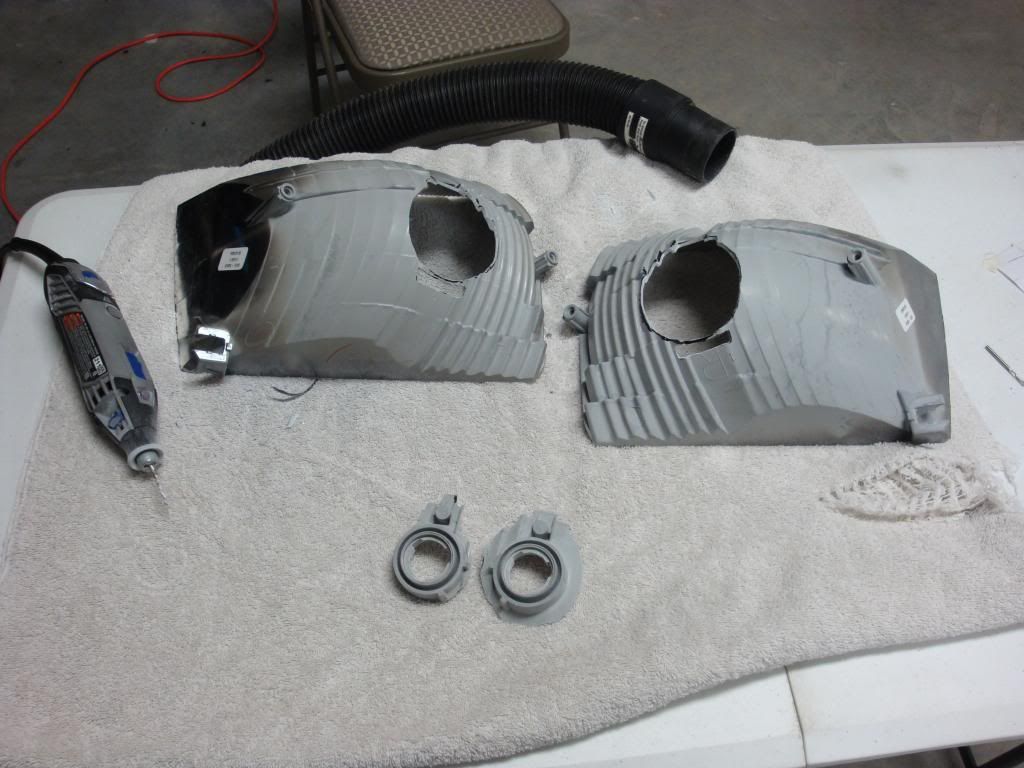
Alright guys I've got a progress report and pics. I have both reflectors cut and the projectors have been test fitted in both of them. Overall it wasn't too bad; just take your time. Patience is key here!
A little guidance for others at this stage:
1) I'll say it again..... patience is key!
2) Draw a rough outline of the projector (use my pics as a guideline) and make the initial cut inside the lines.
3) Once you have the initial cut made start test fitting the projector in place and continue cutting until you have a good fitting projector. As for depth I made sure the bottom of the high-beam solenoid barely comes out of the bottom of the cut. On the top I seated the projector enough that I had to make another cutout for the curved piece on top of the projector. It doesn't actually come out of the back of the reflector but it does stick into the reflector bucket material slightly. I know that's probably clear as mud but you'll understand once you start doing it.
4) After you're happy with the hole make a template for the other side using a piece of paper (or something else; use your imagination). I taped the paper on in four spots and made marks on the paper to line up with certain features of the reflector bucket.
5) Take the paper off and transfer the marks to the other side (since you have to mirror the cutout).
6) Now take a utility knife and trim the inside cutout away.
7) Using the marks on the paper line it up on the back of the other reflector and tape it in place.
8) Now make your other cut. Once again test fit the projector along the way. After I made my initial cut for this side I only had to trim one more time so that the projector sat in the same position as the other side.
9) Step back and admire what you did!
Some things I've learned during this step or from others that have done this:
1) Keep the projector away from your workspace while cutting on the reflector! I left the projector in the house and just went in and out.
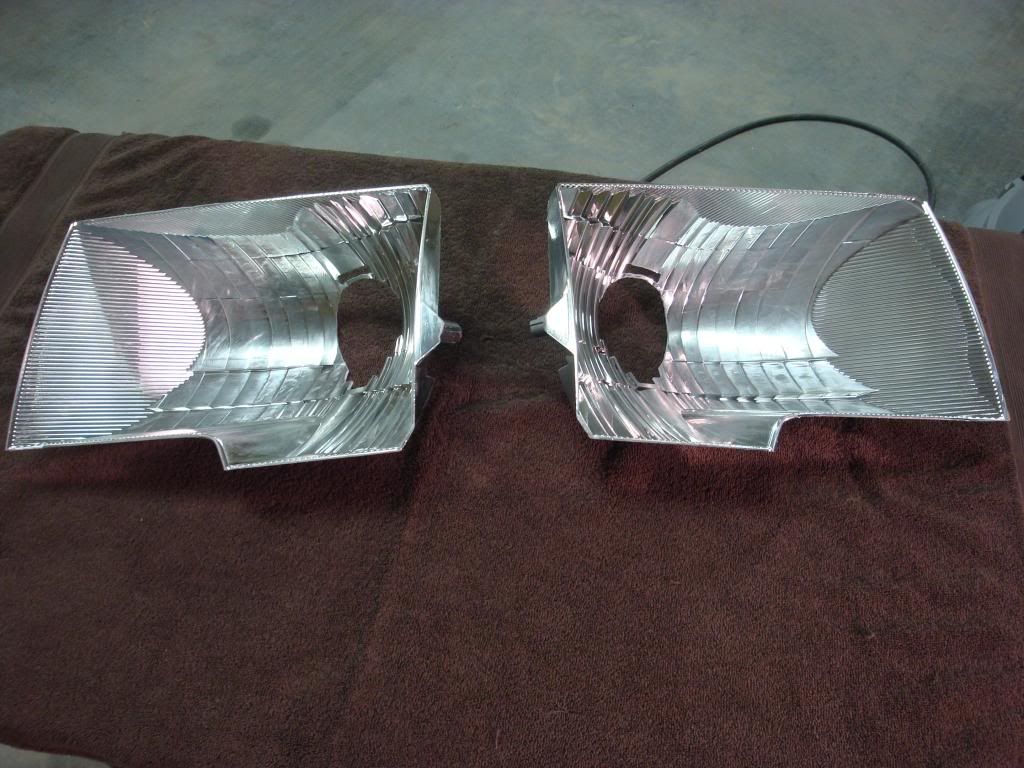
2) Be careful cleaning the reflector bucket if you are going to leave it chrome. It scratches VERY easy.
3) Don't oversize the hole too much but cut enough of the bucket away so that you'll have room for adjustment.
4) Set up a shop-vac next to your workspace to help with dust. It really does help!
5) TAKE YOUR TIME!! It's really not that hard. Just use some common sense and don't get ahead of yourself.
I'm headed back to the garage to do some prep work and painting now. I'm going to get the reflectors painted satin black and if all goes well I'll be able to mount the projectors in the morning. A couple pics of where I'm at now:

A little guidance for others at this stage:
1) I'll say it again..... patience is key!
2) Draw a rough outline of the projector (use my pics as a guideline) and make the initial cut inside the lines.
3) Once you have the initial cut made start test fitting the projector in place and continue cutting until you have a good fitting projector. As for depth I made sure the bottom of the high-beam solenoid barely comes out of the bottom of the cut. On the top I seated the projector enough that I had to make another cutout for the curved piece on top of the projector. It doesn't actually come out of the back of the reflector but it does stick into the reflector bucket material slightly. I know that's probably clear as mud but you'll understand once you start doing it.
4) After you're happy with the hole make a template for the other side using a piece of paper (or something else; use your imagination). I taped the paper on in four spots and made marks on the paper to line up with certain features of the reflector bucket.
5) Take the paper off and transfer the marks to the other side (since you have to mirror the cutout).
6) Now take a utility knife and trim the inside cutout away.
7) Using the marks on the paper line it up on the back of the other reflector and tape it in place.
8) Now make your other cut. Once again test fit the projector along the way. After I made my initial cut for this side I only had to trim one more time so that the projector sat in the same position as the other side.
9) Step back and admire what you did!
Some things I've learned during this step or from others that have done this:
1) Keep the projector away from your workspace while cutting on the reflector! I left the projector in the house and just went in and out.
2) Be careful cleaning the reflector bucket if you are going to leave it chrome. It scratches VERY easy.
3) Don't oversize the hole too much but cut enough of the bucket away so that you'll have room for adjustment.
4) Set up a shop-vac next to your workspace to help with dust. It really does help!
5) TAKE YOUR TIME!! It's really not that hard. Just use some common sense and don't get ahead of yourself.
I'm headed back to the garage to do some prep work and painting now. I'm going to get the reflectors painted satin black and if all goes well I'll be able to mount the projectors in the morning. A couple pics of where I'm at now:
03-29-2013, 10:53 PM
#105
Senior Member
Nice! My lights still haven't shipped yet. I did however get a set of used lights for $140 so I'll get started once they ship the projectors out. Thanks for the pics.
03-29-2013, 11:02 PM
#107

Seeing yal do this is making me so jealous! I cant wait until I can do this! Just one request! More Yoga Pants!
03-29-2013, 11:32 PM
#108
Huge Member
Thread Starter
Alright guys I've got a progress report and pics. I have both reflectors cut and the projectors have been test fitted in both of them. Overall it wasn't too bad; just take your time. Patience is key here!
A little guidance for others at this stage:
1) I'll say it again..... patience is key!
2) Draw a rough outline of the projector (use my pics as a guideline) and make the initial cut inside the lines.
3) Once you have the initial cut made start test fitting the projector in place and continue cutting until you have a good fitting projector. As for depth I made sure the bottom of the high-beam solenoid barely comes out of the bottom of the cut. On the top I seated the projector enough that I had to make another cutout for the curved piece on top of the projector. It doesn't actually come out of the back of the reflector but it does stick into the reflector bucket material slightly. I know that's probably clear as mud but you'll understand once you start doing it.
4) After you're happy with the hole make a template for the other side using a piece of paper (or something else; use your imagination). I taped the paper on in four spots and made marks on the paper to line up with certain features of the reflector bucket.
5) Take the paper off and transfer the marks to the other side (since you have to mirror the cutout).
6) Now take a utility knife and trim the inside cutout away.
7) Using the marks on the paper line it up on the back of the other reflector and tape it in place.
8) Now make your other cut. Once again test fit the projector along the way. After I made my initial cut for this side I only had to trim one more time so that the projector sat in the same position as the other side.
9) Step back and admire what you did!
Some things I've learned during this step or from others that have done this:
1) Keep the projector away from your workspace while cutting on the reflector! I left the projector in the house and just went in and out.
2) Be careful cleaning the reflector bucket if you are going to leave it chrome. It scratches VERY easy.
3) Don't oversize the hole too much but cut enough of the bucket away so that you'll have room for adjustment.
4) Set up a shop-vac next to your workspace to help with dust. It really does help!
5) TAKE YOUR TIME!! It's really not that hard. Just use some common sense and don't get ahead of yourself.
I'm headed back to the garage to do some prep work and painting now. I'm going to get the reflectors painted satin black and if all goes well I'll be able to mount the projectors in the morning. A couple pics of where I'm at now:
03-30-2013, 12:01 AM
#109
Senior Member
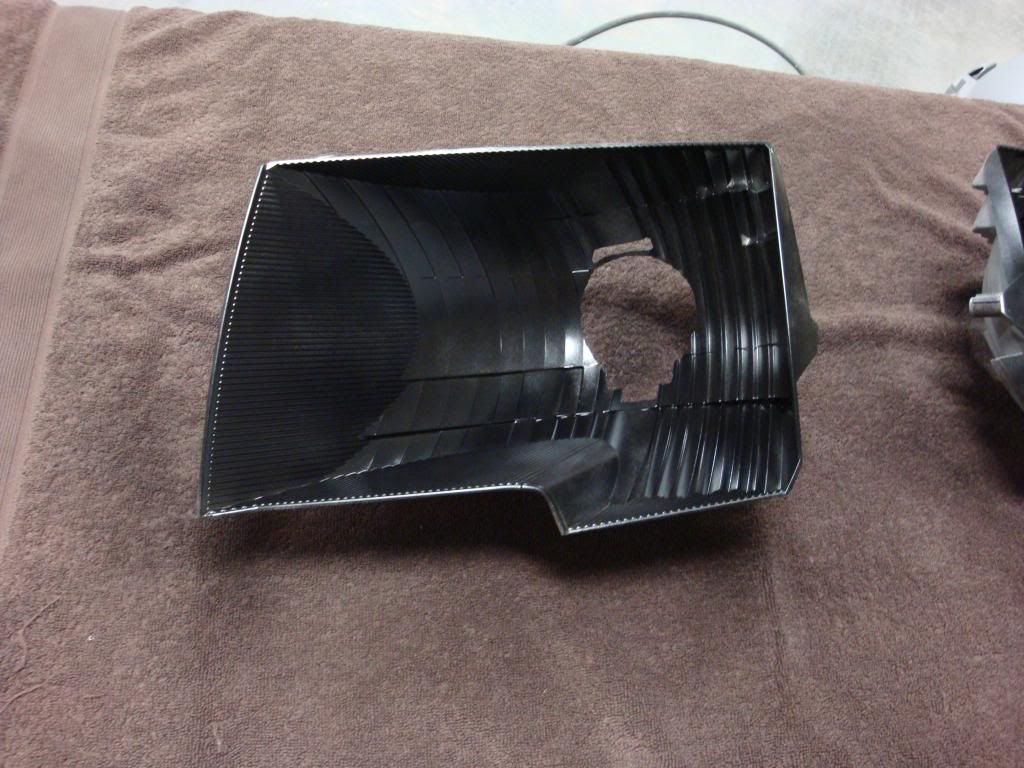
Reflectors have been painted!
Tomorrow morning I'm going to get the mounting harness installed and set the projectors in place on the truck using the JB Steel Stik method that TRS shows in their video. Hopefully it'll work out and I won't have any issues later on down the road. After the projectors are tacked in place I'll pull the headlights and finish epoxying them with JB Kwik. Then I plan to make the shroud extensions, attach them to the shrouds and paint both. After that's all ready I'll install the LED halos and attach the shrouds to the projectors. If all goes well I'll be resealing the headlights late tomorrow night and installing them Sunday night!
A few tips for painting:
1) Make sure you're in a CLEAN environment. I learned this the hard way. Luckily the imperfection I have will be hidden by the shroud otherwise I'm not sure what I'd do.
2) Scuff the chrome reflector up with sandpaper (I used 400 grit) and blow the dust out using a compressor.
3) Wipe the reflector down with tack cloth.
4) I did two light coats of primer and finished off with a good coat of satin black base. Don't apply it too heavy but make sure you have good even coverage.
5) Step back and admire what you've accomplished!
Chrome scuffed up
First coat of primer
Second coat of primer
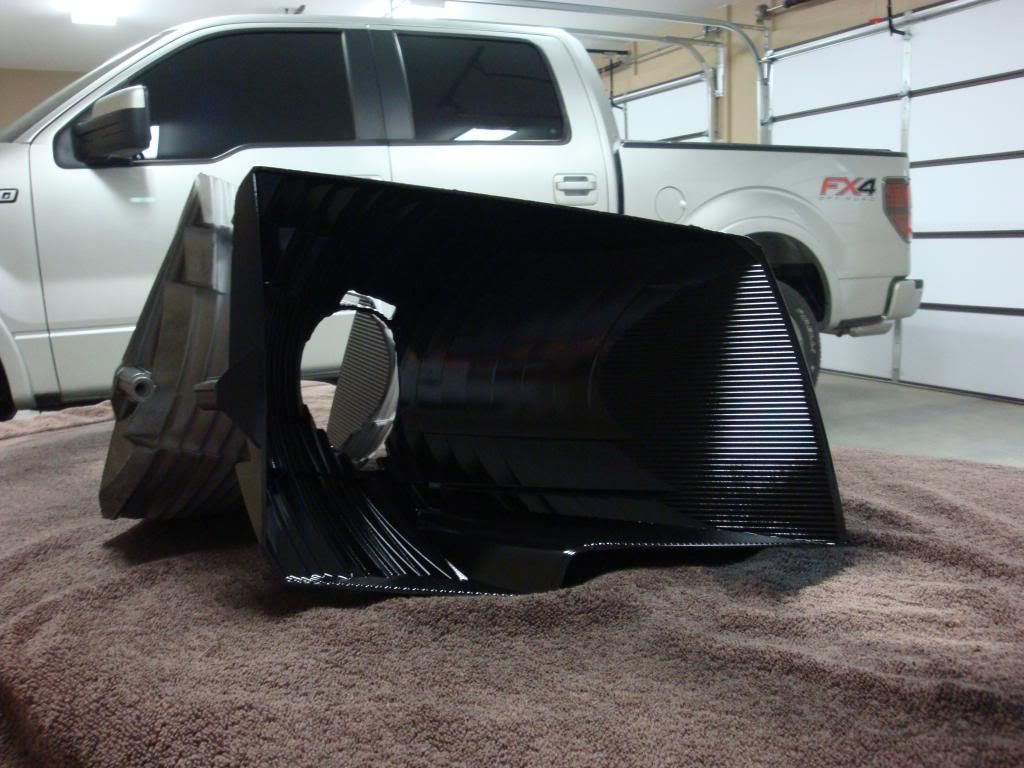
Final satin black coat (hasn't dried so it still looks a little glossy)

Tomorrow morning I'm going to get the mounting harness installed and set the projectors in place on the truck using the JB Steel Stik method that TRS shows in their video. Hopefully it'll work out and I won't have any issues later on down the road. After the projectors are tacked in place I'll pull the headlights and finish epoxying them with JB Kwik. Then I plan to make the shroud extensions, attach them to the shrouds and paint both. After that's all ready I'll install the LED halos and attach the shrouds to the projectors. If all goes well I'll be resealing the headlights late tomorrow night and installing them Sunday night!
A few tips for painting:
1) Make sure you're in a CLEAN environment. I learned this the hard way. Luckily the imperfection I have will be hidden by the shroud otherwise I'm not sure what I'd do.
2) Scuff the chrome reflector up with sandpaper (I used 400 grit) and blow the dust out using a compressor.
3) Wipe the reflector down with tack cloth.
4) I did two light coats of primer and finished off with a good coat of satin black base. Don't apply it too heavy but make sure you have good even coverage.
5) Step back and admire what you've accomplished!
Chrome scuffed up
First coat of primer
Second coat of primer
Final satin black coat (hasn't dried so it still looks a little glossy)
Last edited by FX44AU; 03-30-2013 at 12:04 AM.