
How to Paint Your Emblems - Color Match
 12-27-2011, 01:05 AM
#1
Predator Master
Thread Starter

Ok, so painting emblems isn't an original idea by any means. However, I put a little twist to painting my emblems that give it a professional OEM look like it should have anyway. This is super easy with some patience.
Materials Needed
Spray Paint 2 cans if you have NO pearl in your paint, and 3 cans if you do. Get the paint at a local automotive shop that make and mix paint for body shops in town. Call around and find one that can put the basecoat of your desired color into a spray can. Get your paint code from your dealer if you don�t know it. Then get a spray can of pearl (if applicable) and a spray can of automotive clear. Cost me $42 bucks and some change total.
Heavy grit sand paper and Fine grit sand paper <---This will be used to remove the texture and smooth out the black insert you will be painting.
3M Double sided tape <--Oreilley Auto has it for 6 bucks. One roll is exactly enough.
Hair Dryer <--Optional but I say work smart, not hard. This helps soooo much, just get it out.
Flat head Screwdriver or similar
Old Credit card I used an expired NRA membership card <--Use this to slide under the emblems so you don�t scratch your vehicle paint.
Sander <---Also Optional but remember the work smart thing...
Razor blade with handle <--Don�t stab or slice yourself please
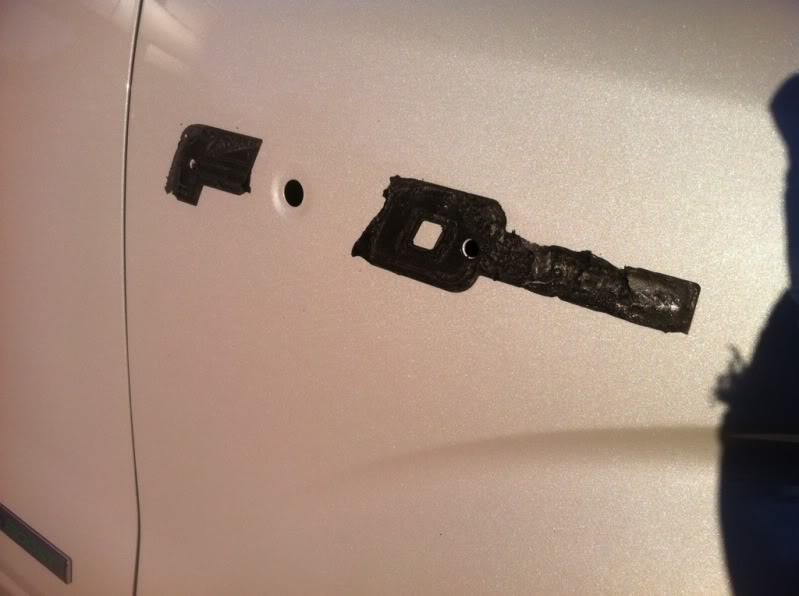
Step 1 Remove badges
Simply slide the credit card between the body of your truck and the emblem to be removed. The credit card will help protect your trucks paint and aid in chopping through the sticky backing on the emblem. Some people use 30lb test fishing line which will work too. Next insert your flat head between the two and begin to pry emblem away from truck. Go slow slow slow and use the dang blow dryer its waaaay easier if you do but you don't have to. There will be double sided tape stuck to your truck, just leave it for now...
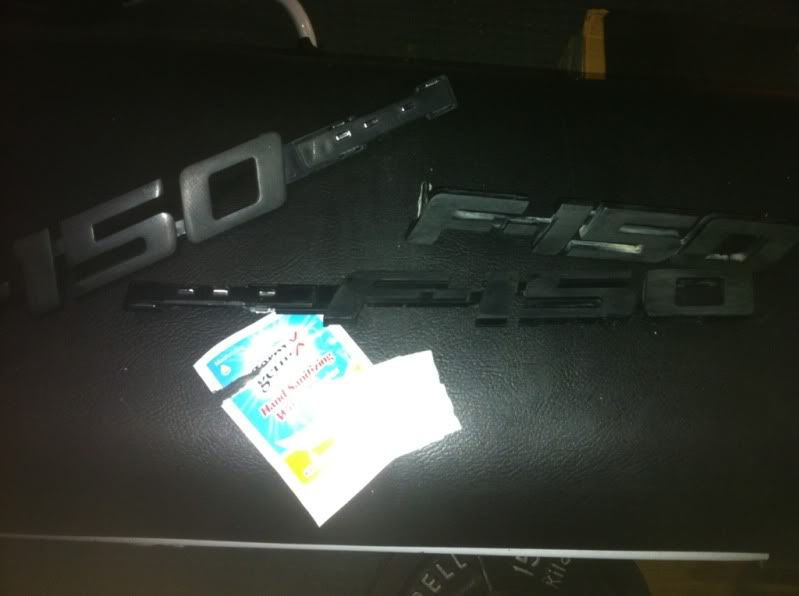
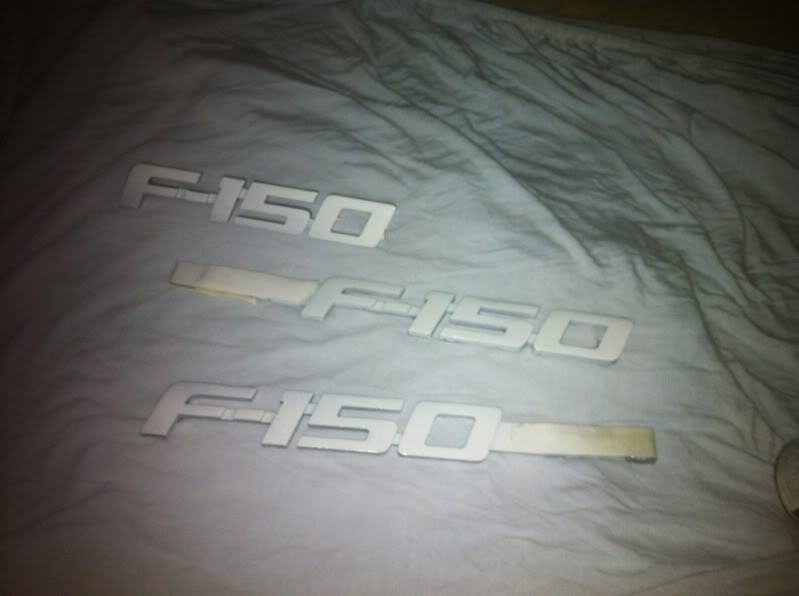
Step 2 Separate black backing from chrome surround bezel
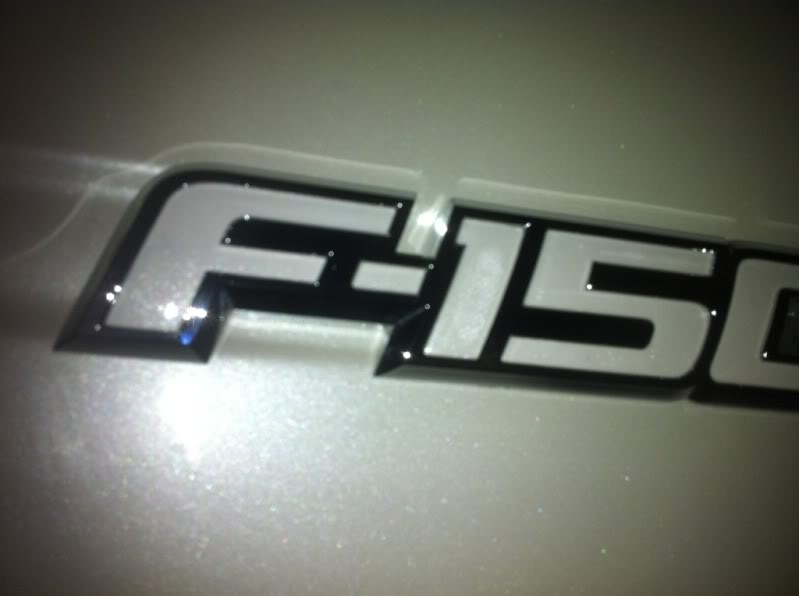
This isnt too hard but it all goes back to patience. Use your razor blade for this if you need to. Lord please don't stab yourself or cut off a finger, this isn�t worth it. Use the blade to get between the black backing to be removed and the chrome bezel. If you look closely, you will see that it is snapped in place by a hairline lip. Start at one end and work your way back. To pop the chrome piece out of the 0 in F150, just push on it, it�ll pop out and you will have to chase it...
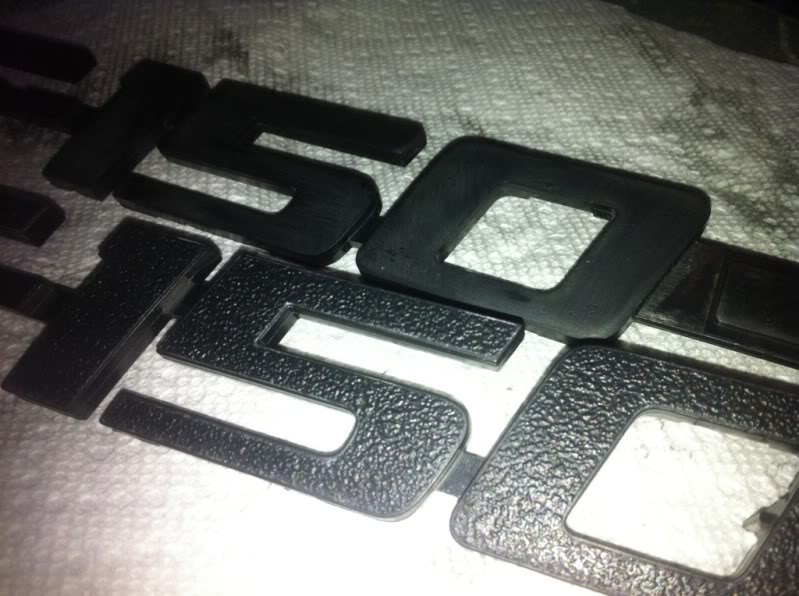
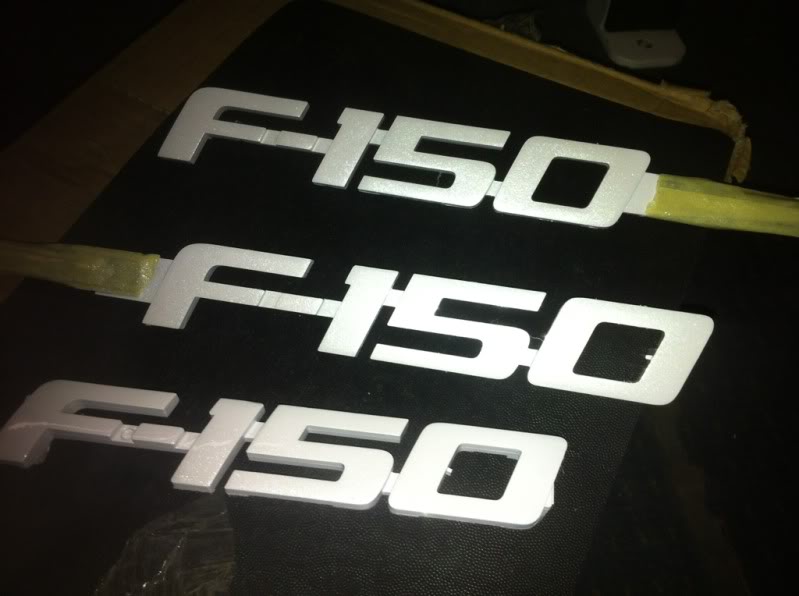
Step 3 Sand off the ugly texture on the black emblem insert
Use a motorized sander and save lots of time. What we wanna do here is sand them down until smooth with your heavy grit sand paper. Once you cannot see anymore texture lines, give it a good once over with the fine grit paper. If done correctly, you should have no scratches or grooves in the black.
In the pic below, notice the difference between the two...
Step 4 Clean them
I simply used some alcohol wipes we had laying around...Soap and water is fine but just make sure the parts are dry before moving on to step 5.
Step 5 (Optional) Tape off parts you want to remain black.
I didn�t want the "lariat" portion of my truck painted because it would make the word hard to see inside the chrome surround since it is so small and my truck is white. Other colored vehicles would probably look great though. Just tape off the three tiny chrome parts and remove after final coat.
Step 6 Lay your base
First coat should be your base coat and barely cover anything. Do it this way, and it will be perfect. Wait ten minutes and give it another light coat. Now it should be close. Make sure you hit it at all angles... Wait ten more minutes and hit it with a final medium/light coat for good coverage. We are trying to avoid paint running. If you get a run, wait fifteen to twenty minutes and use your fine grit sand paper to smooth out any runs. Let it dry for 30 minutes <---DO THIS
Step 7 Pearl it up
This is really pretty easy and best done in full sunlight, not the dark like me.
Spray a light coat of pearl on all emblems and let dry for 5 minutes. Pick them up and walk over to your truck in the sunlight and see if the two pearls match up. Don't worry if it's not as shiny, just pay attention to the pearl match. Mine took two coats and not a bit more. You don�t want to overdo it because it won�t look right if you ask me. If you do over do it, you have to wait till the next day and sand down the pearl, shoot a light coat of base again and repeat the pearl process. That's no fun!
Here is my pearl <---don�t even know if you can tell, but it's there...
Step 8 Clear it
Same thing. Shoot it light one time and give it about 20 minutes to get tacky and hit it again. Three light coats should be good and you shouldn�t have to wait till its completely dry to hit it again. We just want to avoid runs. On your last coat, if all looks nice and shiny, let it sit for a solid hour or more before doing anything.
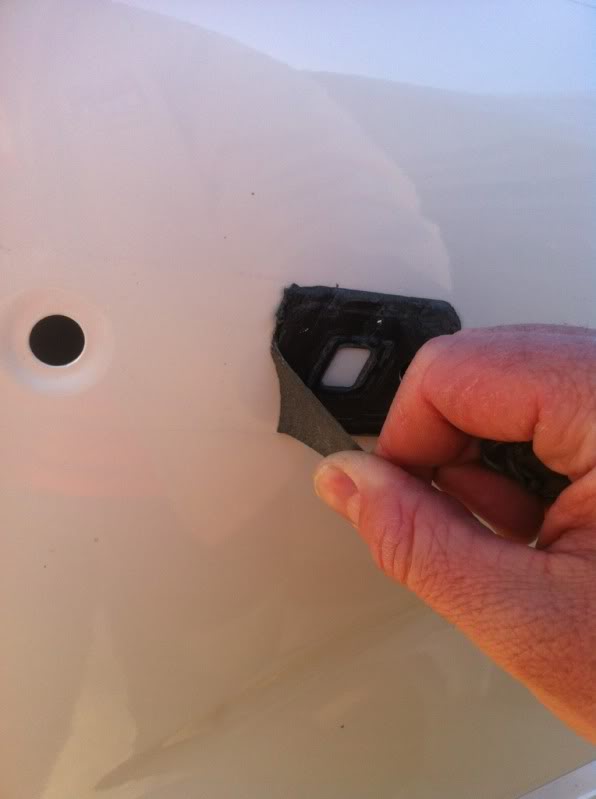
Step 9 Remove old adhesive
Bust out the blow dryer and heat the left over adhesive up. Once it gets nice and warm, you can peel the majority of it off, or roll it like a booger. Once it's free of the old gunk, wipe it clean with soap and water or an alcohol pad like I did. We want the new adhesive to stick really good.
Step 10 Pop the newly painted backing into the chrome bezel
Absolutely wait till the paint has dried. I know how bad you want to get this back on your truck, but HAVE PATIENCE GRASSHOPPA!!!
Start with the chrome o that goes into the 0. If you wait till after you get the big pieces together, its a little harder to get back in. You don�t want to scratch your new paint like me, trust me. Anyhow, pop the backing back onto the chrome bezel and resnap into place. Just work the backing until you have all of it nice and tight to the chrome bezel and under those little hair lips (haha).
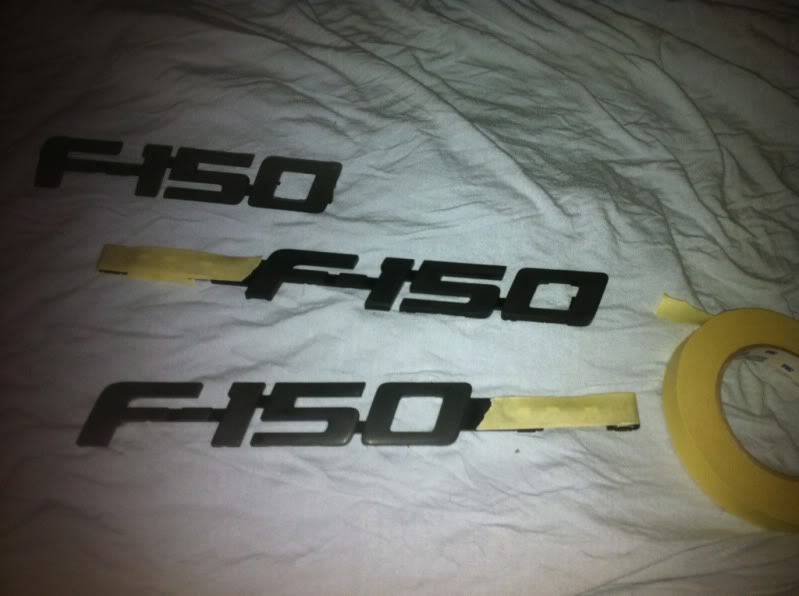
Step 11 Add 3M double sided tape
For this, just get some scissors and reapply the sticky tape to the backing of the emblem. I used every bit of my roll and didn't waste any. just make sure you have enough to get a sufficient amount on all emblems or you will be runnin back to autozone.
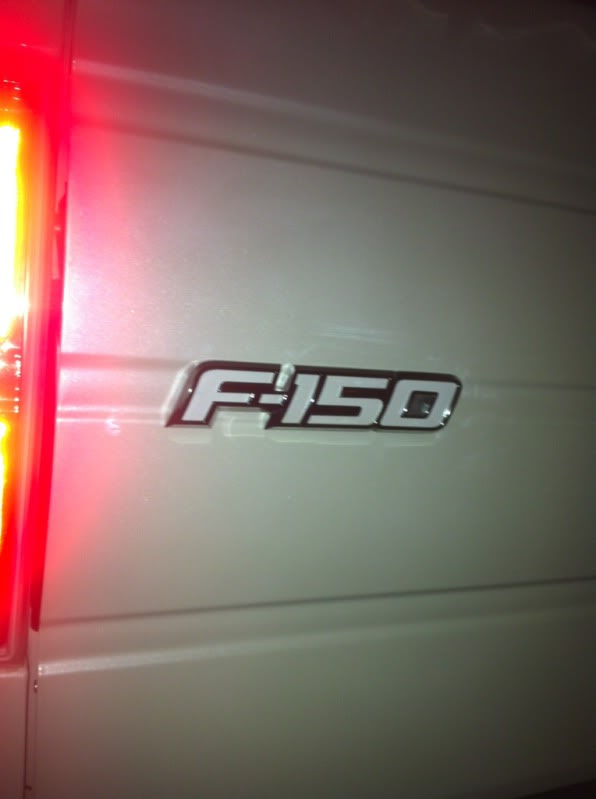
Step 12 Reattach emblems on truck
This is super easy since there are pegs that get you all lined up. No guessing. Just press on and press hard to ensure good stick.
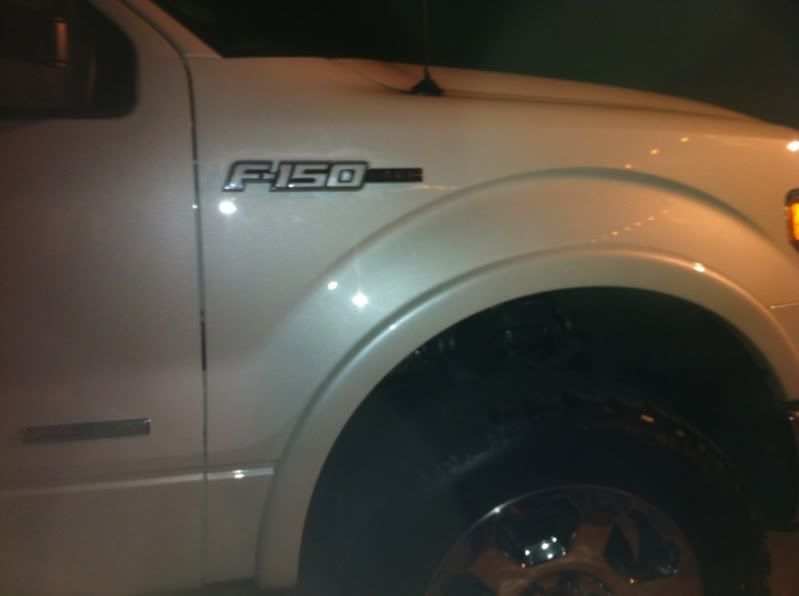
Enjoy...Here is how mine came out...
Materials Needed
Spray Paint 2 cans if you have NO pearl in your paint, and 3 cans if you do. Get the paint at a local automotive shop that make and mix paint for body shops in town. Call around and find one that can put the basecoat of your desired color into a spray can. Get your paint code from your dealer if you don�t know it. Then get a spray can of pearl (if applicable) and a spray can of automotive clear. Cost me $42 bucks and some change total.
Heavy grit sand paper and Fine grit sand paper <---This will be used to remove the texture and smooth out the black insert you will be painting.
3M Double sided tape <--Oreilley Auto has it for 6 bucks. One roll is exactly enough.
Hair Dryer <--Optional but I say work smart, not hard. This helps soooo much, just get it out.
Flat head Screwdriver or similar
Old Credit card I used an expired NRA membership card <--Use this to slide under the emblems so you don�t scratch your vehicle paint.
Sander <---Also Optional but remember the work smart thing...
Razor blade with handle <--Don�t stab or slice yourself please
Step 1 Remove badges
Simply slide the credit card between the body of your truck and the emblem to be removed. The credit card will help protect your trucks paint and aid in chopping through the sticky backing on the emblem. Some people use 30lb test fishing line which will work too. Next insert your flat head between the two and begin to pry emblem away from truck. Go slow slow slow and use the dang blow dryer its waaaay easier if you do but you don't have to. There will be double sided tape stuck to your truck, just leave it for now...
Step 2 Separate black backing from chrome surround bezel
This isnt too hard but it all goes back to patience. Use your razor blade for this if you need to. Lord please don't stab yourself or cut off a finger, this isn�t worth it. Use the blade to get between the black backing to be removed and the chrome bezel. If you look closely, you will see that it is snapped in place by a hairline lip. Start at one end and work your way back. To pop the chrome piece out of the 0 in F150, just push on it, it�ll pop out and you will have to chase it...
Step 3 Sand off the ugly texture on the black emblem insert
Use a motorized sander and save lots of time. What we wanna do here is sand them down until smooth with your heavy grit sand paper. Once you cannot see anymore texture lines, give it a good once over with the fine grit paper. If done correctly, you should have no scratches or grooves in the black.
In the pic below, notice the difference between the two...
Step 4 Clean them
I simply used some alcohol wipes we had laying around...Soap and water is fine but just make sure the parts are dry before moving on to step 5.
Step 5 (Optional) Tape off parts you want to remain black.
I didn�t want the "lariat" portion of my truck painted because it would make the word hard to see inside the chrome surround since it is so small and my truck is white. Other colored vehicles would probably look great though. Just tape off the three tiny chrome parts and remove after final coat.
Step 6 Lay your base
First coat should be your base coat and barely cover anything. Do it this way, and it will be perfect. Wait ten minutes and give it another light coat. Now it should be close. Make sure you hit it at all angles... Wait ten more minutes and hit it with a final medium/light coat for good coverage. We are trying to avoid paint running. If you get a run, wait fifteen to twenty minutes and use your fine grit sand paper to smooth out any runs. Let it dry for 30 minutes <---DO THIS
Step 7 Pearl it up
This is really pretty easy and best done in full sunlight, not the dark like me.
Spray a light coat of pearl on all emblems and let dry for 5 minutes. Pick them up and walk over to your truck in the sunlight and see if the two pearls match up. Don't worry if it's not as shiny, just pay attention to the pearl match. Mine took two coats and not a bit more. You don�t want to overdo it because it won�t look right if you ask me. If you do over do it, you have to wait till the next day and sand down the pearl, shoot a light coat of base again and repeat the pearl process. That's no fun!
Here is my pearl <---don�t even know if you can tell, but it's there...
Step 8 Clear it
Same thing. Shoot it light one time and give it about 20 minutes to get tacky and hit it again. Three light coats should be good and you shouldn�t have to wait till its completely dry to hit it again. We just want to avoid runs. On your last coat, if all looks nice and shiny, let it sit for a solid hour or more before doing anything.
Step 9 Remove old adhesive
Bust out the blow dryer and heat the left over adhesive up. Once it gets nice and warm, you can peel the majority of it off, or roll it like a booger. Once it's free of the old gunk, wipe it clean with soap and water or an alcohol pad like I did. We want the new adhesive to stick really good.
Step 10 Pop the newly painted backing into the chrome bezel
Absolutely wait till the paint has dried. I know how bad you want to get this back on your truck, but HAVE PATIENCE GRASSHOPPA!!!
Start with the chrome o that goes into the 0. If you wait till after you get the big pieces together, its a little harder to get back in. You don�t want to scratch your new paint like me, trust me. Anyhow, pop the backing back onto the chrome bezel and resnap into place. Just work the backing until you have all of it nice and tight to the chrome bezel and under those little hair lips (haha).
Step 11 Add 3M double sided tape
For this, just get some scissors and reapply the sticky tape to the backing of the emblem. I used every bit of my roll and didn't waste any. just make sure you have enough to get a sufficient amount on all emblems or you will be runnin back to autozone.
Step 12 Reattach emblems on truck
This is super easy since there are pegs that get you all lined up. No guessing. Just press on and press hard to ensure good stick.
Enjoy...Here is how mine came out...

The following 20 users liked this post by TexasTexas95:
Adamantium (11-07-2012),
bsmit24 (08-14-2014),
Clinton.Brookwell (02-18-2013),
FreeMars (01-26-2021),
Goodfellow (02-23-2017),
and 15 others liked this post.


The following users liked this post:
Scottmcw (04-20-2013)
01-06-2012, 05:01 PM
#7

I just did it you way and Im waiting tomorow to put it back in the chrome bezel. It seem to look amazing! Ill try to post pics tomorow when it will be finished. Thanks again for your idea and your detail post!
Trending Topics
01-06-2012, 05:36 PM
#8
Ford Freak
On my '09, the F150 badges were one piece, so I stripped the black off, then painted the inlay. I also used automotive touch up paint, then did the " FX4 " to match the sticker on my bedside.

 01-06-2012, 07:20 PM
#10
Proudly Canadian
Looks kick ***. And is exactly what I plan on doing with my Red Candy FX4. Thanks for the write up, now I don't have to stumble my way through... lol.