
How do you remove the front shocks on a 2014?
 07-31-2014, 06:32 PM
#51
Done now I can relax. Mods are done for a while.
 07-31-2014, 07:24 PM
#53
Junior Member

I just put a 2and1/2 lift in my 2014 fx4 the first thing I noticed was the change in strut mounting but what I ended up doing is removing all the hardware that holds your abs brake line and electrical so it could move freely popped the cv joint out of the hub so I could move the lower control arm much further and it was a lot easier to get in one trick I found is to put the nuts back on the studs of the lower strut mount when you have it out put the studs with nuts on in a vise and pull that bushing to a better angle for reinstallation so instead of your studs being straight up and down they will be pointed in at the LCA for when u bring it back into place
Last edited by Dakkon85; 07-31-2014 at 07:52 PM.


 02-15-2015, 11:53 PM
#55

ok, here it is ...
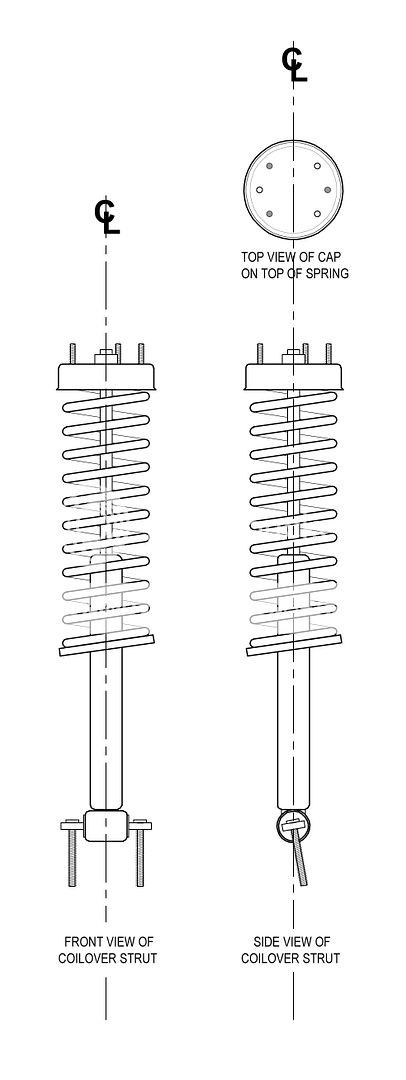
As you can see, from the "front view", the bolts are vertical ... but from the side view, they are rotated to an angle of about 10 degrees or so (best guess), and they are FIXED in place, meaning that they do not rotate. So, the strut on either side (driver/passenger) has to be inserted into place with the bolts facing the same direction as they were when you took it out (which is inward towards the truck).
For this reason, you have to rotate ONLY the top cap. Look at that portion of the drawing ... there are 3 bolts on top that are part of the cap assembly - represented by the circles that are NOT filled w/ shading. When you put the spacer on, the bolt pattern is opposite of these bolts (at least on the 1.5" spacer that I got from Autospring). This is because the bolts on top of the strut cap are longer than the space from top to bottom of the spacer. There are holes on top of the spacer to let the bolts stick thru just a little bit. Kevin (Autospring) has the bolt pattern twisted 180 degrees so that the new bolts (that are part of the spacer, welded to it) are out of the way of the factory bolts. THEREFORE you have to rotate the CAP ONLY 180 degrees to get the bolts on the spacer into the same position that the strut bolts were, and so that they will line up with the holes in the frame mount where the top of strut goes.
Now, if you do a 2" or 2.5" kit, it may be tall enough that the bolts on the spacer are already in the proper positions, and do not have to be adjusted by rotating the strut cap.
Hope that helps you understand how it works on the 2014's ...
04-06-2015, 12:48 PM
#56
1st gear, W.O.T

Join Date: Nov 2011
Posts: 12
Likes: 0
Received 0 Likes
on
0 Posts

I just did mine this weekend on my 2014 and that new bottom strut mount is a huge pain. The way we approached it was to compress the springs then pry them out of their cradle. It would have been easier to remove the LCA but in the end we got it.
Another thing I want to note is that that bottom bracket will move within the bushing. People are probably just afraid because it wont simply turn by hand. If you put the bar in a vice and turn the strut it moves easily or if you put a pry bar through the bolt hole. Even if you don't twist it the opposite direction when you have the strut out it will reseat itself once you snug it down and drive on it. This should not be a concern.
Unless of course you snap one of the bolts because your instructions had torque specs for the single bolt through the bottom of the strut and you spaced out and didn't think about how these smaller bolts need less torqure.
04-07-2015, 07:04 AM
#57

I just did mine this weekend on my 2014 and that new bottom strut mount is a huge pain. The way we approached it was to compress the springs then pry them out of their cradle. It would have been easier to remove the LCA but in the end we got it.
Another thing I want to note is that that bottom bracket will move within the bushing. People are probably just afraid because it wont simply turn by hand. If you put the bar in a vice and turn the strut it moves easily or if you put a pry bar through the bolt hole. Even if you don't twist it the opposite direction when you have the strut out it will reseat itself once you snug it down and drive on it. This should not be a concern.
Unless of course you snap one of the bolts because your instructions had torque specs for the single bolt through the bottom of the strut and you spaced out and didn't think about how these smaller bolts need less torqure.
Another thing I want to note is that that bottom bracket will move within the bushing. People are probably just afraid because it wont simply turn by hand. If you put the bar in a vice and turn the strut it moves easily or if you put a pry bar through the bolt hole. Even if you don't twist it the opposite direction when you have the strut out it will reseat itself once you snug it down and drive on it. This should not be a concern.
Unless of course you snap one of the bolts because your instructions had torque specs for the single bolt through the bottom of the strut and you spaced out and didn't think about how these smaller bolts need less torqure.
Hey schurchill, what made it a pain exactly? I figured that using spring compressors would be the easiest method for my 14, considering I don't have air tools to buzz the LCA bolts off. All my nearby shops charge rape for labor, so I really want to tackle this myself. Thanks for the tip!