
rear backup camera on aftermarket radio..
 06-19-2015, 09:08 PM
#1


Is there anyway to get the reverse backup camera to work on a kenwood dnn992...I have 2013 xlt and the camera is in the rear view mirror...I would like it to show on the radio...I been searching for an answer and can't seem to find it...any help would be appreciated...thanks
 06-19-2015, 09:38 PM
#2

I know it is possible if you swap a non-nav factory radio to a nav factory radio. You might want to look on the back of your radio and see if you have a plug input that would accept this harness.
http://www.4dtech.com/#!store/czm5/!...tegory=7069089
http://www.4dtech.com/#!store/czm5/!...tegory=7069089
06-20-2015, 10:32 AM
#3
Senior Member


I just did this with excellent results. Now I have the picture in both the mirror and on the new Kenwood head unit. The plus is I can now operate the rear camera while on the road, should I be towing or whatever.
The connector is behind and under the parking brake mount on the drivers side kick panel. I just soldered a cord that terminates in an RCA connector, about 6 feet long. Probably 40 minutes as I went slow to make sure I was on the correct wires. I will look and see if I can locate the wire colors, but I think the camera + is white with a green trace. I think the - was maybe brown.
The connector is behind and under the parking brake mount on the drivers side kick panel. I just soldered a cord that terminates in an RCA connector, about 6 feet long. Probably 40 minutes as I went slow to make sure I was on the correct wires. I will look and see if I can locate the wire colors, but I think the camera + is white with a green trace. I think the - was maybe brown.
06-20-2015, 11:02 AM
#4
Senior Member
Found it! The inner is white green and the outer is brown purple.
The procedure from another site:
The procedure from another site:
1. Run a ~6 foot video cable from your aftermarket unit under the dash, under the steering wheel and down toward the hood release.
2. Remove the driver side kick panel, just pull it out. You will slide it over the hood release. You will also have to lift up the plastic door sill protector (just the front) to get the panel out.
3. Remove the hood release. There is a single 8mm silver bolt. Once it is out, just slide the assembly housing up and it will come loose. Set aside.
4. Now, behind where the hood release bracket was, you should see a large black connector that has a white retaining clip. This clip can be unhooked and then rotated up to release the connector. Pull the connector out.
5. On the lower right on the connector you will see a brown wire and a brown-yellow stripe wire. These are the camera. White/green is Video (+) and brown/purple stripe is Video (-). I used wire taps with some short 18 gauge wire to attach to the video cable (cut off the end of the video cable - the inner cable that is also the plug's tip goes to the brown wire, the outer part of the video cable goes to brown-yellow stripe).
6. To verify you have the right set, you will notice that the two wires combine along with a another wire wrapped inblack tape as they go up towards the dash. That third wire is the shield.
7. Put everything back together. Note you will have to peel the weatherstriping back to get the kickpanel cover to seat correctly.
Last edited by Dunrollin; 06-20-2015 at 11:06 AM.
 06-20-2015, 07:26 PM
#7

Trending Topics
 06-20-2015, 09:11 PM
#9
Senior Member
http://www.f150online.com/forums/mul...ra-wiring.html
This is the link I quoted from. I think I see the two wires in your bottom photo, the two bottom-most wires. Be careful, they are very thin.
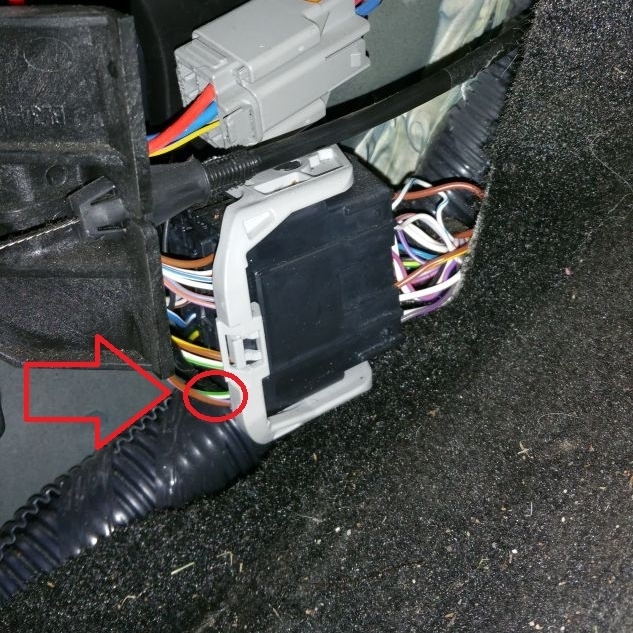
This is the link I quoted from. I think I see the two wires in your bottom photo, the two bottom-most wires. Be careful, they are very thin.
Last edited by Dunrollin; 06-20-2015 at 09:22 PM.