
Need help with system. JL10TW3-D4, Audison LRX4.5, kicker 400.1
 11-06-2016, 08:05 AM
#11

Spent a few hours on the sub box yesterday. 1.5 hours of sanding, an hour of shopping and an hour of painting. Im pretty happy with how it came out. There's a couple imperfections in the paint if you look close (could have used a little more wood filler in spots) but from 2+ feet away you cant tell at all.
I sanded it with 120 grit, then gave it 4 coats of Duplicolor Bed Armor. Its has a slight texture to it, no where as gritty as rockerguard, and it looks great imo. Best part about the bed liner is now the whole sub box is encased in a rubberized polyurethane membrane, can be easily touched up and will help seal all of the pores of the MDF.
My amp wiring kits (got a knuconepts 4 awg and 8 awg) and jl power distribution box will be here Tuesday. Going hunting this morning then going to see about amp mounting locations. Im hoping I can get both behind the seat, with enough clearance to dissipate heat and not effect the seat functionality at all. I may mount the kicker amp on the side of the sub box, but checked to see if it will work out that way yet.
There's a little bit of dust on the top from me moving it around, but here are some pics
<center>
<a href="http://smg.photobucket.com/user/Jdb107/media/Mobile%20Uploads/20161105_110012_zpsm8yswucc.jpg.html" target="_blank"><img src="http://img.photobucket.com/albums/v494/Jdb107/Mobile%20Uploads/20161105_110012_zpsm8yswucc.jpg" border="0" alt=" photo 20161105_110012_zpsm8yswucc.jpg"/></a>
<a href="http://smg.photobucket.com/user/Jdb107/media/Mobile%20Uploads/20161105_110706_zpsgeiq1fog.jpg.html" target="_blank"><img src="http://img.photobucket.com/albums/v494/Jdb107/Mobile%20Uploads/20161105_110706_zpsgeiq1fog.jpg" border="0" alt=" photo 20161105_110706_zpsgeiq1fog.jpg"/></a>
<a href="http://smg.photobucket.com/user/Jdb107/media/Mobile%20Uploads/20161106_044130_zps2eszc7ey.jpg.html" target="_blank"><img src="http://img.photobucket.com/albums/v494/Jdb107/Mobile%20Uploads/20161106_044130_zps2eszc7ey.jpg" border="0" alt=" photo 20161106_044130_zps2eszc7ey.jpg"/></a>
<a href="http://smg.photobucket.com/user/Jdb107/media/Mobile%20Uploads/20161106_044139_zpsldispapk.jpg.html" target="_blank"><img src="http://img.photobucket.com/albums/v494/Jdb107/Mobile%20Uploads/20161106_044139_zpsldispapk.jpg" border="0" alt=" photo 20161106_044139_zpsldispapk.jpg"/></a>
<a href="http://smg.photobucket.com/user/Jdb107/media/Mobile%20Uploads/20161106_044206_zpsbyphdou7.jpg.html" target="_blank"><img src="http://img.photobucket.com/albums/v494/Jdb107/Mobile%20Uploads/20161106_044206_zpsbyphdou7.jpg" border="0" alt=" photo 20161106_044206_zpsbyphdou7.jpg"/></a>
</center>


 11-07-2016, 02:51 PM
#14
Junior Member

Join Date: Oct 2016
Posts: 2
Likes: 0
Received 0 Likes
on
0 Posts
Man am I gonna be following this thread! I'm dealing with a lot of the same issues right now. My winter project is gutting the interior and sound system on my boat. I have 14 speakers and 3 amps in it that I've just thrown together over the last 3 years. Actually building a smaller system custom for the boat this time so I have all that gear to put in my truck if I can use it. I have a 2010 lariat with Sony. I have a kenwood touch screen going in because I want the bigger back up camera screen. My biggest challenge has been the sub box. I can't find one that I like for just under the rear passenger single seat. I'm a construction worker that tends to throw tool boxes behind my seat so I don't want to lose that space. Figured I would have to build my own box and can't wait to find out how yours sounds. Love the look of it. I was also looking at the same JL 10" w3 so definitely interested in how it works out for you. I have an Infinity Kappa K5 amp that I think will work good for the truck. Pretty sure I'm going with Kappa components up front and coax for rear doors. I already have tweeters mounted in the pillar from the Sony system so it's easier. I chose the Kappa speakers because they're one of the few 2 ohm speakers out there. The k5 amp is 100 rms x 4 @ 2ohms and 350 rms sub channel @2ohms. Can't wait to see how your system progresses. Good luck.
11-08-2016, 08:31 AM
#15
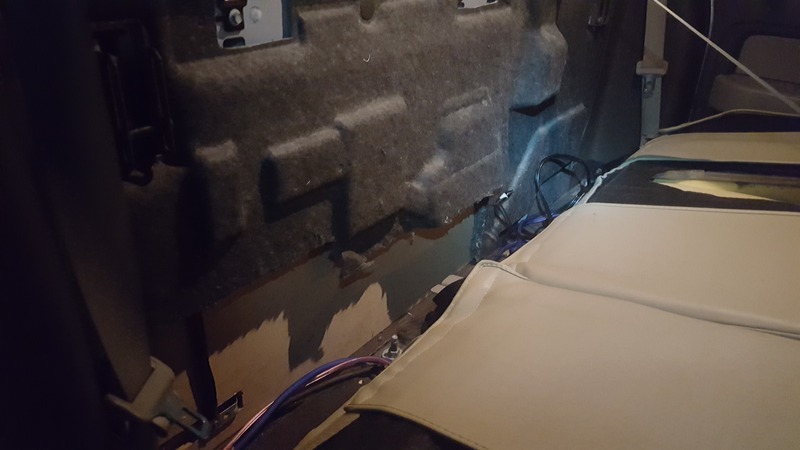
Thanks guys. Next project to tackle is going to be mounting the amps. It's going to be tight but i THINK i can fit them both behind the single seat. I test fit the amps just resting them behind the seat, and it does impact being able to raise and lock it into position - most people don't seem to mention this in the amp install posts. Even if it does allow the seat to fold up, the seat will the touching the amp and i would assume it has a good possibility of overheating. Im not wanting to cut the insulation back there, and im a little hesitant to cover up one of the vents that go through the back of the cab, so I may use some MDF and compress the insulation and make a channel to keep the vent relatively functional.
Over the weekend Ialso packed 8oz of polyfiber fill in the enclosure, then installed the sub. I couldn't find any speaker cup terminals that I liked, so i'm going to run the wires straight from the sub, through the box (caulk around it) to the amp.
I also have ordered herts hcx 6.5 165 hi energy speakers for the front, and will just leave the rears installed. I'm going to run new speaker wire to the fronts so I dont have to hack up the factory wires.
The sub box fits pretty good. The seat is lifted maybe 3/4 of an inch, at the very end- not enough to really notice unless you're looking for it. I fixed the seat cover after taking the pics (should have done it before!)
<center>
<a href="http://smg.photobucket.com/user/Jdb107/media/Mobile%20Uploads/20161106_124211_zpsqejlq263.jpg.html" target="_blank"><img src="http://img.photobucket.com/albums/v494/Jdb107/Mobile%20Uploads/20161106_124211_zpsqejlq263.jpg" border="0" alt=" photo 20161106_124211_zpsqejlq263.jpg"/></a>
<a href="http://smg.photobucket.com/user/Jdb107/media/Mobile%20Uploads/20161106_124200_zpsi3csofao.jpg.html" target="_blank"><img src="http://img.photobucket.com/albums/v494/Jdb107/Mobile%20Uploads/20161106_124200_zpsi3csofao.jpg" border="0" alt=" photo 20161106_124200_zpsi3csofao.jpg"/></a>
<a href="http://smg.photobucket.com/user/Jdb107/media/Mobile%20Uploads/20161106_124028_zpsgntaqewa.jpg.html" target="_blank"><img src="http://img.photobucket.com/albums/v494/Jdb107/Mobile%20Uploads/20161106_124028_zpsgntaqewa.jpg" border="0" alt=" photo 20161106_124028_zpsgntaqewa.jpg"/></a>
<a href="http://smg.photobucket.com/user/Jdb107/media/Mobile%20Uploads/20161106_123954_zpsjjsovp6q.jpg.html" target="_blank"><img src="http://img.photobucket.com/albums/v494/Jdb107/Mobile%20Uploads/20161106_123954_zpsjjsovp6q.jpg" border="0" alt=" photo 20161106_123954_zpsjjsovp6q.jpg"/></a>
</center>
11-09-2016, 12:59 AM
#16
One Clean Machine
iTrader: (5)
Great work on the Sub Box! If you trim your all weather mat, I'll bet the seat will sit flat. Without the seat pushing down on it, when its occupied.
11-11-2016, 11:16 AM
#17
Got the sub all installed yesterday. It is way louder and deeper than I anticipated...I have the gain turned down to 2.5/10. I have to tune the amp so everything flows. I see why you guys recommended to disconnect the rear speakers now too. Once I get my hertz installed in the front I'll spend some time to adjust everything.
I rushed through taking some pics. I worked from 430a m to 530pm on wednesday, then started wiring the truck until 1030 at night, then finished it up yestersay from 6am until 1pm, then went on a 5 hour road trip.
Everything was pretty easy, used a coat hanger and string to pull all the wires through. Ran 4 rcas, remote wire and 16 gauge speaker wire down the drivers side and the power wire down the passenger side. I installed my pac converter so it's accessible kind of around the the gas pedal.
The most difficult time I had was fitting the amps. I fully removed the insulation behind the seat to test fit the mounting. Even without the carpet, neither of my seats will latch to the wall, but they will lock with the bottoms flipped up. I'll have to do some more test fitting to see if this can be avoided. There's lots of clearance without the seats flipped up but it presses against the amps when flipped up. Once I get it figured out I'll cut the rear insulation accordingly, it was really loud in the cab on the highway without it.
<center>
<a href="http://smg.photobucket.com/user/Jdb107/media/Mobile%20Uploads/20161110_125312_zpsgri29hyi.jpg.html" target="_blank"><img src="http://img.photobucket.com/albums/v494/Jdb107/Mobile%20Uploads/20161110_125312_zpsgri29hyi.jpg" border="0" alt=" photo 20161110_125312_zpsgri29hyi.jpg"/></a>
<a href="http://smg.photobucket.com/user/Jdb107/media/Mobile%20Uploads/20161110_125308_zpstccqtxel.jpg.html" target="_blank"><img src="http://img.photobucket.com/albums/v494/Jdb107/Mobile%20Uploads/20161110_125308_zpstccqtxel.jpg" border="0" alt=" photo 20161110_125308_zpstccqtxel.jpg"/></a>
<a href="http://smg.photobucket.com/user/Jdb107/media/Mobile%20Uploads/20161109_200621_zpsexbtzw6u.jpg.html" target="_blank"><img src="http://img.photobucket.com/albums/v494/Jdb107/Mobile%20Uploads/20161109_200621_zpsexbtzw6u.jpg" border="0" alt=" photo 20161109_200621_zpsexbtzw6u.jpg"/></a>
<a href="http://smg.photobucket.com/user/Jdb107/media/Mobile%20Uploads/20161110_090806_zpssjrnlz9m.jpg.html" target="_blank"><img src="http://img.photobucket.com/albums/v494/Jdb107/Mobile%20Uploads/20161110_090806_zpssjrnlz9m.jpg" border="0" alt=" photo 20161110_090806_zpssjrnlz9m.jpg"/></a>
<a href="http://smg.photobucket.com/user/Jdb107/media/Mobile%20Uploads/20161109_200625_zpshx51lzcb.jpg.html" target="_blank"><img src="http://img.photobucket.com/albums/v494/Jdb107/Mobile%20Uploads/20161109_200625_zpshx51lzcb.jpg" border="0" alt=" photo 20161109_200625_zpshx51lzcb.jpg"/></a>
</center>
11-26-2016, 08:59 AM
#18
Some updates:
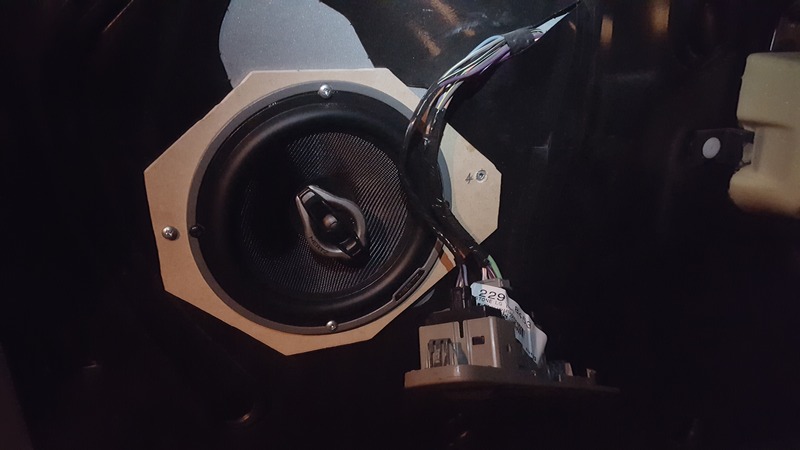
Spent last weekend building 6.5 speaker adapters out of 1/4" MDF. I painted with the last bit of bedliner to weather proof them. Also pulled speaker wire through the molex connectors, and wow, what a pita that was. It took atleast an hour per side.
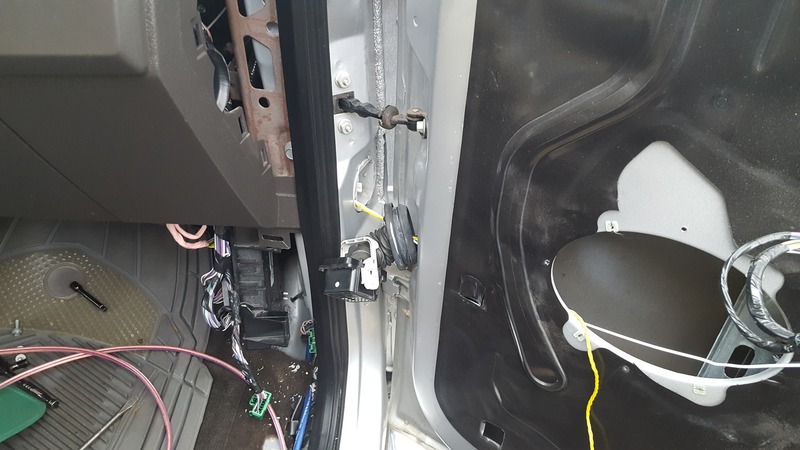
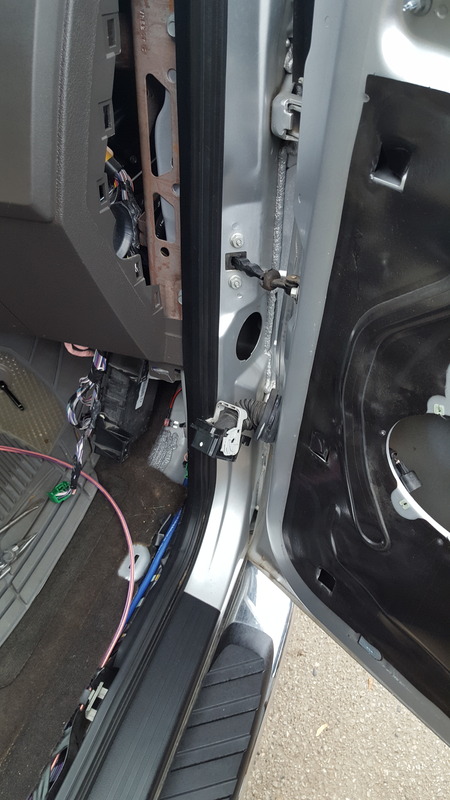
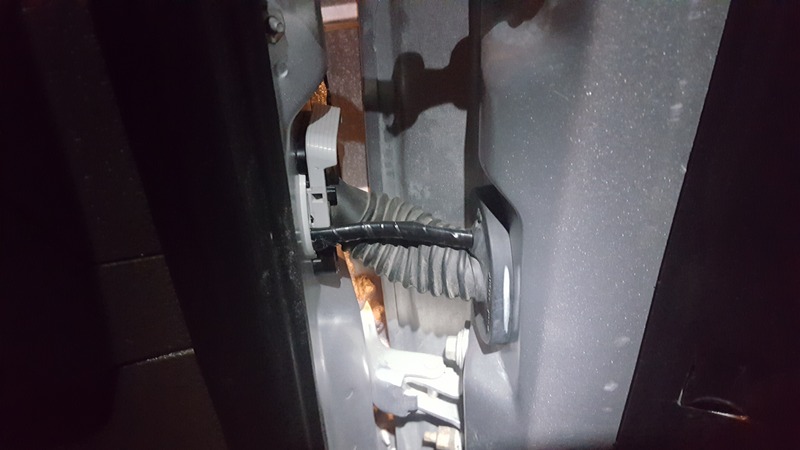
Passenger side required me to pull the fuse panel, a 4wd control box, and a plastic body filler panel, a ground cable, and disconnect a few wiring harnesses. Then 10 minutes of contorting my wrist in every direction to unscrew the molex connector. Driver side required me to pull the parking brake assembly, disconnect some more wiring harnesses and a ground. It was a little bit easier than the passenger side. Not having a garage and doing this in my driveway between the fence and my travel trailer didn't make it any easier lol. I drilled through the side of the molex, instead of through the connector, using 14 awg wire.
I should have the whole system up and running later today, then will spend a couple hours tuning it, which I have some questions about. Before doing anything, i have to turn the pac gains down, as the gains for both amps were as low as they could go, and the speakers started to distort around 1/2 volume.
So my understanding of tuning amps is to isolate what i'm testing, turn volume up to 3/4 with gains all the way down, then slowly turn up gain until it distorts slightly, then back it off a bit.
My kicker (sub) amp has bass boost saying 0-18db @ 40hz. Unsure of really where to set this. Next is the cross over control, which I think i should set at around 80 hz? It also as a sub sonic filter, which is currently off. I think I need to turn it on?
When i tune the audison amp, I'll set the gain. Then I think I want to put the hi filter bypass on instead of full signal, turn the filter to 80hz? Sound about right?
Spent last weekend building 6.5 speaker adapters out of 1/4" MDF. I painted with the last bit of bedliner to weather proof them. Also pulled speaker wire through the molex connectors, and wow, what a pita that was. It took atleast an hour per side.
Passenger side required me to pull the fuse panel, a 4wd control box, and a plastic body filler panel, a ground cable, and disconnect a few wiring harnesses. Then 10 minutes of contorting my wrist in every direction to unscrew the molex connector. Driver side required me to pull the parking brake assembly, disconnect some more wiring harnesses and a ground. It was a little bit easier than the passenger side. Not having a garage and doing this in my driveway between the fence and my travel trailer didn't make it any easier lol. I drilled through the side of the molex, instead of through the connector, using 14 awg wire.
I should have the whole system up and running later today, then will spend a couple hours tuning it, which I have some questions about. Before doing anything, i have to turn the pac gains down, as the gains for both amps were as low as they could go, and the speakers started to distort around 1/2 volume.
So my understanding of tuning amps is to isolate what i'm testing, turn volume up to 3/4 with gains all the way down, then slowly turn up gain until it distorts slightly, then back it off a bit.
My kicker (sub) amp has bass boost saying 0-18db @ 40hz. Unsure of really where to set this. Next is the cross over control, which I think i should set at around 80 hz? It also as a sub sonic filter, which is currently off. I think I need to turn it on?
When i tune the audison amp, I'll set the gain. Then I think I want to put the hi filter bypass on instead of full signal, turn the filter to 80hz? Sound about right?


Last edited by Clubsoda; 11-26-2016 at 09:40 AM.

