
2015 F-150 Lariat Non-Sony stereo upgrade
 01-24-2016, 05:20 PM
#1


I know there are other thread and did not want to post this on those threads. This is what I did for my upgrade:
1. Kicker DSP multichannel amp from the 2013-2014 VSS kit from Rogel Ford. Harness matched perfect to my touchscreen with Navigation OEM unit. Sold the speakers and under seat subwoofer since I wanted to retain full use of floor.
2. Used a Kicker 250.1 amp that I had already but might upgrade at a later date.
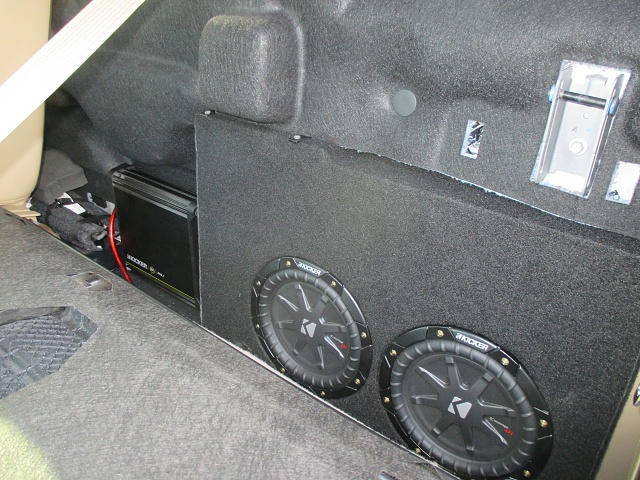
3. Custom box that fits behind the seat with 2 8" Kicker CompRT shallow mount subs.
4. I did not want to relocate the rear window motor or manipulate anything major on the truck. Only had to cut the rear carpet to allow placement of sub.
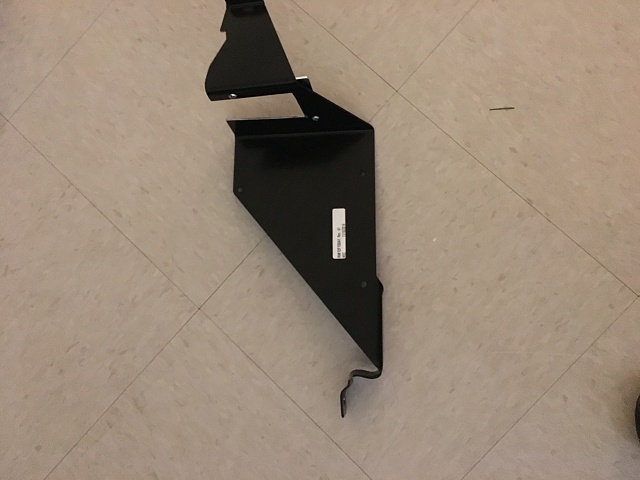
I had to modify the 2013-2014 Kicker bracket to allow it to mount under the 2015 dash.
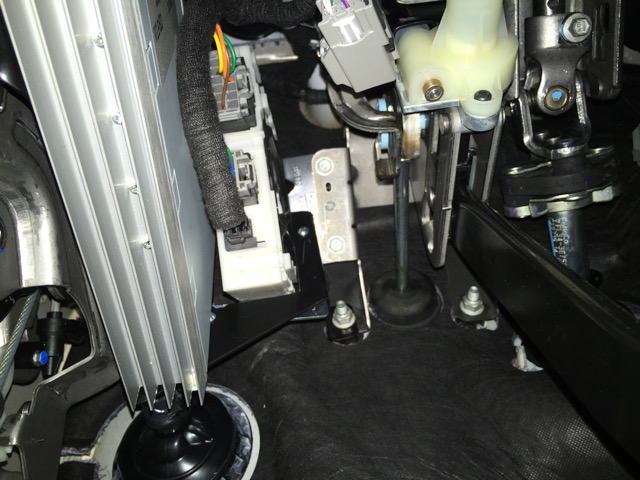
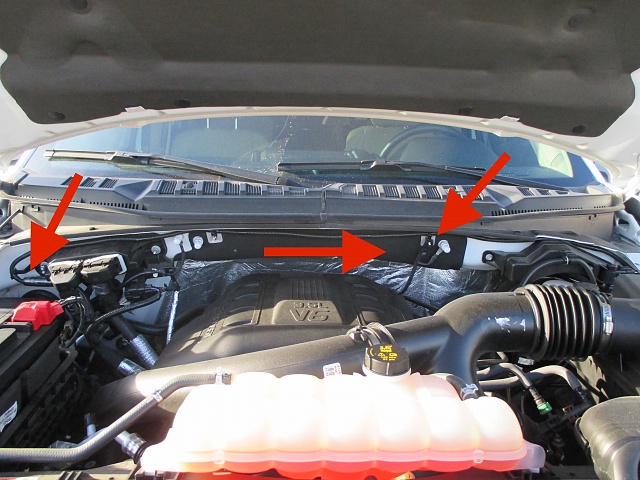
The bracket mounted up easily and is very stable. I ran the power from the battery to the driver side firewall grommet area with the bundle of wires. I put the power in split tubing for a better factory look. I used some little brackets so I could tip-tie the cable for security.
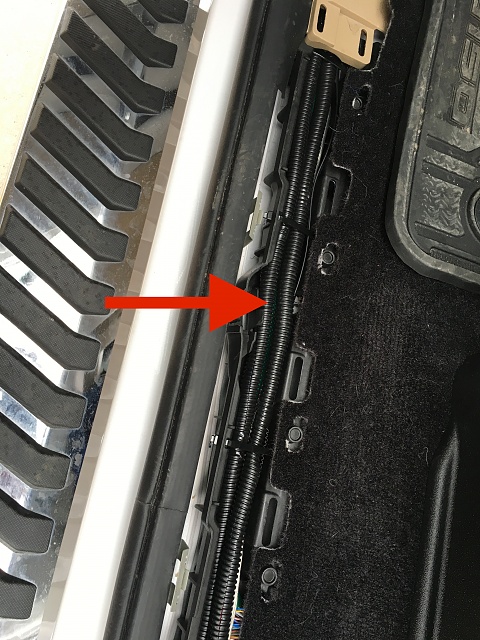
Ran power and signal down the driver side door sill area. Easy to remove and reinstall. I did break a couple of the small white clips but ordered some new ones before I re-installed. Again, I put it in the split tubing for protection and a more factory look.
Built a box to fit behind the seat. I made the notches to fit above the bolts on the floor and used some brackets with nuts to help secure the box once it was in.
More to follow.........
1. Kicker DSP multichannel amp from the 2013-2014 VSS kit from Rogel Ford. Harness matched perfect to my touchscreen with Navigation OEM unit. Sold the speakers and under seat subwoofer since I wanted to retain full use of floor.
2. Used a Kicker 250.1 amp that I had already but might upgrade at a later date.
3. Custom box that fits behind the seat with 2 8" Kicker CompRT shallow mount subs.
4. I did not want to relocate the rear window motor or manipulate anything major on the truck. Only had to cut the rear carpet to allow placement of sub.
I had to modify the 2013-2014 Kicker bracket to allow it to mount under the 2015 dash.

The bracket mounted up easily and is very stable. I ran the power from the battery to the driver side firewall grommet area with the bundle of wires. I put the power in split tubing for a better factory look. I used some little brackets so I could tip-tie the cable for security.

Ran power and signal down the driver side door sill area. Easy to remove and reinstall. I did break a couple of the small white clips but ordered some new ones before I re-installed. Again, I put it in the split tubing for protection and a more factory look.

Built a box to fit behind the seat. I made the notches to fit above the bolts on the floor and used some brackets with nuts to help secure the box once it was in.

More to follow.........
 01-24-2016, 05:45 PM
#2
Continued....
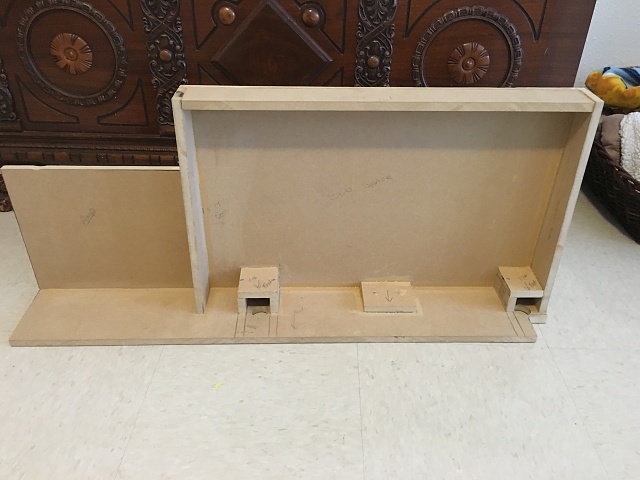
Built the box with the following dimensions.
Overall 34" wide x 15" height. The base is 5.5" but the actual enclose speaker box portion on the box is 23" width x 15" height x 2.75" top depth x 3.75 bottom depth. I cut out the height on the side with the amp to accommodate the amp. I chose these numbers based on the volume and depth of the speakers. I know a few have 10" subs and other style boxes but I was (am still am) pretty close with the seat spacing when the seat is up. Once the box was complete I added another front face panel so that the subs will have the "recessed" look and to strengthen the front baffle panel. I also used 1/2 MDF with some bracing.
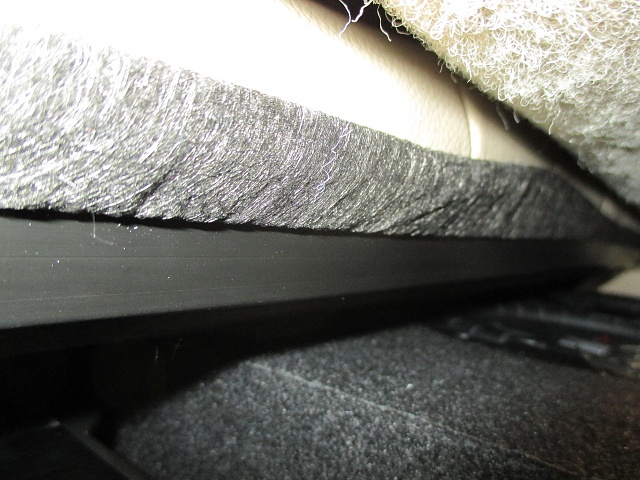
With the box installed, it fits great with the height and width with not having to relocate the motor for the rear window slide. I removed the bottom carpet insulation backing but left the carpet. The rear I just trimmed what I needed to trim to allow the box to fit. I used an "L" bracket that I put a rubber strip on and then fit it into a slot that was on the back wall and then screwed the bracket in the top sub box. This prevents it from moving forward but it was pretty secure anyways.
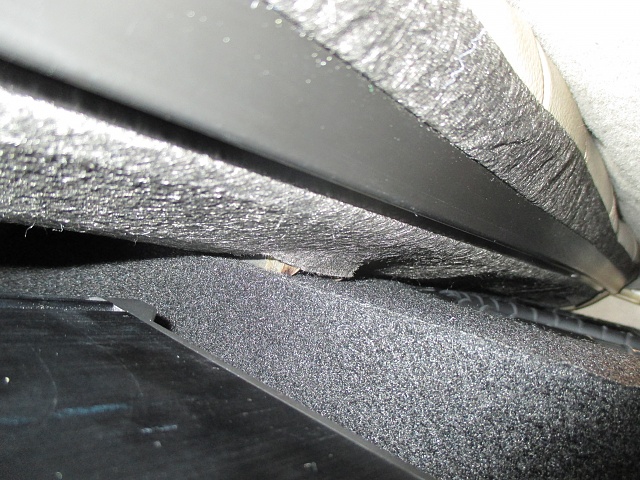
I have no touching of the subwoofer or surround with the seat with the seats up. However, it is close and if the subs were any bigger then the hight of the sub from the floor would probably make contact with the seat rear. There is a metal tube in the seat that would make contact. Using 8" subs I do not have the contact.
Ran short on power wire but will be cleaning that up later. I also ran the under dash amp power to the rear instead of the engine compartment. I ran a single power wire from the battery to the rear and then made both (front amp and sub amp) at a single point.
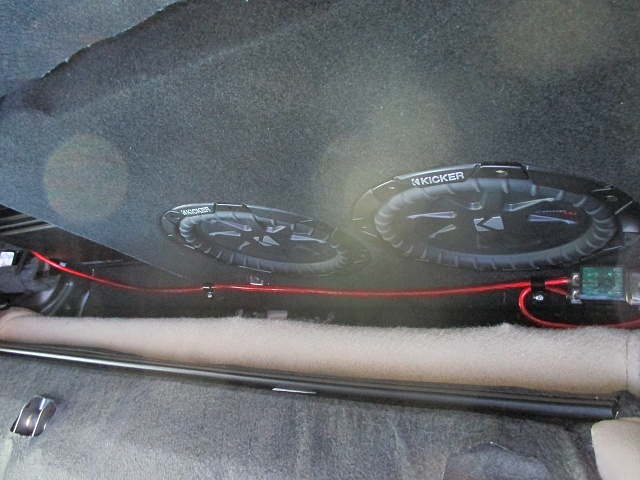
View from down looking up with the seats up and stowed. Just above the sub is where the seat starts to get closer to the box so a bigger sub might have wedged up against it. Maybe...?
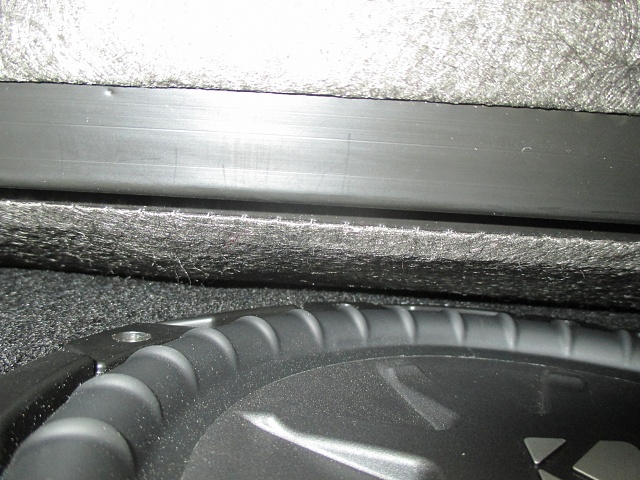
The last pic shows part of the seat pushing up against the box. It is a metal piece that protrudes out some. Does not interfere with the seat stowing. Locks into place without any more effort than before and allows complete use of the floor. Of course, with the seats down there is ALL kinds of room behind there. I also added a remote bass volume control for the amp.
To me it sounds great considering the factory sound prior to the installation. Now, I had the amp with a 10" sub in my Camry before the truck and the 10" in the trunk sounded deeper but the two 8" subs do play good with the tight bass and does play fairly low bass for the size. Vibrates the seat and rear mirror as well. Overall, I am happy. The Kicker amp for the door speakers actually allow a pretty much full volume music playing with very nice sound but would not mind the door speakers a little louder compared to the bass I just added. But.... I am happy with the install and overall improvement. The cost savings was great as well and I did not have to modify anything major or move anything.
Any questions let me know. Enjoy!
Built the box with the following dimensions.
Overall 34" wide x 15" height. The base is 5.5" but the actual enclose speaker box portion on the box is 23" width x 15" height x 2.75" top depth x 3.75 bottom depth. I cut out the height on the side with the amp to accommodate the amp. I chose these numbers based on the volume and depth of the speakers. I know a few have 10" subs and other style boxes but I was (am still am) pretty close with the seat spacing when the seat is up. Once the box was complete I added another front face panel so that the subs will have the "recessed" look and to strengthen the front baffle panel. I also used 1/2 MDF with some bracing.
With the box installed, it fits great with the height and width with not having to relocate the motor for the rear window slide. I removed the bottom carpet insulation backing but left the carpet. The rear I just trimmed what I needed to trim to allow the box to fit. I used an "L" bracket that I put a rubber strip on and then fit it into a slot that was on the back wall and then screwed the bracket in the top sub box. This prevents it from moving forward but it was pretty secure anyways.
I have no touching of the subwoofer or surround with the seat with the seats up. However, it is close and if the subs were any bigger then the hight of the sub from the floor would probably make contact with the seat rear. There is a metal tube in the seat that would make contact. Using 8" subs I do not have the contact.


Ran short on power wire but will be cleaning that up later. I also ran the under dash amp power to the rear instead of the engine compartment. I ran a single power wire from the battery to the rear and then made both (front amp and sub amp) at a single point.
View from down looking up with the seats up and stowed. Just above the sub is where the seat starts to get closer to the box so a bigger sub might have wedged up against it. Maybe...?


The last pic shows part of the seat pushing up against the box. It is a metal piece that protrudes out some. Does not interfere with the seat stowing. Locks into place without any more effort than before and allows complete use of the floor. Of course, with the seats down there is ALL kinds of room behind there. I also added a remote bass volume control for the amp.
To me it sounds great considering the factory sound prior to the installation. Now, I had the amp with a 10" sub in my Camry before the truck and the 10" in the trunk sounded deeper but the two 8" subs do play good with the tight bass and does play fairly low bass for the size. Vibrates the seat and rear mirror as well. Overall, I am happy. The Kicker amp for the door speakers actually allow a pretty much full volume music playing with very nice sound but would not mind the door speakers a little louder compared to the bass I just added. But.... I am happy with the install and overall improvement. The cost savings was great as well and I did not have to modify anything major or move anything.
Any questions let me know. Enjoy!
03-02-2016, 10:18 AM
#3

Continued....
Built the box with the following dimensions.
Overall 34" wide x 15" height. The base is 5.5" but the actual enclose speaker box portion on the box is 23" width x 15" height x 2.75" top depth x 3.75 bottom depth. I cut out the height on the side with the amp to accommodate the amp. I chose these numbers based on the volume and depth of the speakers. I know a few have 10" subs and other style boxes but I was (am still am) pretty close with the seat spacing when the seat is up. Once the box was complete I added another front face panel so that the subs will have the "recessed" look and to strengthen the front baffle panel. I also used 1/2 MDF with some bracing.
With the box installed, it fits great with the height and width with not having to relocate the motor for the rear window slide. I removed the bottom carpet insulation backing but left the carpet. The rear I just trimmed what I needed to trim to allow the box to fit. I used an "L" bracket that I put a rubber strip on and then fit it into a slot that was on the back wall and then screwed the bracket in the top sub box. This prevents it from moving forward but it was pretty secure anyways.
I have no touching of the subwoofer or surround with the seat with the seats up. However, it is close and if the subs were any bigger then the hight of the sub from the floor would probably make contact with the seat rear. There is a metal tube in the seat that would make contact. Using 8" subs I do not have the contact.
Attachment 411995
Attachment 411999
Ran short on power wire but will be cleaning that up later. I also ran the under dash amp power to the rear instead of the engine compartment. I ran a single power wire from the battery to the rear and then made both (front amp and sub amp) at a single point.
View from down looking up with the seats up and stowed. Just above the sub is where the seat starts to get closer to the box so a bigger sub might have wedged up against it. Maybe...?
Attachment 412002
Attachment 412003
Attachment 412005
The last pic shows part of the seat pushing up against the box. It is a metal piece that protrudes out some. Does not interfere with the seat stowing. Locks into place without any more effort than before and allows complete use of the floor. Of course, with the seats down there is ALL kinds of room behind there. I also added a remote bass volume control for the amp.
To me it sounds great considering the factory sound prior to the installation. Now, I had the amp with a 10" sub in my Camry before the truck and the 10" in the trunk sounded deeper but the two 8" subs do play good with the tight bass and does play fairly low bass for the size. Vibrates the seat and rear mirror as well. Overall, I am happy. The Kicker amp for the door speakers actually allow a pretty much full volume music playing with very nice sound but would not mind the door speakers a little louder compared to the bass I just added. But.... I am happy with the install and overall improvement. The cost savings was great as well and I did not have to modify anything major or move anything.
Any questions let me know. Enjoy!
 03-03-2016, 10:46 AM
#4
Junior Member

Join Date: Mar 2016
Posts: 1
Likes: 0
Received 0 Likes
on
0 Posts
Are the dimensions for your enclosure internal or external? I am looking to do something very similar with a single 10" kicker comp rt but I am not sure it will fit due to the added depth of the larger sub. Thank
03-03-2016, 06:13 PM
#5
I was looking to do a 10" but the added depth was my concern along with the larger diameter. If you look at the pics with the 8" you will see the top surround does not touch the rear seat. However, just above the surround area is where it would start to contact a larger 10" sub. Plus the depth was a concern and why I went with the 8". I know others have put in a 10" sub and say the seats can be folded up but I have not seen many good pictures that show the seats up and what space is between the sub and seat. My pictures show there is room and no touching of the surround when the sub is mounted low on the baffle. There is just enough room for the 8". It was a decision between the shallow Rockford Fosgates or the Kickers. Kickers ended up being a better price when I was shopping and overall happy with them. Plus the Rockford's were shallow mount but they protruded out another inch or so with the mount ring. I do think I need a bigger amp since the 250.1 is only giving each sub 125 watts RMS and they can handle 300 RMS each.
03-04-2016, 11:57 AM
#6


External dimensions before adding the carpet. I also added an additional 1/2 MDF baffle face for extra strength. I glued the two pieces together. This also gives the sub a recessed look. It is not totally flush with the outer speaker ring but close enough for the effect of a recessed look. So actually add 1/2 to the total depth but not calculated for internal volume. Make sense?? I calculated around .39 with the lower cutouts included for volume and also put in some poly-fill.
I was looking to do a 10" but the added depth was my concern along with the larger diameter. If you look at the pics with the 8" you will see the top surround does not touch the rear seat. However, just above the surround area is where it would start to contact a larger 10" sub. Plus the depth was a concern and why I went with the 8". I know others have put in a 10" sub and say the seats can be folded up but I have not seen many good pictures that show the seats up and what space is between the sub and seat. My pictures show there is room and no touching of the surround when the sub is mounted low on the baffle. There is just enough room for the 8". It was a decision between the shallow Rockford Fosgates or the Kickers. Kickers ended up being a better price when I was shopping and overall happy with them. Plus the Rockford's were shallow mount but they protruded out another inch or so with the mount ring. I do think I need a bigger amp since the 250.1 is only giving each sub 125 watts RMS and they can handle 300 RMS each.
I was looking to do a 10" but the added depth was my concern along with the larger diameter. If you look at the pics with the 8" you will see the top surround does not touch the rear seat. However, just above the surround area is where it would start to contact a larger 10" sub. Plus the depth was a concern and why I went with the 8". I know others have put in a 10" sub and say the seats can be folded up but I have not seen many good pictures that show the seats up and what space is between the sub and seat. My pictures show there is room and no touching of the surround when the sub is mounted low on the baffle. There is just enough room for the 8". It was a decision between the shallow Rockford Fosgates or the Kickers. Kickers ended up being a better price when I was shopping and overall happy with them. Plus the Rockford's were shallow mount but they protruded out another inch or so with the mount ring. I do think I need a bigger amp since the 250.1 is only giving each sub 125 watts RMS and they can handle 300 RMS each.
03-04-2016, 03:32 PM
#7
The amp is 2 ohm stable and I have them wired for a 2 ohm load. The amp is rated for 125 at 4 ohm and 250 at 2 ohm. So looking at the JL audio XD 600/1 that will put 300 RMS per sub. I like the JL also since it appears to use the same sub remote cable as the Kicker. The manual says "standard phone" cable and the Kicker one I ran already is a standard phone cable. So should be able to just change out the bass **** and not have to re-run wires. Hopefully......
Trending Topics
03-23-2016, 05:46 AM
#8

Just curious as to the cost of your set-up and the difficulty of doing it?
I'm a handy person buuuut have little experience in the auto audio scene.
I want to keep my set-up simple and just add a sub and amp to the stock speakers to start.
I'm a handy person buuuut have little experience in the auto audio scene.
I want to keep my set-up simple and just add a sub and amp to the stock speakers to start.
03-23-2016, 09:39 AM
#9
The amp I already had so figure 150.00 to 200.00 for an amp similar. Maybe more depending on the brand.
Rounded/Estimated prices:
Wood: 1/2 MDF - 25.00
Subs: 89.00 each (x2) 178.00
Carpet: 5.00 from local shop
Wire kit: 20.00
Remote Bass ****: 18.00
Misc: 12.00 (split tubing, screws, glue, L-brackets for securing, etc).
Around 450.00 depending on what deals you get and cost of your amp.
Not difficult to build and install. Just took borrowing a table saw and my time. Different than some of the other builds but it sounds good and I think better than the single Kicker in the VSS system.
I also did the front under dash Kicker VSS amp for the door speakers. Bought that system and sold the speakers and sub since it was for the 2013/2014 F-150 and I wanted to retain the under seat storage. That added a little but by the time I bought the system from Rogel Ford and sold that parts I was in for around 150.00 for the amp and plug and play harness.
Any other questions let me know.
03-23-2016, 01:11 PM
#10
The amp I already had so figure 150.00 to 200.00 for an amp similar. Maybe more depending on the brand.
Rounded/Estimated prices:
Wood: 1/2 MDF - 25.00
Subs: 89.00 each (x2) 178.00
Carpet: 5.00 from local shop
Wire kit: 20.00
Remote Bass ****: 18.00
Misc: 12.00 (split tubing, screws, glue, L-brackets for securing, etc).
Around 450.00 depending on what deals you get and cost of your amp.
Not difficult to build and install. Just took borrowing a table saw and my time. Different than some of the other builds but it sounds good and I think better than the single Kicker in the VSS system.
I also did the front under dash Kicker VSS amp for the door speakers. Bought that system and sold the speakers and sub since it was for the 2013/2014 F-150 and I wanted to retain the under seat storage. That added a little but by the time I bought the system from Rogel Ford and sold that parts I was in for around 150.00 for the amp and plug and play harness.
Any other questions let me know.
Rounded/Estimated prices:
Wood: 1/2 MDF - 25.00
Subs: 89.00 each (x2) 178.00
Carpet: 5.00 from local shop
Wire kit: 20.00
Remote Bass ****: 18.00
Misc: 12.00 (split tubing, screws, glue, L-brackets for securing, etc).
Around 450.00 depending on what deals you get and cost of your amp.
Not difficult to build and install. Just took borrowing a table saw and my time. Different than some of the other builds but it sounds good and I think better than the single Kicker in the VSS system.
I also did the front under dash Kicker VSS amp for the door speakers. Bought that system and sold the speakers and sub since it was for the 2013/2014 F-150 and I wanted to retain the under seat storage. That added a little but by the time I bought the system from Rogel Ford and sold that parts I was in for around 150.00 for the amp and plug and play harness.
Any other questions let me know.