
2009-2014 Radio upgrade WITHOUT keeping Sync.
 06-23-2015, 01:05 AM
#1
4Runner Driver
Thread Starter

(DISCLAIMER: I am not a professional stereo installer, just an enthusiast who has installed about a dozen different systems in different kinds of vehicles over the years. I am by no means a true expert in the field, my past career as an automotive technician and parts counterperson notwithstanding. Follow the information I provide at your own risk, and if you see something I did wrong or know a better way to either do or explain something I show, by all means, chime in!)
I was asked in one of the many Sync complaint threads we have going in the 2009-2014 forum to post some pics and details of how I went about this when I actually did it, so here it is:
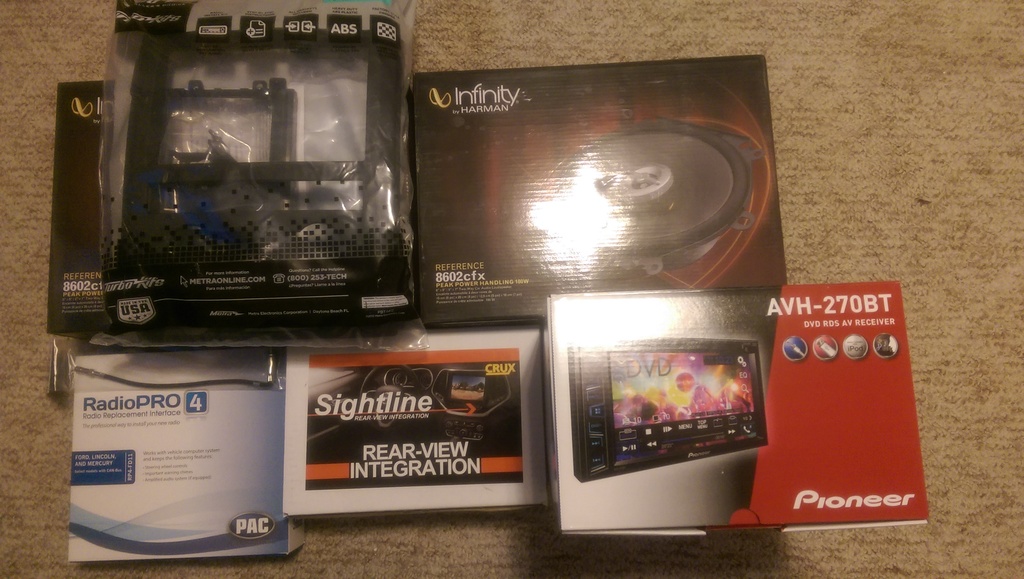
1. Buy the aftermarket head unit of your choice, in either single or double DIN, that has the features you want. NONE of your Sync features are going to work after this, so make sure you buy one with everything you want it to do, even the stuff Sync already does.
2. Buy this: http://www.pac-audio.com/productDeta...ProductId=1117 Or buy the iDatalink Maestro. I went with the adapter from PAC, so that's what I'll be showing. If you get your head unit from Crutchfield, they'll give you a discount on the adapter module of your choice.
3. Buy the rest of he install gear you'll need such as the faceplate, and Chrysler antenna adapter (yes it fits). Crutchfield does give a discount on these as well, and will give you options. (No, I don't work for Crutchfield, Yes, I know they are a little higher in price on some things, but the instructions they send with their stuff, their knowledgeable and helpful staff, tech support, and the bundles they put together to make sure you have everything you need for the job are, in my opinion, worth it, and in the past I've avoided them solely because of price, I've bought a lot of my stuff from Sonic Electronix and Amazon over the years as well.)
Here's what I'm going with:
4. Once you have all of the pieces to your puzzle, set EVERYTHING aside except the wiring harness for your radio, the wiring harness for your adapter, and the manuals for each. Read both manuals carefully, and make sure you understand what they're telling you when it comes to the wiring. Remember the Crutchfield tech support I mentioned? In my particular case, I actually had a question Sunday afternoon when doing this part, so I called them. It was because Pioneer instructed to wire the parking brake wire to the power side of the parking brake switch, while the wire from the adapter was labeled as being negative (-). The tech support specialist on the other end was able to verify that those wires actually did go together, and that I didn't have to go hacking into my truck's harness. Make sure you set any settings used by your adapter correctly, and if you want, go ahead and pre-assemble your radio to it's mounting brackets.
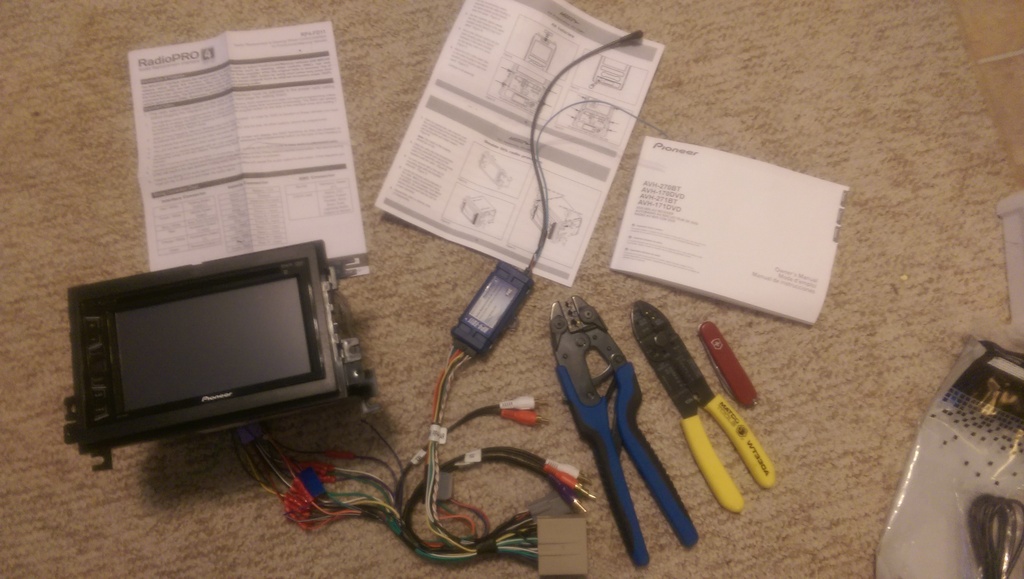
5. Once you have the harness for the radio and the harness for your adapter spliced together (I used butt connectors, you can also use solder and tape, solder and shrink tubing, or crimp caps.), get out to the truck, roll the windows down, eject the CD if you have one, do one last master reset for old time's sake (possibly redundant, I did it anyway to clear out my personal info from Sync and to make sure my phone was un-paired) and get ready to spend the next hour or so in the cab.
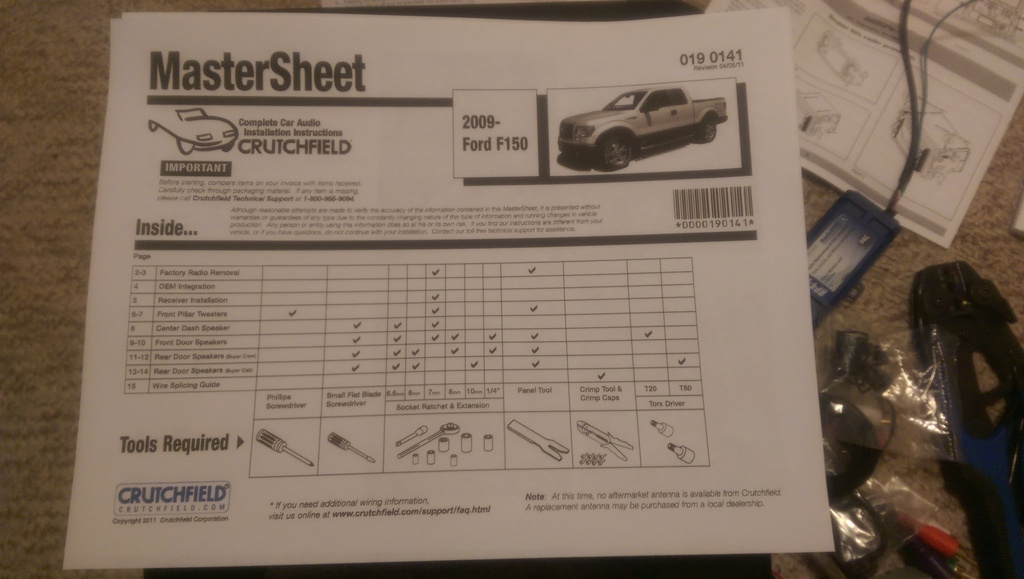
6. Crutchfield has an all-inclusive list of tools needed for the job with their master sheet instructions (the only thing they forgot is the Swiss Army knife, which comes in handy anywhere, including on this job). It's the one page of theirs I've included in the pictures (don't want to get the site in trouble for copyright infringement, and that page IS the cover sheet), so make sure you've got those tools gathered.
7. Most technical literature will tell you to disconnect the negative battery cable at this point. I didn't, and I know others won't, but it's probably a pretty good idea anyway, remember my disclaimer at the beginning?
8. If you've pulled the trim on the side of the radio to put in a gauge or other more useful thing in place of that craptacular coin holder we were provided with (non-4x4 guys), you already know how to remove the one on the driver's side and LOOSEN the passenger side one. If not, grasp the driver's side one at the bottom, near the floor, and tug outward gently, when that fastener pops, slowly work your way up to the top, loosening, but NOT removing it. Then loosen the right-hand-side (as you're sitting) of the instrument cluster bezel in a similar manner. After this is done, you can NOW maneuver the trim piece out. Remember to disconnect the 4x4 harness from either the switch (4wd) or coin holder (2wd). On the passenger side, you can only LOOSEN the trim piece, as it's held in under the airbag. This is enough, so don't go forcing it, and unless you're turning wrenches at a Ford dealership by day, leave that airbag alone!
(Forgot to take a picture at this point, thunderstorm hit while I was working in the truck, so I rolled the windows up and kept working, it got hot, and humid, and hot, so I kind of was focusing on working quickly and forgot to take pictures for a few steps, I'll try to describe in detail here, it's nothing too complicated.)
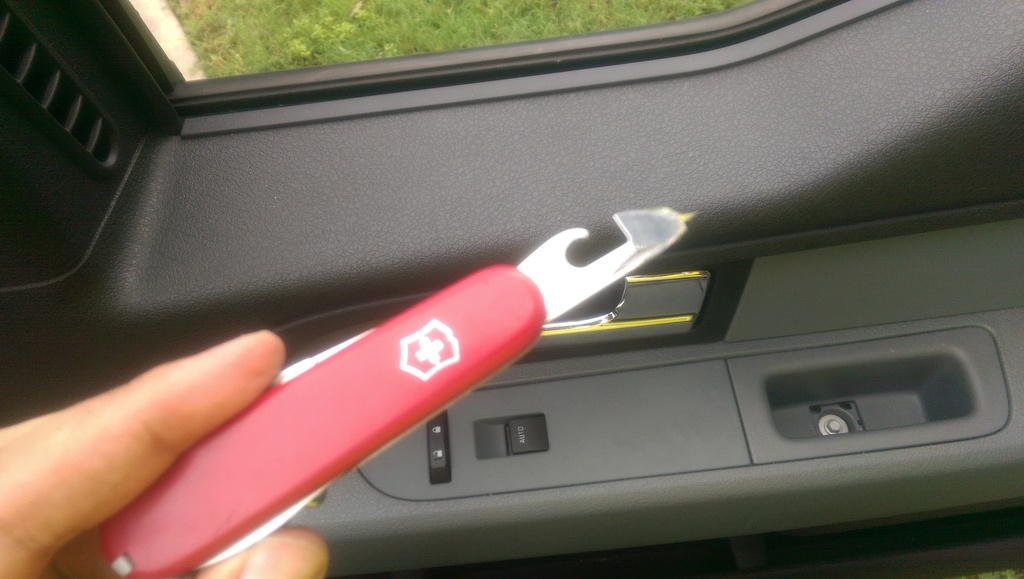
9. You know that rubber piece in front of your LCD near the top of the dash? Lift it out. Then take out those screws. Then, put a small pocket knife blade, flatblade screwdriver, or other small object carefully under the plate holding your Sync emblem, aux port, and USB port. If you look under it you'll find a tiny slot for said object to slide into, using that will facilitate removing that plate so that you can take out the last screw holding in the stereo bezel. Go ahead and unplug your aux and USB ports at this time.
10. Working up from the bottom, slowly loosen the bezel in a similar manner to removing the trim earlier, you'll have harnesses to unplug from your hazard/TCS/airbag buttons, the faceplate itself, the HVAC controls, and the power port.
11. You'll now be able to see your factory stereo, it's only got four bolts holding it in. Once you take those out, it slides out really easily, and it's time to unplug it. You'll have a satellite radio antenna lead, your AM/FM antenna lead, and two harnesses. All came out easily except the AM/FM lead, I swear Arnold Schwarzenegger was moonlighting on the assembly line that day and jammed that cable in as far as possible, it was a to get loose!
(Yay! A picture!)
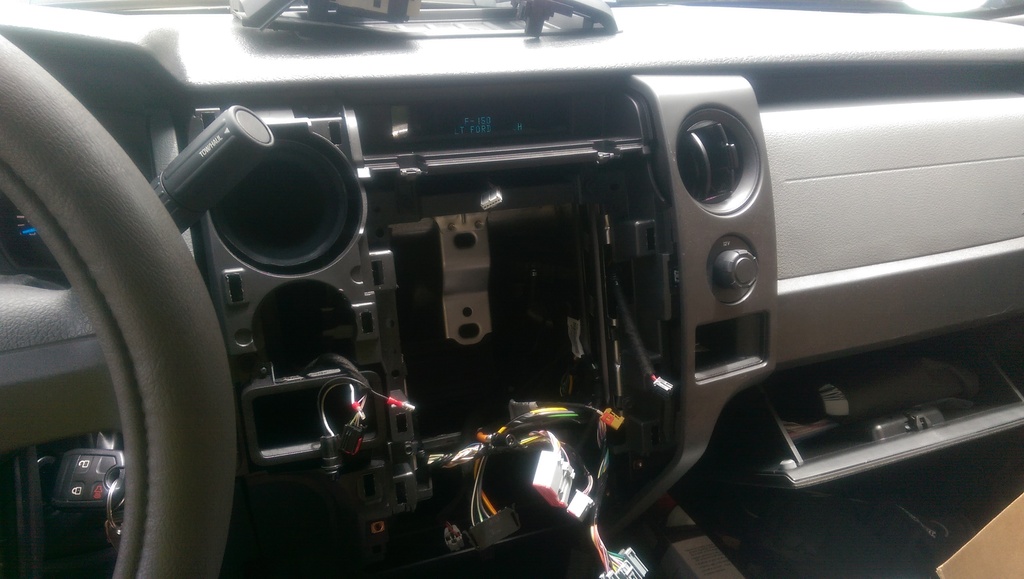
I turned the key on out of curiousity at this point to see what the LCD would say, it just stayed on "F150 BUILT FORD TOUGH", no, it wasn't fading out, not sure why the camera on my phone did that.
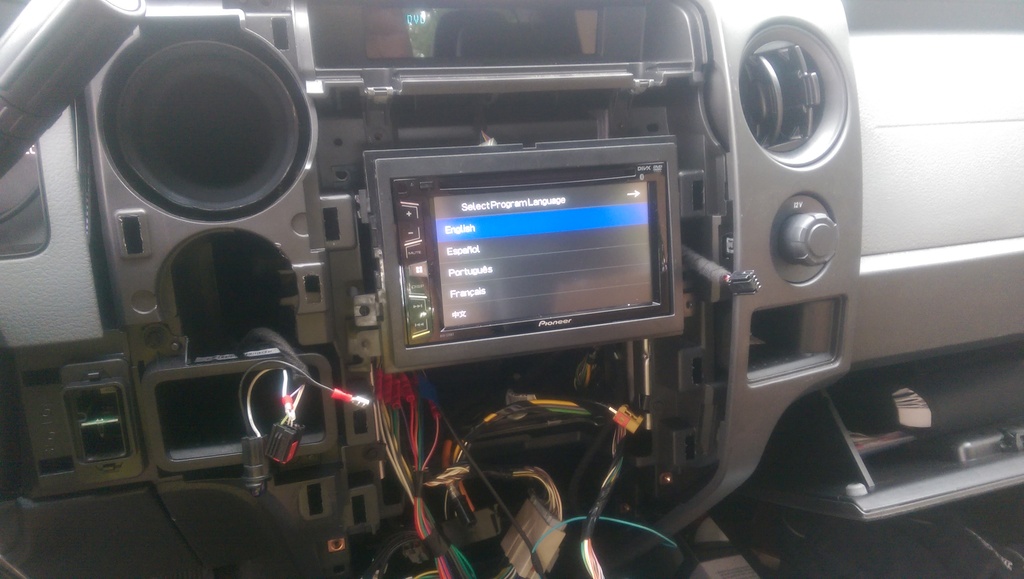
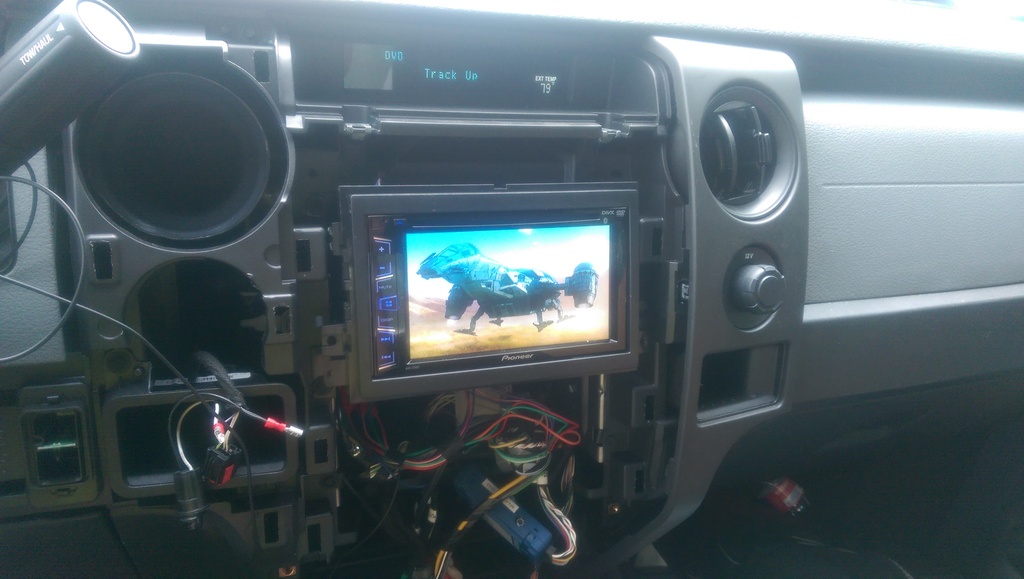
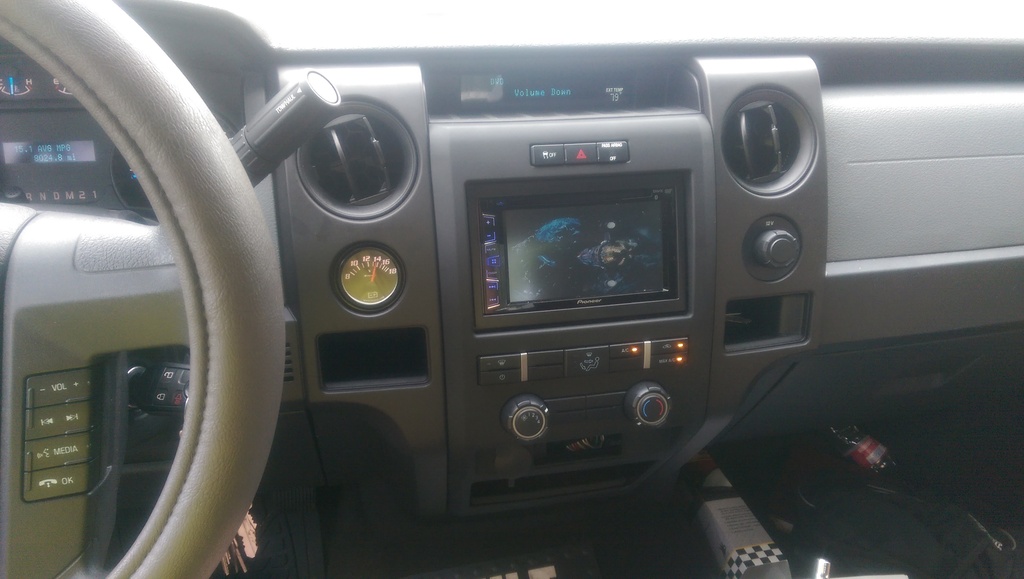
12. If you didn't pre-assemble your brackets to your radio (I did, some don't), assemble them now, and test fit it. Plug in your connections, re-connect the battery if you disconnected it, and turn the key and try it out. If it all works, shut it all down, and fine-tune the fitment at this point.
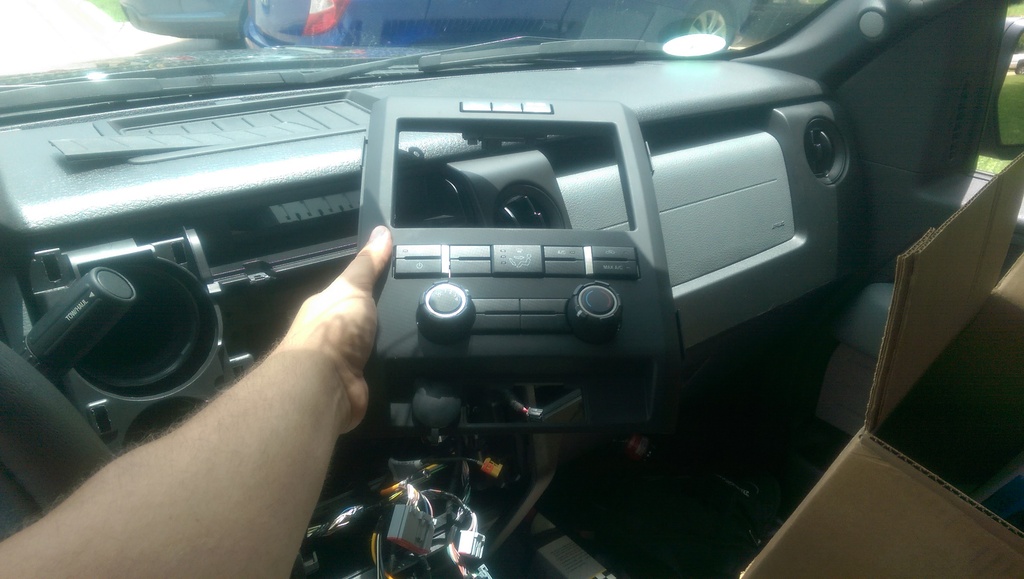
13. From there, the remainder is pretty much the reverse of what you've done so far. You'll need to transfer your buttons (TCS/Hazard/Airbag), power port, and HVAC controls to your new bezel, but that's pretty straight-forward. If you opted for another adapter like the Maestro and are keeping the factory aux and USB ports, you may have some issue with getting the Sync/USB/Aux plate to fit the new bezel, I did, but it's no big deal for me, as I've got a delete plate ordered and will be putting switches for my off-road lights there.
I also installed my Infinity speakers yesterday, and will show some helpful tips there (this is where the Swiss Army knife comes in).
I was asked in one of the many Sync complaint threads we have going in the 2009-2014 forum to post some pics and details of how I went about this when I actually did it, so here it is:
1. Buy the aftermarket head unit of your choice, in either single or double DIN, that has the features you want. NONE of your Sync features are going to work after this, so make sure you buy one with everything you want it to do, even the stuff Sync already does.
2. Buy this: http://www.pac-audio.com/productDeta...ProductId=1117 Or buy the iDatalink Maestro. I went with the adapter from PAC, so that's what I'll be showing. If you get your head unit from Crutchfield, they'll give you a discount on the adapter module of your choice.
3. Buy the rest of he install gear you'll need such as the faceplate, and Chrysler antenna adapter (yes it fits). Crutchfield does give a discount on these as well, and will give you options. (No, I don't work for Crutchfield, Yes, I know they are a little higher in price on some things, but the instructions they send with their stuff, their knowledgeable and helpful staff, tech support, and the bundles they put together to make sure you have everything you need for the job are, in my opinion, worth it, and in the past I've avoided them solely because of price, I've bought a lot of my stuff from Sonic Electronix and Amazon over the years as well.)
Here's what I'm going with:
4. Once you have all of the pieces to your puzzle, set EVERYTHING aside except the wiring harness for your radio, the wiring harness for your adapter, and the manuals for each. Read both manuals carefully, and make sure you understand what they're telling you when it comes to the wiring. Remember the Crutchfield tech support I mentioned? In my particular case, I actually had a question Sunday afternoon when doing this part, so I called them. It was because Pioneer instructed to wire the parking brake wire to the power side of the parking brake switch, while the wire from the adapter was labeled as being negative (-). The tech support specialist on the other end was able to verify that those wires actually did go together, and that I didn't have to go hacking into my truck's harness. Make sure you set any settings used by your adapter correctly, and if you want, go ahead and pre-assemble your radio to it's mounting brackets.
5. Once you have the harness for the radio and the harness for your adapter spliced together (I used butt connectors, you can also use solder and tape, solder and shrink tubing, or crimp caps.), get out to the truck, roll the windows down, eject the CD if you have one, do one last master reset for old time's sake (possibly redundant, I did it anyway to clear out my personal info from Sync and to make sure my phone was un-paired) and get ready to spend the next hour or so in the cab.
6. Crutchfield has an all-inclusive list of tools needed for the job with their master sheet instructions (the only thing they forgot is the Swiss Army knife, which comes in handy anywhere, including on this job). It's the one page of theirs I've included in the pictures (don't want to get the site in trouble for copyright infringement, and that page IS the cover sheet), so make sure you've got those tools gathered.
7. Most technical literature will tell you to disconnect the negative battery cable at this point. I didn't, and I know others won't, but it's probably a pretty good idea anyway, remember my disclaimer at the beginning?
8. If you've pulled the trim on the side of the radio to put in a gauge or other more useful thing in place of that craptacular coin holder we were provided with (non-4x4 guys), you already know how to remove the one on the driver's side and LOOSEN the passenger side one. If not, grasp the driver's side one at the bottom, near the floor, and tug outward gently, when that fastener pops, slowly work your way up to the top, loosening, but NOT removing it. Then loosen the right-hand-side (as you're sitting) of the instrument cluster bezel in a similar manner. After this is done, you can NOW maneuver the trim piece out. Remember to disconnect the 4x4 harness from either the switch (4wd) or coin holder (2wd). On the passenger side, you can only LOOSEN the trim piece, as it's held in under the airbag. This is enough, so don't go forcing it, and unless you're turning wrenches at a Ford dealership by day, leave that airbag alone!
(Forgot to take a picture at this point, thunderstorm hit while I was working in the truck, so I rolled the windows up and kept working, it got hot, and humid, and hot, so I kind of was focusing on working quickly and forgot to take pictures for a few steps, I'll try to describe in detail here, it's nothing too complicated.)
9. You know that rubber piece in front of your LCD near the top of the dash? Lift it out. Then take out those screws. Then, put a small pocket knife blade, flatblade screwdriver, or other small object carefully under the plate holding your Sync emblem, aux port, and USB port. If you look under it you'll find a tiny slot for said object to slide into, using that will facilitate removing that plate so that you can take out the last screw holding in the stereo bezel. Go ahead and unplug your aux and USB ports at this time.
10. Working up from the bottom, slowly loosen the bezel in a similar manner to removing the trim earlier, you'll have harnesses to unplug from your hazard/TCS/airbag buttons, the faceplate itself, the HVAC controls, and the power port.
11. You'll now be able to see your factory stereo, it's only got four bolts holding it in. Once you take those out, it slides out really easily, and it's time to unplug it. You'll have a satellite radio antenna lead, your AM/FM antenna lead, and two harnesses. All came out easily except the AM/FM lead, I swear Arnold Schwarzenegger was moonlighting on the assembly line that day and jammed that cable in as far as possible, it was a
to get loose!(Yay! A picture!)
I turned the key on out of curiousity at this point to see what the LCD would say, it just stayed on "F150 BUILT FORD TOUGH", no, it wasn't fading out, not sure why the camera on my phone did that.
12. If you didn't pre-assemble your brackets to your radio (I did, some don't), assemble them now, and test fit it. Plug in your connections, re-connect the battery if you disconnected it, and turn the key and try it out. If it all works, shut it all down, and fine-tune the fitment at this point.
13. From there, the remainder is pretty much the reverse of what you've done so far. You'll need to transfer your buttons (TCS/Hazard/Airbag), power port, and HVAC controls to your new bezel, but that's pretty straight-forward. If you opted for another adapter like the Maestro and are keeping the factory aux and USB ports, you may have some issue with getting the Sync/USB/Aux plate to fit the new bezel, I did, but it's no big deal for me, as I've got a delete plate ordered and will be putting switches for my off-road lights there.
I also installed my Infinity speakers yesterday, and will show some helpful tips there (this is where the Swiss Army knife comes in).

The following users liked this post:
despotic (06-23-2015)
06-23-2015, 01:06 AM
#2
4Runner Driver
Thread Starter
(continued)
When pulling the panels behind the door handles to get to the bolts holding the door panel on, I found none of my 15 or so trim removal tools to be capable of getting in there. However, the can opener/screwdriver blade on my Swiss Army knife was perfect for the job.
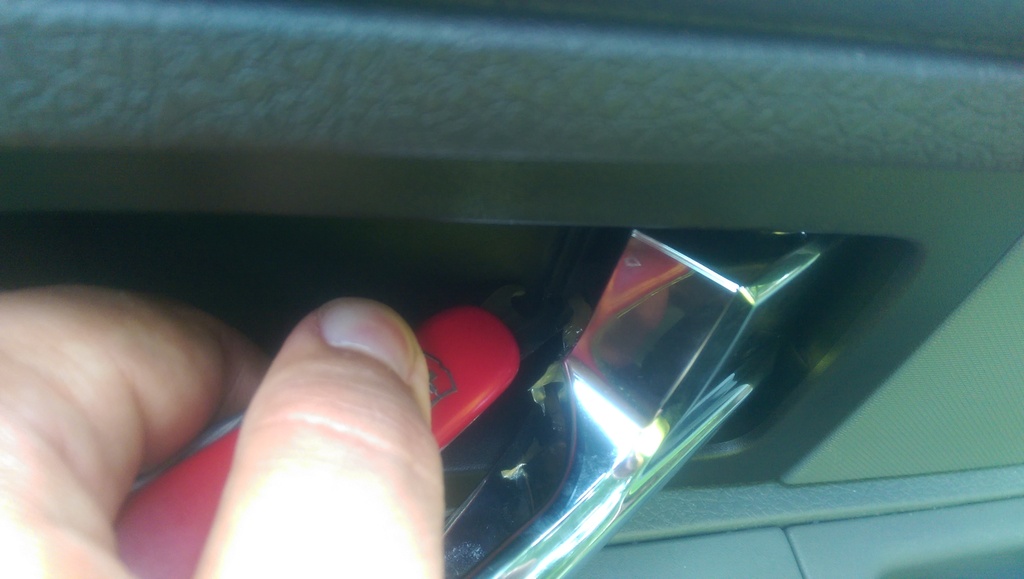
(They must pay the guy that greases Ford's door handles by the ounce! All four were like this on the inside!)
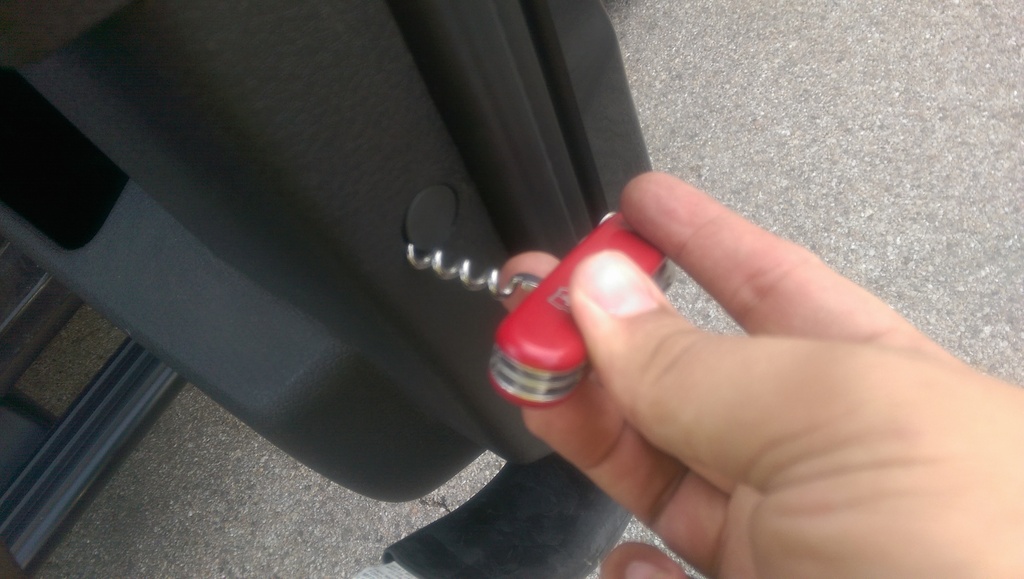
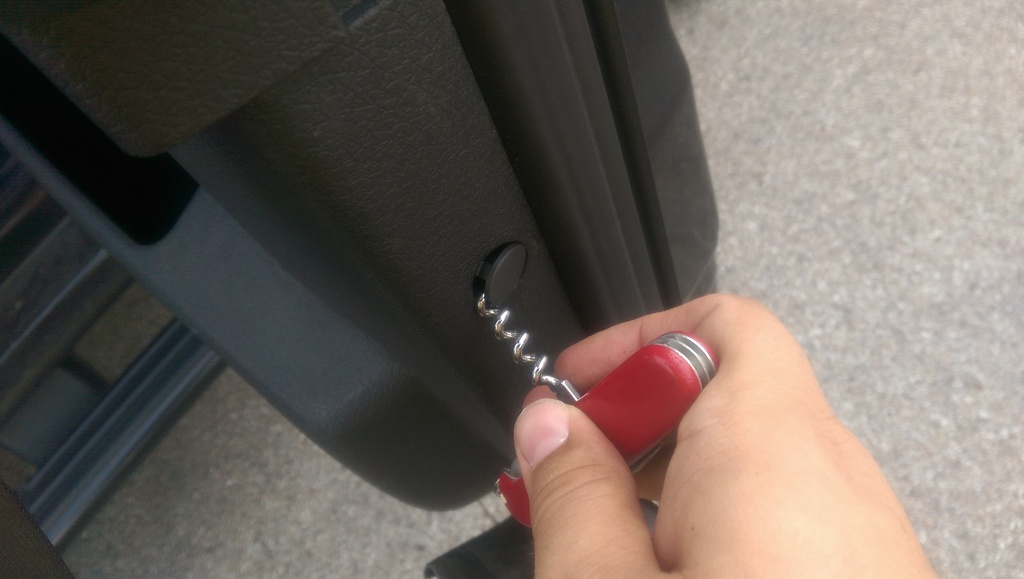
I also hadn't grabbed any of my picks out of my toolbox for the screw covers on my suicide rear doors (Supercab), but discovered that the corkscrew from my Swiss Army knife made an awesome removal tool for them. Simply push on the cover on the opposite side of the hole with a finger (either hole, there are two) and put the tip of the corkscrew in the other and turn, voila, the cover pops right off, and not a scratch to either the door panel or the cover!
Here's the finalized installation while watching Serenity after it was all said-and-done. Why Serenity? Because new stereo systems are shiny, and it's my gorram truck! That's why!
When it was done, my sole complaint (because I LOOOOOOOVE complaining, look at my post history, no joke... maybe I should get help... ), is that with the PAC adapter, the LCD display that used to have your music info, channel info, station info, etc. now just displays the most recent steering wheel control you pressed. It's nice that it confirms for you that the steering wheel controls are still working properly, but if I turn the volume down, that's all I'm going to see there until I hit another button, just kinda weird. Honestly, if that's the only thing I can complain about with my new setup, it's already beating the hell out of the stock radio and Sync.
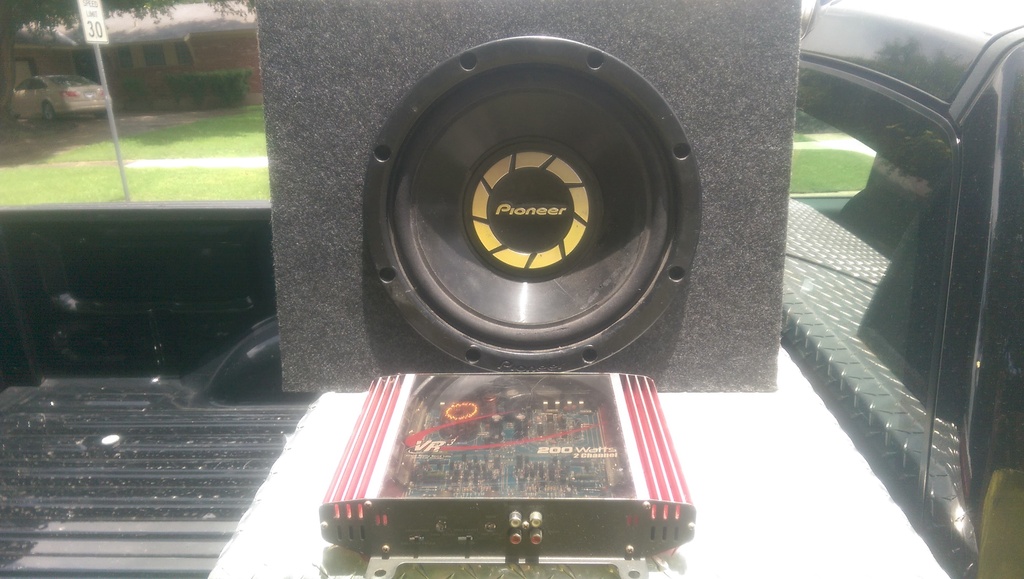
You'll see my old, dingy, beat-to-hell amp (had it 12 years and in five or six cars at this point) a slightly less dingy and beat-to-hell 12" sub (bought used and had in my previous truck for two years), and a nice new tailgate-handle backup camera among the things I bought or had for installation in the truck. I didn't get to them yet, but if there's interest in how that's done by me (either for the "hey! watch this idiot do this!" or the "hey, I'm interested in those, can you show me?" factor, I'll add them later this week or sometime next week when I actually get them done.
In the end, the Sync module is still in the dash. After seeing that it didn't interfere with anything at this point, I chose to leave it since I wasn't sure what, if any, other CAN communications were being routed through it, and it saved me a ton of work, and left me in a good position for re-installation of the stock components if I choose to do so when taking the truck in for warranty work, or if I choose to sell it. The new Pioneer head unit does everything I want and need it to do, and with the steering wheel controls still working, the only thing I'm missing that I had with Sync is voice command, and that failed to work correctly on a nearly daily basis toward the end there, so I can't say that I miss it much.
I hope you enjoyed my little write-up, such as it is, and if you have any questions, concerns, comments, criticisms, jokes at my expense, or kudos to give, feel free to leave comments.
When pulling the panels behind the door handles to get to the bolts holding the door panel on, I found none of my 15 or so trim removal tools to be capable of getting in there. However, the can opener/screwdriver blade on my Swiss Army knife was perfect for the job.
(They must pay the guy that greases Ford's door handles by the ounce! All four were like this on the inside!)
I also hadn't grabbed any of my picks out of my toolbox for the screw covers on my suicide rear doors (Supercab), but discovered that the corkscrew from my Swiss Army knife made an awesome removal tool for them. Simply push on the cover on the opposite side of the hole with a finger (either hole, there are two) and put the tip of the corkscrew in the other and turn, voila, the cover pops right off, and not a scratch to either the door panel or the cover!
Here's the finalized installation while watching Serenity after it was all said-and-done. Why Serenity? Because new stereo systems are shiny, and it's my gorram truck! That's why!
When it was done, my sole complaint (because I LOOOOOOOVE complaining, look at my post history, no joke... maybe I should get help...
), is that with the PAC adapter, the LCD display that used to have your music info, channel info, station info, etc. now just displays the most recent steering wheel control you pressed. It's nice that it confirms for you that the steering wheel controls are still working properly, but if I turn the volume down, that's all I'm going to see there until I hit another button, just kinda weird. Honestly, if that's the only thing I can complain about with my new setup, it's already beating the hell out of the stock radio and Sync.You'll see my old, dingy, beat-to-hell amp (had it 12 years and in five or six cars at this point) a slightly less dingy and beat-to-hell 12" sub (bought used and had in my previous truck for two years), and a nice new tailgate-handle backup camera among the things I bought or had for installation in the truck. I didn't get to them yet, but if there's interest in how that's done by me (either for the "hey! watch this idiot do this!" or the "hey, I'm interested in those, can you show me?" factor, I'll add them later this week or sometime next week when I actually get them done.
In the end, the Sync module is still in the dash. After seeing that it didn't interfere with anything at this point, I chose to leave it since I wasn't sure what, if any, other CAN communications were being routed through it, and it saved me a ton of work, and left me in a good position for re-installation of the stock components if I choose to do so when taking the truck in for warranty work, or if I choose to sell it. The new Pioneer head unit does everything I want and need it to do, and with the steering wheel controls still working, the only thing I'm missing that I had with Sync is voice command, and that failed to work correctly on a nearly daily basis toward the end there, so I can't say that I miss it much.
I hope you enjoyed my little write-up, such as it is, and if you have any questions, concerns, comments, criticisms, jokes at my expense, or kudos to give, feel free to leave comments.
Last edited by Mattwrotethis; 06-23-2015 at 01:16 AM.
The following 4 users liked this post by Mattwrotethis:
06-23-2015, 05:28 PM
#3

This is great, thanks a bunch Matt!
I'm wondering now, if you want to play music from your phone via bluetooth, or talk on the phone now, that will all route through your new head unit correct? Were you able to take advantage of the mic that is already installed in the roof or do you have to use the mic that came with your new deck?
I'm wondering now, if you want to play music from your phone via bluetooth, or talk on the phone now, that will all route through your new head unit correct? Were you able to take advantage of the mic that is already installed in the roof or do you have to use the mic that came with your new deck?
06-23-2015, 05:54 PM
#4
F150 Forum

(continued)
When it was done, my sole complaint (because I LOOOOOOOVE complaining, look at my post history, no joke... maybe I should get help... ), is that with the PAC adapter, the LCD display that used to have your music info, channel info, station info, etc. now just displays the most recent steering wheel control you pressed. It's nice that it confirms for you that the steering wheel controls are still working properly, but if I turn the volume down, that's all I'm going to see there until I hit another button, just kinda weird.
When it was done, my sole complaint (because I LOOOOOOOVE complaining, look at my post history, no joke... maybe I should get help...
), is that with the PAC adapter, the LCD display that used to have your music info, channel info, station info, etc. now just displays the most recent steering wheel control you pressed. It's nice that it confirms for you that the steering wheel controls are still working properly, but if I turn the volume down, that's all I'm going to see there until I hit another button, just kinda weird.It's a small thing, but that's one of the advantages of Maestro and a compatible radio. You get the clock back too. You can always flash the MRR to not retain Sync by unchecking the boxes on the web updater. When you do this, you will be able to remap the voice and phone buttons to control the aftermarket BT and voice features.
The following users liked this post:
despotic (06-23-2015)
06-23-2015, 10:13 PM
#5
4Runner Driver
Thread Starter
This is great, thanks a bunch Matt!
I'm wondering now, if you want to play music from your phone via bluetooth, or talk on the phone now, that will all route through your new head unit correct? Were you able to take advantage of the mic that is already installed in the roof or do you have to use the mic that came with your new deck?
I'm wondering now, if you want to play music from your phone via bluetooth, or talk on the phone now, that will all route through your new head unit correct? Were you able to take advantage of the mic that is already installed in the roof or do you have to use the mic that came with your new deck?
It's a small thing, but that's one of the advantages of Maestro and a compatible radio. You get the clock back too. You can always flash the MRR to not retain Sync by unchecking the boxes on the web updater. When you do this, you will be able to remap the voice and phone buttons to control the aftermarket BT and voice features.
Last edited by Mattwrotethis; 06-23-2015 at 10:20 PM.
06-23-2015, 11:03 PM
#6


Yes, it goes through the new head unit, works great. For now I am using the mic that came with the new radio stuck to the top of the steering column. I would need to make an adapter of some sort to use the original, shouldn't be terribly difficult, but not something I've had the time to look into. I may, in the future, move the mic elsewhere, but it's pretty inobtrusive where its at now, but the idea of it looking stock is tempting, so I may either move it (has a looooong lead), or work on an adapter for the original mic.
When you say "compatible radio", are you meaning compatible with Maestro or compatible with Sync? Thanks for the input either way, getting more info out there was one of the goals of this!
When you say "compatible radio", are you meaning compatible with Maestro or compatible with Sync? Thanks for the input either way, getting more info out there was one of the goals of this!
06-23-2015, 11:47 PM
#7
4Runner Driver
Thread Starter
If Maestro will do what I want better, and my current radio or a similar one is compatible, I might look into going that route. If you're meaning Sync compatible, never mind. I didn't want to keep Sync, that was the point in this. I know some do, and others who feel they must to upgrade, and don't know they don't have to.
Last edited by Mattwrotethis; 06-23-2015 at 11:50 PM.
Trending Topics
06-24-2015, 12:46 PM
#9
Again, compatible with Sync or with Maestro?
If Maestro will do what I want better, and my current radio or a similar one is compatible, I might look into going that route. If you're meaning Sync compatible, never mind. I didn't want to keep Sync, that was the point in this. I know some do, and others who feel they must to upgrade, and don't know they don't have to.
If Maestro will do what I want better, and my current radio or a similar one is compatible, I might look into going that route. If you're meaning Sync compatible, never mind. I didn't want to keep Sync, that was the point in this. I know some do, and others who feel they must to upgrade, and don't know they don't have to.
06-24-2015, 04:52 PM
#10
F150 Forum
Again, compatible with Sync or with Maestro?
If Maestro will do what I want better, and my current radio or a similar one is compatible, I might look into going that route. If you're meaning Sync compatible, never mind. I didn't want to keep Sync, that was the point in this. I know some do, and others who feel they must to upgrade, and don't know they don't have to.
If Maestro will do what I want better, and my current radio or a similar one is compatible, I might look into going that route. If you're meaning Sync compatible, never mind. I didn't want to keep Sync, that was the point in this. I know some do, and others who feel they must to upgrade, and don't know they don't have to.
The following users liked this post:
Mattwrotethis (06-24-2015)