Topic Sponsor
Stereo/Audio Come discuss all Ford F150 Stereo and Audio questions here!
Sponsored by:
Sponsored by: The Magic Brand

12NMford's Crew Cab system build

Thread Tools
 
Search this Thread
 
Old 07-24-2013, 09:30 AM
  #11  
Junior Member
Thread Starter
 
12NMford's Avatar
 
Join Date: Jun 2013
Posts: 20
Likes: 0
Received 2 Likes on 2 Posts
Default

Originally Posted by 12V Guy
Hi,

With or without amplifier should make no difference for Maestro. I would double check to make sure you didn't displace the 3.5mm audio cable from either the back of the 890 or from the Maestro module. This is the main audio path and since we feed into a pre-amp input of the Kenwood, our audio is available on the RCA and the speaker wires.

Hope this is your issue, but please let me know.

Best,
Thanks for the reply, your exactly right, I ended up pulling everything apart the night I posted the question and found the 3.5mm plug on the Maestro module want plugged in all the way, this must have happened when I was zip tie the cables down too tight, an amateur mistake but its working perfectly now, thanks again for your reply and the great products!
The following users liked this post:
12V Guy (07-26-2013)
Old 07-24-2013, 09:33 AM
  #12  
Junior Member
Thread Starter
 
12NMford's Avatar
 
Join Date: Jun 2013
Posts: 20
Likes: 0
Received 2 Likes on 2 Posts
Default

Originally Posted by mike d
Clean looking install and top notch components!
I used JL C5-570s in the front of my truck and they sound fantastic.
I'm a big fan of JL stuff now.
Thanks man, I agree, they're expensive but well worth it, JL sure does make great stuff!
Old 07-24-2013, 02:43 PM
  #13  
Member
 
Set_da_Hook's Avatar
 
Join Date: Jul 2013
Posts: 42
Received 3 Likes on 3 Posts

Default

What's the thickness of your speaker baffle? I am going to start on my doors this weekend and was wondering if a 3/4" would work.
Old 07-24-2013, 08:30 PM
  #14  
Senior Member
iTrader: (1)
 
Wyo11Scab's Avatar
 
Join Date: Jul 2011
Location: Victoria,TX
Posts: 4,302
Received 484 Likes on 437 Posts

Default

Originally Posted by Set_da_Hook
What's the thickness of your speaker baffle? I am going to start on my doors this weekend and was wondering if a 3/4" would work.
that is pretty thick
Old 07-24-2013, 08:59 PM
  #15  
Member
 
Set_da_Hook's Avatar
 
Join Date: Jul 2013
Posts: 42
Received 3 Likes on 3 Posts

Default

Originally Posted by Wyo11Scab
that is pretty thick
Yea I pulled the door card off this evening and measured. My plan is to flush mount the mid bass in the baffle. Looks like a 1/2" baffle is about max you can go depending on woofer excursion. My challenger I had to use doubled up 3/4" baffles for my 8" mid bass to clear the window and they were still about an inch from the inside of the door card.
Old 07-24-2013, 10:52 PM
  #16  
Junior Member
Thread Starter
 
12NMford's Avatar
 
Join Date: Jun 2013
Posts: 20
Likes: 0
Received 2 Likes on 2 Posts
Default

Originally Posted by Set_da_Hook

Yea I pulled the door card off this evening and measured. My plan is to flush mount the mid bass in the baffle. Looks like a 1/2" baffle is about max you can go depending on woofer excursion. My challenger I had to use doubled up 3/4" baffles for my 8" mid bass to clear the window and they were still about an inch from the inside of the door card.
I used 3/16" Masonite it worked just fine the speaker easily cleared the window and brackets. Post pics of whatever you use I'm curious thanks!
Old 09-07-2013, 01:07 PM
  #17  
Junior Member
Thread Starter
 
12NMford's Avatar
 
Join Date: Jun 2013
Posts: 20
Likes: 0
Received 2 Likes on 2 Posts
Default

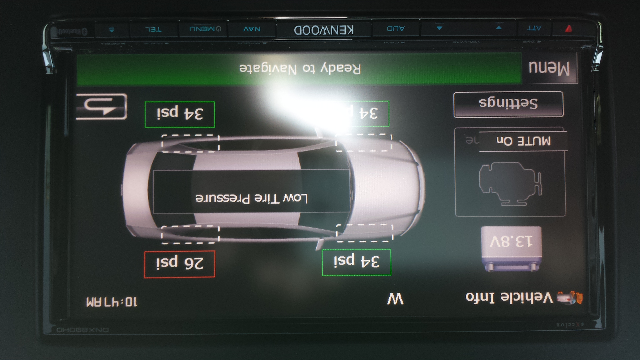
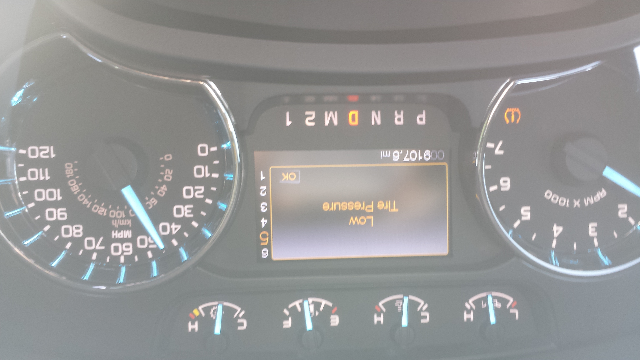
So I left my house this morning and didn't notice that my left rear tire was low but was happy because the system automatically showed this:

12NMford's Crew Cab system build-forumrunner_20130907_105917.jpg


12NMford's Crew Cab system build-forumrunner_20130907_110656.jpg
The following users liked this post:
12V Guy (11-14-2013)
Old 11-14-2013, 08:46 AM
  #18  
F150 Forum
 
12V Guy's Avatar
 
Join Date: Aug 2012
Location: Montreal
Posts: 335
Received 147 Likes on 86 Posts
Default

Originally Posted by 12NMford
So I left my house this morning and didn't notice that my left rear tire was low but was happy because the system automatically showed this:

Attachment 253943


Attachment 253948
Isn't that the coolest thing!! We loved making this product with Kenwood. It was lots of fun and it is great to see posts like this!! Thank you for sharing. PS, always make sure your tire shop reprograms your sensors properly if you rotate your tires or the locations will get confused.

Best,
Old 11-14-2013, 09:15 AM
  #19  
Junior Member
Thread Starter
 
12NMford's Avatar
 
Join Date: Jun 2013
Posts: 20
Likes: 0
Received 2 Likes on 2 Posts
Default

Originally Posted by 12V Guy

Isn't that the coolest thing!! We loved making this product with Kenwood. It was lots of fun and it is great to see posts like this!! Thank you for sharing. PS, always make sure your tire shop reprograms your sensors properly if you rotate your tires or the locations will get confused.

Best,
Yes I'm very happy with the system! You stated the question before I was able to, I had the tires rotated and now the fronts are confused with the rear. How can I go about resetting this? Thanks
Old 11-14-2013, 10:11 AM
  #20  
F150 Forum
 
12V Guy's Avatar
 
Join Date: Aug 2012
Location: Montreal
Posts: 335
Received 147 Likes on 86 Posts
Default

Originally Posted by 12NMford
Yes I'm very happy with the system! You stated the question before I was able to, I had the tires rotated and now the fronts are confused with the rear. How can I go about resetting this? Thanks


Easiest way is to have the shop do it with their tool. However, some people have said that this works:


1) Make sure your tires are inflated to the recommended psi.
2) Turn ignition to the on position. If you have a push button start, push the start button without pressing the brake pedal.
3) Push the hazard light button 6 times. The horn should honk and you should see "Train left front tire" in the LCD display between the tach and speedo.
4) Release air pressure in the front left tire until you hear the horn honk. The LCD display should now read "Train right front tire".
5) Release air pressure in the right front tire until you hear the horn honk.
6) Repeat for the right rear tire, and then the left rear tire.
7) You should now see "Training Complete" in the LCD display on the instrument cluster.
8) Fill your tires back up to the recommended pressure.


Quick Reply: 12NMford's Crew Cab system build


All times are GMT -4. The time now is 06:54 PM.