
DIY: 2014 EcoBoost Bumper Grille
 06-26-2014, 08:45 PM
#1
Member
Thread Starter

I'm not a fan of the ordinary. I enjoy tinkering with my vehicles...adding my own touches...customizing...etc. With that...I want to say...I am thoroughly impressed with the build quality and functionality of my 2014 XTL EcoBoost...HOWEVER...I wasn't satisfied with the lack of protection to my intercooler directly behind the front bumper. I searched the web and a couple local truck part shops...I just wasn't sold on any of the aftermarket options out there. I decided to take a look behind the bumper to see if there was something that could be done in my own garage and below is what I have created. I figured it would be a good idea to make a how-to or do it yourself for those of you out there who are crafty, like something different and a bit of a challenge.

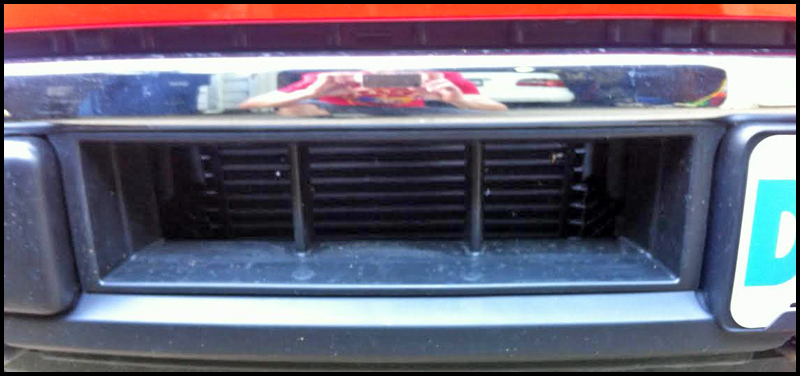
#1 This is what your 2009-2014 front bumper will look like from the factory. I'm willing to bet that a good sized bird, rock,
or road debris of some kind could end up making a mess of your intercooler at highway speeds.
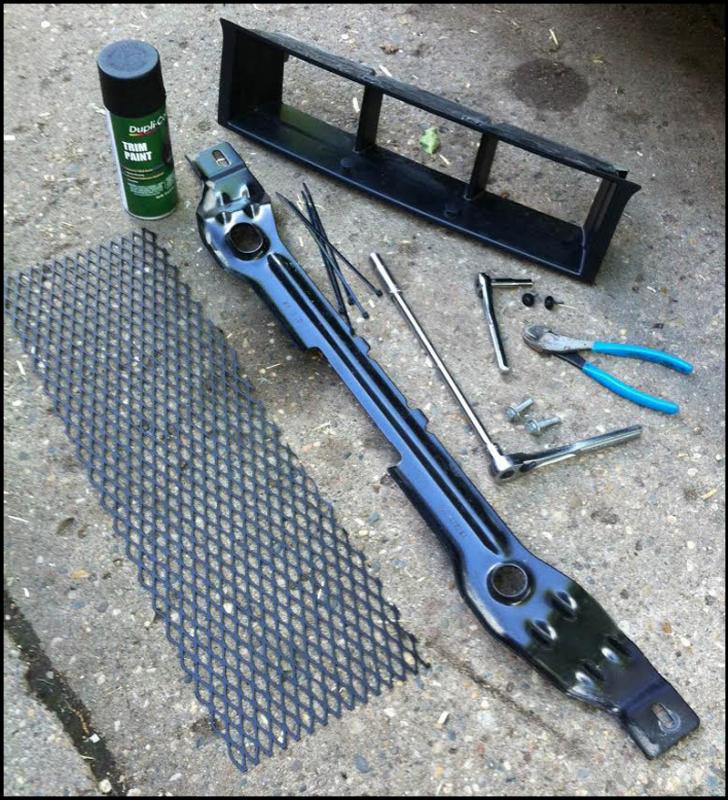
#2 Very few supplies are needed for this creation.
1 - can of Duplicolor Trim Paint. You can find this at most auto part stores, (AutoZone, O'Reilly's, Advance Auto, NAPA, etc.)
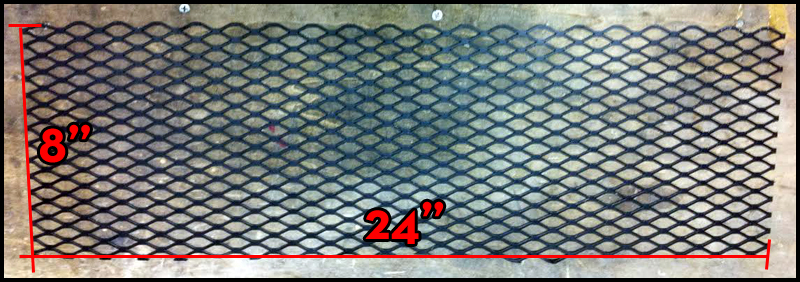
1 - 12" x 24" sheet of expanded metal. You can purchase this item in the hardware isle at most local hardware stores,
(Home Depot, Lowes, Menards, ACE, etc.)

#3 You'll need to cut the sheet of expanded metal down to about 8" high.
The 24" length is perfect. I used my tin snips to cut the metal...if you have a Dremel or angle grinder...that will work too.
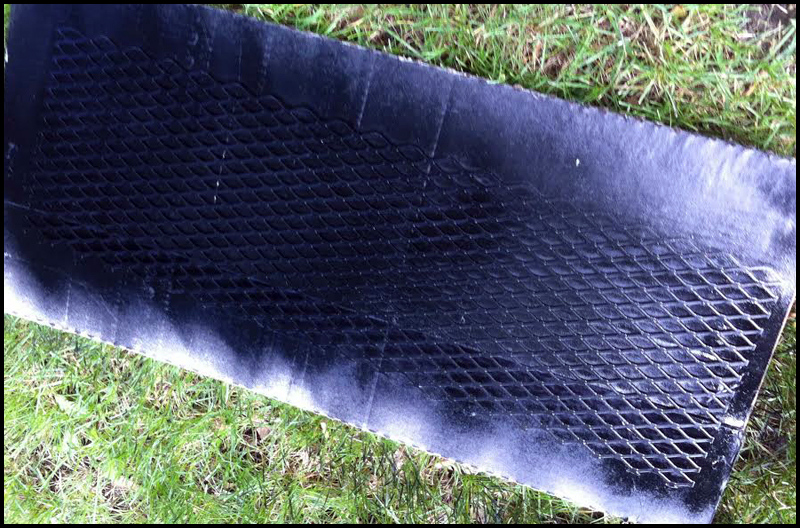
#4 I thru down 4-5 healthy coats of paint since this item will take a beating being it's right at the bow of your truck.
#4 Once the paint dries it's time to grab our tools and go to town with disassembly.
Pop the hood and locate the two bolts that hold the intercooler brace/bracket down tight.
A 3/8" ratchet, long extension and 10mm socket works best.
Remove both bolts and the bracket will come off fairly easy.
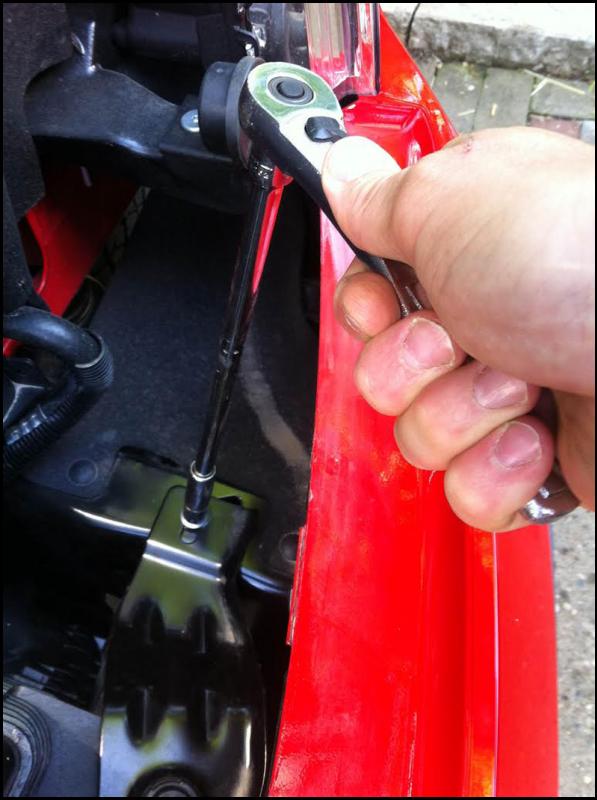
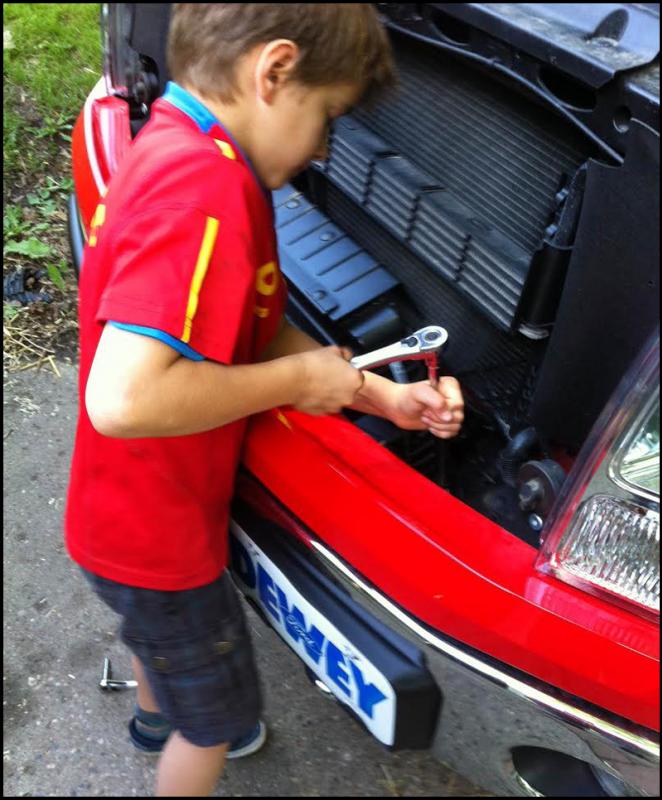
Fortunately, my son loves to wrench on cars with his father. Relish these moments.
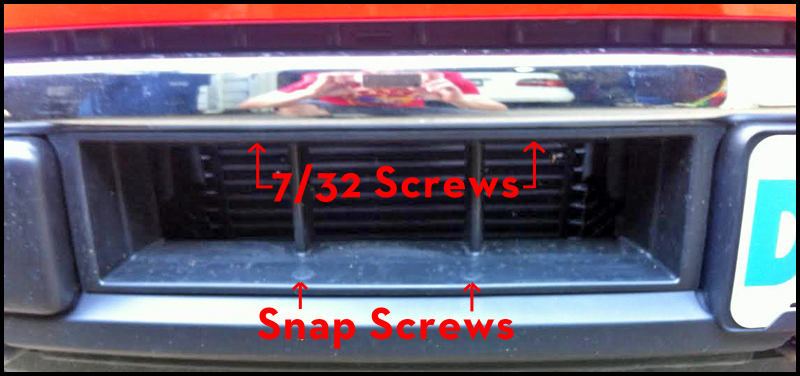
#5 If you get down low and look up into the grille opening...you'll see two black hex screws. Use a 7/32 socket/wrench to
remove these. You'll also need to remove the small snap screws located at the bottom of the grille shroud. I was able to get
my finger in between the shroud and the bumper...you'll need to push the plastic snap screws up to relieve some pressure
and fully disengage them from the shroud.
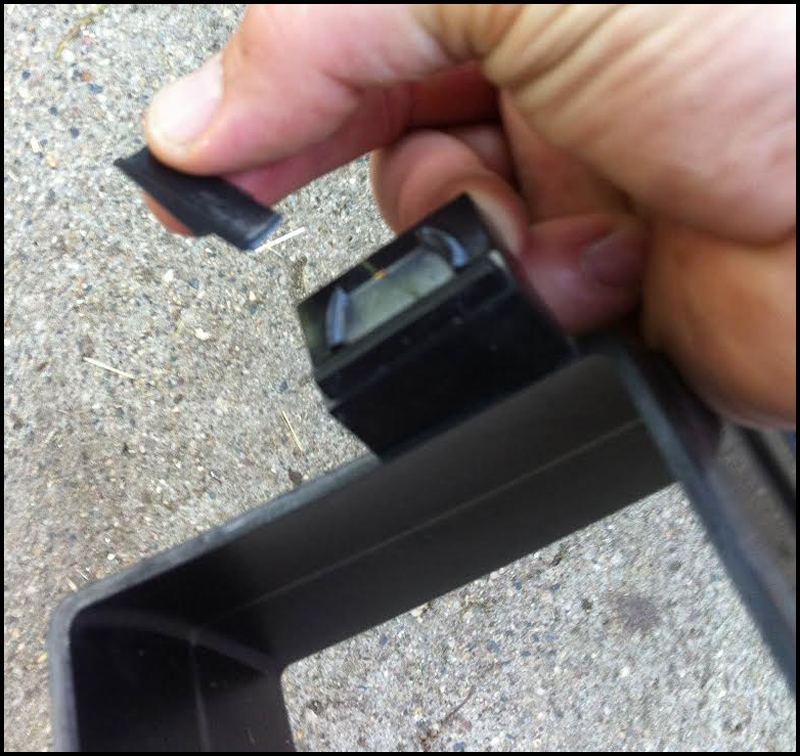
There are also some small pressure clips on the back side of the shroud that need to be squeezed together in-order to fully
detach the shroud from the bumper opening. (the only picture I have of these is after I decided to break them off due to
the interference they were causing when I was installing my metal grille piece.)
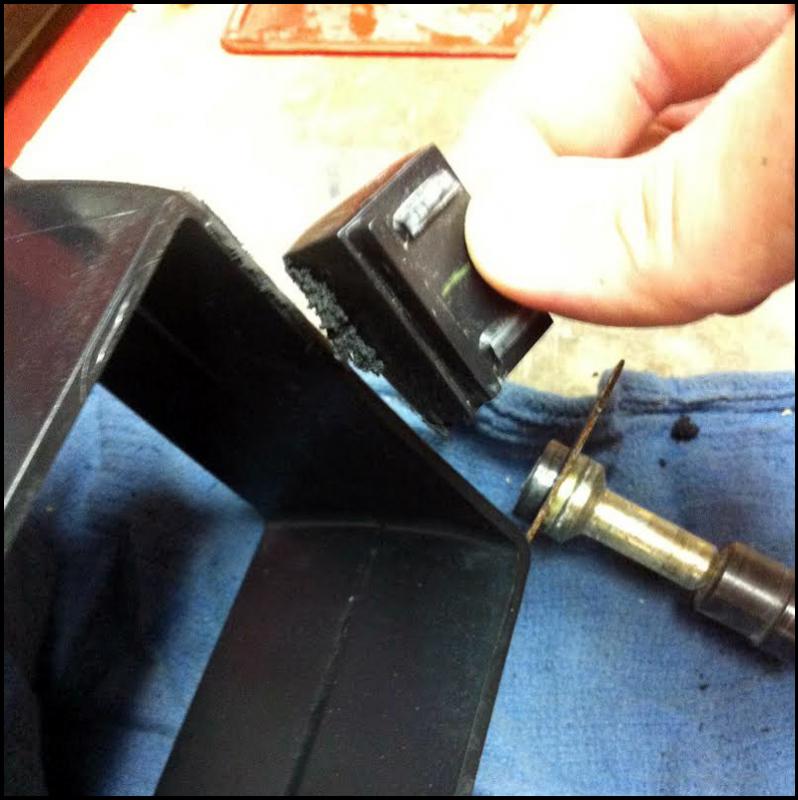
Here you can see I went as far as just cutting the entire part off with my die grinder. You'll want to do this.
Continued on the next post...
#1 This is what your 2009-2014 front bumper will look like from the factory. I'm willing to bet that a good sized bird, rock,
or road debris of some kind could end up making a mess of your intercooler at highway speeds.
#2 Very few supplies are needed for this creation.
1 - can of Duplicolor Trim Paint. You can find this at most auto part stores, (AutoZone, O'Reilly's, Advance Auto, NAPA, etc.)
1 - 12" x 24" sheet of expanded metal. You can purchase this item in the hardware isle at most local hardware stores,
(Home Depot, Lowes, Menards, ACE, etc.)
#3 You'll need to cut the sheet of expanded metal down to about 8" high.
The 24" length is perfect. I used my tin snips to cut the metal...if you have a Dremel or angle grinder...that will work too.
#4 I thru down 4-5 healthy coats of paint since this item will take a beating being it's right at the bow of your truck.
#4 Once the paint dries it's time to grab our tools and go to town with disassembly.
Pop the hood and locate the two bolts that hold the intercooler brace/bracket down tight.
A 3/8" ratchet, long extension and 10mm socket works best.
Remove both bolts and the bracket will come off fairly easy.
Fortunately, my son loves to wrench on cars with his father. Relish these moments.
#5 If you get down low and look up into the grille opening...you'll see two black hex screws. Use a 7/32 socket/wrench to
remove these. You'll also need to remove the small snap screws located at the bottom of the grille shroud. I was able to get
my finger in between the shroud and the bumper...you'll need to push the plastic snap screws up to relieve some pressure
and fully disengage them from the shroud.
There are also some small pressure clips on the back side of the shroud that need to be squeezed together in-order to fully
detach the shroud from the bumper opening. (the only picture I have of these is after I decided to break them off due to
the interference they were causing when I was installing my metal grille piece.)
Here you can see I went as far as just cutting the entire part off with my die grinder. You'll want to do this.
Continued on the next post...
Last edited by gabebauman; 06-26-2014 at 09:05 PM.
 06-26-2014, 08:56 PM
#2
Member
Thread Starter
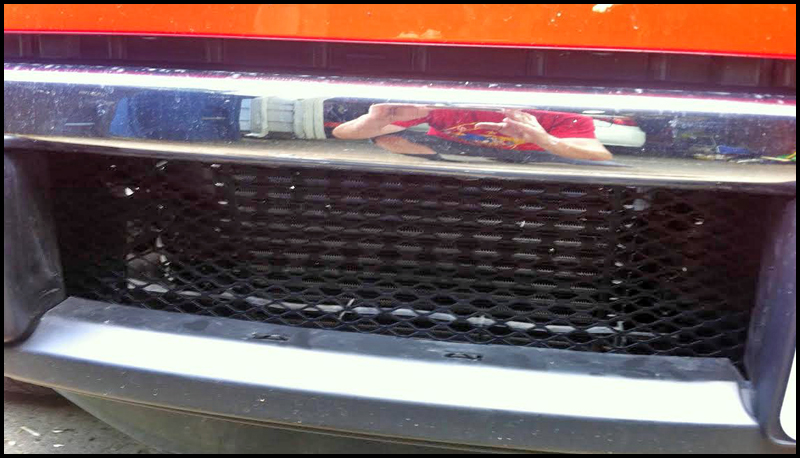
#6 Here you can see the bracket/brace is removed as well as the grille shroud.
Notice the two silver 10mm bolts...those are what hold the bracket in place.
The two black 7/32 screws are up near the small ratchet are from the grille shroud.
The zip ties will be used to attach the new grille piece.
#7 You'll need to thread the new grille piece into the opening from the backside of the bumper opening,
(this is why we removed the intercooler bracket/brace). In-order to gain access to the space behind the bumper.
To securely fasten the grille piece to the bumper opening, I simply used five black zip ties. There are holes in the bumper,
(you'll see them when you start fiddling with this project). Run the zip tie thru the grill, thru the hole and back around thru the grill.
Cut the access tie off so it's not hanging loosely like some wacky drifter kid's Nissan 240 bumper attachment decor.
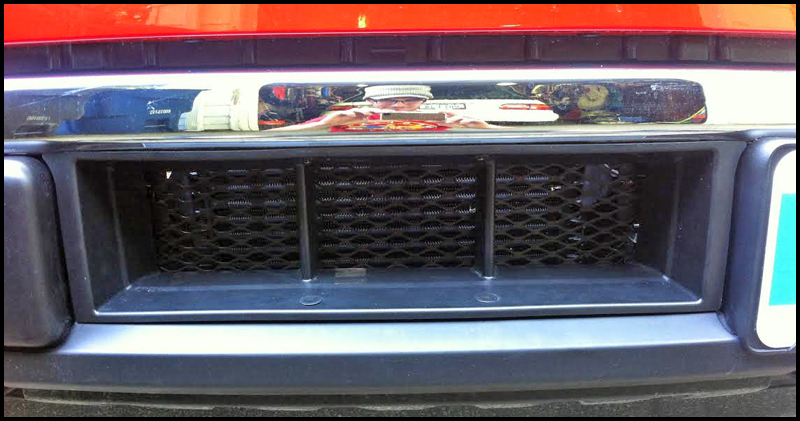
#8 Simply reinstall the OEM grille shroud and voila, you've completed your EcoBoost lower bumper grille DIY.
Notice the two silver 10mm bolts...those are what hold the bracket in place.
The two black 7/32 screws are up near the small ratchet are from the grille shroud.
The zip ties will be used to attach the new grille piece.
#7 You'll need to thread the new grille piece into the opening from the backside of the bumper opening,
(this is why we removed the intercooler bracket/brace). In-order to gain access to the space behind the bumper.
To securely fasten the grille piece to the bumper opening, I simply used five black zip ties. There are holes in the bumper,
(you'll see them when you start fiddling with this project). Run the zip tie thru the grill, thru the hole and back around thru the grill.
Cut the access tie off so it's not hanging loosely like some wacky drifter kid's Nissan 240 bumper attachment decor.
#8 Simply reinstall the OEM grille shroud and voila, you've completed your EcoBoost lower bumper grille DIY.
Last edited by gabebauman; 06-26-2014 at 09:26 PM.
The following users liked this post:
Matthew Reagan (02-01-2015)
07-31-2014, 11:26 PM
#3
Senior Member
Nicely done. I'm sure this would work for the 5.0 crowd as well if they wanted to get rid of the license plate holder.
08-01-2014, 09:21 AM
#4
Member
Thread Starter
