RedResistance's "Getting Her Back to Original" Thread. (Pictures inside)
 07-02-2011, 07:27 PM
#1
With Great Patience...
Thread Starter
Join Date: Jul 2011
Location: Mariposa, CA
Posts: 90
Likes: 0
Received 0 Likes
on
0 Posts
Hello all from Mariposa California!
My names Shawn and I just picked up this ugly F-150 in Fresno for $1000 to tow my Toyotas and other misc cars around.
It's a 1989 Ford F-150 XLT Lariat Regular Cab 4x4 with a 302 EFI/4spd Granny Gear with 225k miles. It's got 32" tires, front hub manual lockers, and working cruise control. Other than that, its got a broken fuel gauge, broken temp gauge, broken dash lights, broken bed light, a headlight bulb that wont stay in it's housing, no stereo/speakers, an automatic steering column, non-working a/c, massive exhaust leaks, no fuel cap for the front fuel tank, bunch of vacuum leaks, code 52 (power steering pressure switch), a non-working fuel tank switch, 6 original shocks, a suspicious looking non-operative alarm, a tailgate that wont open without finesse, a completely primered body and a tenacious owner who wont stop 'till every single one of those things is fixed. Except the paint.. I like it primered.. I don't have to worry about scratching it.. Lol
The truck runs like garbage, but the compression test I did on the engine made me buy it; 135-145 psi on all cylinders. The transmission is picky as would be expected from a truck. The clutch is stiff as a board and the brakes are good and strong. It's in serious need of a tune up, and just some TLC. What I am waiting for is the Wiring Diagram I just bought on E-bay to arrive so I can begin to rip out all of the aftermarket wiring crap and return all of it to stock.
The purpose of this thread is to gather information on how I'm going to be going about fixing all of these things. Basicially a write-up on how I got my truck back to original (except the paint lol). I won't be covering all of the diagnosis bases in every process, but I will be covering the ones that I do personally. This will also help you guys help me figure out whats going on with my truck. I don't know half as much as the community as a whole does and I want and need your help to "Get Her Back to Original". I hope this thread will be helpful to me and to all of you as well. Thanks!
Here's some pictures of the ugly beast.


How to test your window motors and (possibly) fix them
So here is the first issue that I'm tackling: The driver side window is stuck in the down position. I need to fix this before I put a stereo in the truck as it would be all to easy to steal. Both the driver and passenger windows are not working. My assumption was that the motors were not working or that the whole circuit was not getting power due to the ghetto wiring under the dash, and my first guess ended up being right. Checked the fuse and the fuse was good (Always always always check your fuses first!)
After removing the door panels, I retrieved my test light and found a good ground on the door handle. I then put the pointed end of my test light into the red wire (see picture below) and with the key in the ignition in the "run" position toggled the switch up and down and discovered that the motor was getting power when I pressed the down switch, which means there is nothing wrong with the wiring for the circuit for the down switch. I did the same with the yellow wire and discovered that it was getting power when I pressed the up switch. Also, I could hear the motor attempting to work with a little soft click when I would press the switch. Therefore, I could safely assume that my window motor was either siezed or that the current was not strong enough to push it due to old wiring. So, I improvised as the wiring was intact.
I'm not going to reccomend doing what I did to get them to work as I don't want someone to blame me when they fry their wiring, but heres what I did anyway. I ran a direct 12v from the battery to the yellow wire going to the window motor while pressing up on the switch (Try this without pressing it and you'll fry your wiring) and viola the driver side came unstuck. I tested the switch without the direct 12v and the driver side is now working. I did the same tests with the passenger side, and came up with the same results. So, since the wiring was intact on that side too, I tried the same method to unsieze the motor except with the red wire and down on the switch. The passenger side did not come unstuck, but at least the window is up on that side already .
.

Also, a good way to know if your switches are good if you are not getting power to the motor is to find a good ground for your test light and put the pointed end of the test light on the blue wire in the center of your switch (with the key in the "run" position of course!). If the light comes on you more likely than not have a bad switch. If the light does not come on, the wiring before the switch in the circuit is bad.
Basic Sound System
Now that my windows are in the up position, I want to install a basic sound system as the previous one appears to have been litterally ripped out. I had a Dual XDM6820 head unit that I bought at Kragen auto parts years ago and a set of punch 5 1/4" 2-way speakers installed in my non-op Supra (my school project car). After removing the deck and speakers from the Supra, I realized that I needed a to know what wire was what in the Ford as I was so used to doing Toyotas which I know by heart. I found the required information at http://www.the12volt.com/installbay/...etail/868.html. The next thing I did was refer to the information, and test that each wire was in fact what the website said it was. Using my test light, I found a good ground and poked each wire. The Green/Yellow had a constant 12v, the Yellow/Black had nothing which was supposed to have 12v in all positions but off, and the Red was ground. None of the other wires had a 12v in all positions but off. So now i had a problem. I needed a source for 12v in all positions but off. I looked at my fuse box diagram and using my test light again, found an unused fuse location that had power in all positions but off. I ran a wire directly from this fuse location, insulated it, and ran the wire directly to my head unit. This will work until I get my wiring diagram and start tearing the wiring apart under the dashboard (Can't wait to start taking pictures of that job..). Once I had these three wires connected, I pressed the power button on the head unit and cycled the key. It operated normally. I then plugged in the antenna and wired in my speakers to see if the original wiring was still working. Luckily for me, it was. I stuffed the head unit into the dash and the job was done.
Broken Temperature Gauge
The temperature gauge on my truck is not working. There is no code in the ecu for any cooling system related errors. The truck does not leak and does not seem to overheat. So here's my guess: Bad sensor? The gauge is energized as when the key is in the off position it rests on the cold side of the normal line and when i turn the key to the run position it moves farther down to the "C" noticably.
I'm gonna go into town to buy a coolant temperature sensor as they are relatively cheap anyway. I'll update this post as soon as I am finished installing it.
So upon further examination of the location of the Sensor, I've discovered that it'll be a lot easier to get to it with the cap and rotor off, which need to be changed anyway. The local auto parts store is closed for the 4th of July weekend, so It'll be Tuesday when I can buy them.. DOH!
Installed a new temperature sensor, was not the problem. Looks like I've got more gremlins to chase...
Apparently there is a sensor for the ECU and a sender for the gauge... I'll be purchasing a sender tomorrow and replacing it.
Replaced the sending unit.. gauge now works. Yay!!
Used this diagram to figure out where the blighter was!

Exhaust Leaks:
This engine had massive exhaust leaks, and I found the culprits in 8 of 16 exhaust manifold bolts being finger tight. Replaced the exhaust manifold gaskets, replaced some worn and broken hoses and got rid of some useless hard lines, and have now found another exhaust leak at the seam in the weld for the catalytic converter. Pictures soon.


Code 52
Code 52 is a fault the power steering pressure switch that raises the pressure in the power steering system while at low speeds i.e. in parking lots. I found the culprit while replacing my exhaust manifold gaskets. The connector for the switch is broken and not connected. Gonna have to either find a new one or ghetto fab the old one.

Upon further examination of my truck, my steering column is out of a truck that did not have this pressure switch..
yAy Code 52 4 evar!
Non-functional alarm removal:
This truck came with an non-functional alarm when I bought it and some other random crap stuffed under the dash. The job was done by a professional as they used vampire clips rather than cutting all the wires. However there were some that had to be cut for their unit to work.. It was really simple to figure out what wires went where as they are all color coded! haha. It was quite a task to get to all the areas where they cut these wires, but after about 4 hours of hunting I had it all out and the harness repaired. Here's what I pulled out.

My names Shawn and I just picked up this ugly F-150 in Fresno for $1000 to tow my Toyotas and other misc cars around.
It's a 1989 Ford F-150 XLT Lariat Regular Cab 4x4 with a 302 EFI/4spd Granny Gear with 225k miles. It's got 32" tires, front hub manual lockers, and working cruise control. Other than that, its got a broken fuel gauge, broken temp gauge, broken dash lights, broken bed light, a headlight bulb that wont stay in it's housing, no stereo/speakers, an automatic steering column, non-working a/c, massive exhaust leaks, no fuel cap for the front fuel tank, bunch of vacuum leaks, code 52 (power steering pressure switch), a non-working fuel tank switch, 6 original shocks, a suspicious looking non-operative alarm, a tailgate that wont open without finesse, a completely primered body and a tenacious owner who wont stop 'till every single one of those things is fixed. Except the paint.. I like it primered.. I don't have to worry about scratching it.. Lol
The truck runs like garbage, but the compression test I did on the engine made me buy it; 135-145 psi on all cylinders. The transmission is picky as would be expected from a truck. The clutch is stiff as a board and the brakes are good and strong. It's in serious need of a tune up, and just some TLC. What I am waiting for is the Wiring Diagram I just bought on E-bay to arrive so I can begin to rip out all of the aftermarket wiring crap and return all of it to stock.
The purpose of this thread is to gather information on how I'm going to be going about fixing all of these things. Basicially a write-up on how I got my truck back to original (except the paint lol). I won't be covering all of the diagnosis bases in every process, but I will be covering the ones that I do personally. This will also help you guys help me figure out whats going on with my truck. I don't know half as much as the community as a whole does and I want and need your help to "Get Her Back to Original". I hope this thread will be helpful to me and to all of you as well. Thanks!
Here's some pictures of the ugly beast.
How to test your window motors and (possibly) fix them
So here is the first issue that I'm tackling: The driver side window is stuck in the down position. I need to fix this before I put a stereo in the truck as it would be all to easy to steal. Both the driver and passenger windows are not working. My assumption was that the motors were not working or that the whole circuit was not getting power due to the ghetto wiring under the dash, and my first guess ended up being right. Checked the fuse and the fuse was good (Always always always check your fuses first!)
After removing the door panels, I retrieved my test light and found a good ground on the door handle. I then put the pointed end of my test light into the red wire (see picture below) and with the key in the ignition in the "run" position toggled the switch up and down and discovered that the motor was getting power when I pressed the down switch, which means there is nothing wrong with the wiring for the circuit for the down switch. I did the same with the yellow wire and discovered that it was getting power when I pressed the up switch. Also, I could hear the motor attempting to work with a little soft click when I would press the switch. Therefore, I could safely assume that my window motor was either siezed or that the current was not strong enough to push it due to old wiring. So, I improvised as the wiring was intact.
I'm not going to reccomend doing what I did to get them to work as I don't want someone to blame me when they fry their wiring, but heres what I did anyway. I ran a direct 12v from the battery to the yellow wire going to the window motor while pressing up on the switch (Try this without pressing it and you'll fry your wiring) and viola the driver side came unstuck. I tested the switch without the direct 12v and the driver side is now working. I did the same tests with the passenger side, and came up with the same results. So, since the wiring was intact on that side too, I tried the same method to unsieze the motor except with the red wire and down on the switch. The passenger side did not come unstuck, but at least the window is up on that side already
.Also, a good way to know if your switches are good if you are not getting power to the motor is to find a good ground for your test light and put the pointed end of the test light on the blue wire in the center of your switch (with the key in the "run" position of course!). If the light comes on you more likely than not have a bad switch. If the light does not come on, the wiring before the switch in the circuit is bad.
Basic Sound System
Now that my windows are in the up position, I want to install a basic sound system as the previous one appears to have been litterally ripped out. I had a Dual XDM6820 head unit that I bought at Kragen auto parts years ago and a set of punch 5 1/4" 2-way speakers installed in my non-op Supra (my school project car). After removing the deck and speakers from the Supra, I realized that I needed a to know what wire was what in the Ford as I was so used to doing Toyotas which I know by heart. I found the required information at http://www.the12volt.com/installbay/...etail/868.html. The next thing I did was refer to the information, and test that each wire was in fact what the website said it was. Using my test light, I found a good ground and poked each wire. The Green/Yellow had a constant 12v, the Yellow/Black had nothing which was supposed to have 12v in all positions but off, and the Red was ground. None of the other wires had a 12v in all positions but off. So now i had a problem. I needed a source for 12v in all positions but off. I looked at my fuse box diagram and using my test light again, found an unused fuse location that had power in all positions but off. I ran a wire directly from this fuse location, insulated it, and ran the wire directly to my head unit. This will work until I get my wiring diagram and start tearing the wiring apart under the dashboard (Can't wait to start taking pictures of that job..). Once I had these three wires connected, I pressed the power button on the head unit and cycled the key. It operated normally. I then plugged in the antenna and wired in my speakers to see if the original wiring was still working. Luckily for me, it was. I stuffed the head unit into the dash and the job was done.
Broken Temperature Gauge
The temperature gauge on my truck is not working. There is no code in the ecu for any cooling system related errors. The truck does not leak and does not seem to overheat. So here's my guess: Bad sensor? The gauge is energized as when the key is in the off position it rests on the cold side of the normal line and when i turn the key to the run position it moves farther down to the "C" noticably.
I'm gonna go into town to buy a coolant temperature sensor as they are relatively cheap anyway. I'll update this post as soon as I am finished installing it.
So upon further examination of the location of the Sensor, I've discovered that it'll be a lot easier to get to it with the cap and rotor off, which need to be changed anyway. The local auto parts store is closed for the 4th of July weekend, so It'll be Tuesday when I can buy them.. DOH!
Installed a new temperature sensor, was not the problem. Looks like I've got more gremlins to chase...
Apparently there is a sensor for the ECU and a sender for the gauge... I'll be purchasing a sender tomorrow and replacing it.
Replaced the sending unit.. gauge now works. Yay!!
Used this diagram to figure out where the blighter was!
Exhaust Leaks:
This engine had massive exhaust leaks, and I found the culprits in 8 of 16 exhaust manifold bolts being finger tight. Replaced the exhaust manifold gaskets, replaced some worn and broken hoses and got rid of some useless hard lines, and have now found another exhaust leak at the seam in the weld for the catalytic converter. Pictures soon.
Code 52
Code 52 is a fault the power steering pressure switch that raises the pressure in the power steering system while at low speeds i.e. in parking lots. I found the culprit while replacing my exhaust manifold gaskets. The connector for the switch is broken and not connected. Gonna have to either find a new one or ghetto fab the old one.
Upon further examination of my truck, my steering column is out of a truck that did not have this pressure switch..
yAy Code 52 4 evar!
Non-functional alarm removal:
This truck came with an non-functional alarm when I bought it and some other random crap stuffed under the dash. The job was done by a professional as they used vampire clips rather than cutting all the wires. However there were some that had to be cut for their unit to work.. It was really simple to figure out what wires went where as they are all color coded! haha. It was quite a task to get to all the areas where they cut these wires, but after about 4 hours of hunting I had it all out and the harness repaired. Here's what I pulled out.
Last edited by RedResistance; 07-14-2011 at 02:06 PM.
 07-02-2011, 07:27 PM
#2
With Great Patience...
Thread Starter
Join Date: Jul 2011
Location: Mariposa, CA
Posts: 90
Likes: 0
Received 0 Likes
on
0 Posts
Gauge Lights
Also, while I was under the dash, I decided that now would be a good time to fix the dash lights, as removing the alarm and repairing the damage done for it did not fix it. The fuse block was not getting power delivered to the gauge light fuse, and when I would feed the fuse 12v, they would stay on continuously, which means there is a greater problem that I don't care to deal with. So I looked for an easier "fix". I took my test light and tested each wire on the headlight switch to see which one had 12v with the key off and the headlight switch in the running light position. I found that the brown wire had 12v in this position. So I next tried to see which wire when fed 12v would turn the gauge lights on without frying anything. I found that the blue wire with a red stripe which had already been cut would turn the gauge lights on when fed 12v, so I vampire clipped the brown wire and ran it to the blue/red wire. My gauge lights now come on when I tell them to!

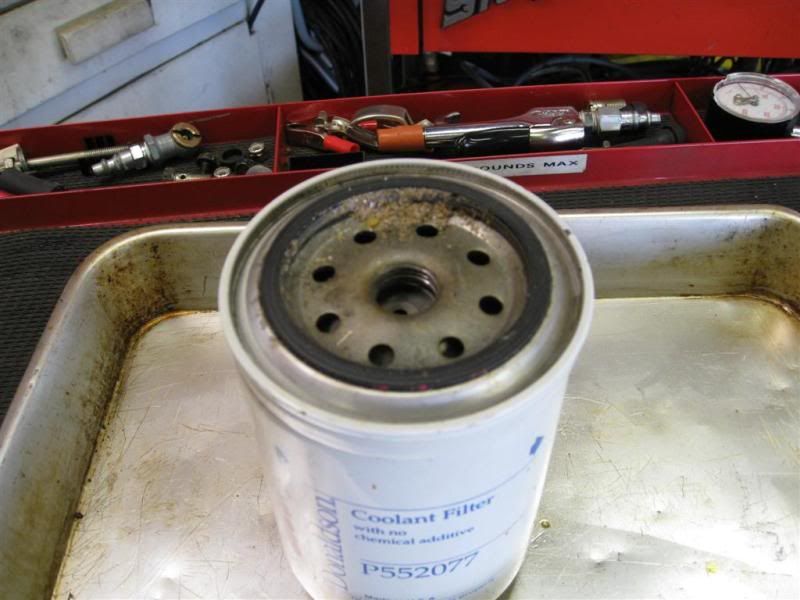
Cooling System Maintenance/Coolant Filter Install
I went to Napa and got a new 195 deg thermosatat (OE Temp) and a new thermostat gasket along with 3 gallons of distilled water. I removed the thermostat and discovered that the thermostat was a 160 degree thermostat which is not the temperature that the EFI system was programmed to run at. So, I installed a backflusing fitting into one of my heater hoses (as shown below) so I could really push all the rusty garbage out of the cooling system. After I did this I backflushed the cooling system with the thermostat out, and what came out of it alsmot made me faint. Never seen such a dirty cooling system before. So, to remedy this problem, I installed a coolant filter as shown below. It is essentially an oil filter relocation kit that I bought at Kragen years ago running a Regular Toyota sized (Same threads as a Ford Filter) oil filter. I have this same setup on both of my Toyotas being fed coolant from the same location and have proven time and time again that they work. So I then emptied out the cooling system as best I could, and installed the new 195 deg OE thermostat and gasket and filled the cooling system as best I could with the distilled water. It runs a lot hotter and idles a lot smoother now, I gotta tell ya.

It's a tight fit, but it won't be so tight after it passes smog and I rip the smog pump out of it!
Here's some pictures of what a coolant filter can do on a cooling system that was already VERY clean and well maintained to begin with.


Also, while I was under the dash, I decided that now would be a good time to fix the dash lights, as removing the alarm and repairing the damage done for it did not fix it. The fuse block was not getting power delivered to the gauge light fuse, and when I would feed the fuse 12v, they would stay on continuously, which means there is a greater problem that I don't care to deal with. So I looked for an easier "fix". I took my test light and tested each wire on the headlight switch to see which one had 12v with the key off and the headlight switch in the running light position. I found that the brown wire had 12v in this position. So I next tried to see which wire when fed 12v would turn the gauge lights on without frying anything. I found that the blue wire with a red stripe which had already been cut would turn the gauge lights on when fed 12v, so I vampire clipped the brown wire and ran it to the blue/red wire. My gauge lights now come on when I tell them to!
Cooling System Maintenance/Coolant Filter Install
I went to Napa and got a new 195 deg thermosatat (OE Temp) and a new thermostat gasket along with 3 gallons of distilled water. I removed the thermostat and discovered that the thermostat was a 160 degree thermostat which is not the temperature that the EFI system was programmed to run at. So, I installed a backflusing fitting into one of my heater hoses (as shown below) so I could really push all the rusty garbage out of the cooling system. After I did this I backflushed the cooling system with the thermostat out, and what came out of it alsmot made me faint. Never seen such a dirty cooling system before. So, to remedy this problem, I installed a coolant filter as shown below. It is essentially an oil filter relocation kit that I bought at Kragen years ago running a Regular Toyota sized (Same threads as a Ford Filter) oil filter. I have this same setup on both of my Toyotas being fed coolant from the same location and have proven time and time again that they work. So I then emptied out the cooling system as best I could, and installed the new 195 deg OE thermostat and gasket and filled the cooling system as best I could with the distilled water. It runs a lot hotter and idles a lot smoother now, I gotta tell ya.
It's a tight fit, but it won't be so tight after it passes smog and I rip the smog pump out of it!
Here's some pictures of what a coolant filter can do on a cooling system that was already VERY clean and well maintained to begin with.
Last edited by RedResistance; 07-14-2011 at 03:31 PM.


Trending Topics
07-14-2011, 03:02 PM
#9
With Great Patience...
Thread Starter
Join Date: Jul 2011
Location: Mariposa, CA
Posts: 90
Likes: 0
Received 0 Likes
on
0 Posts
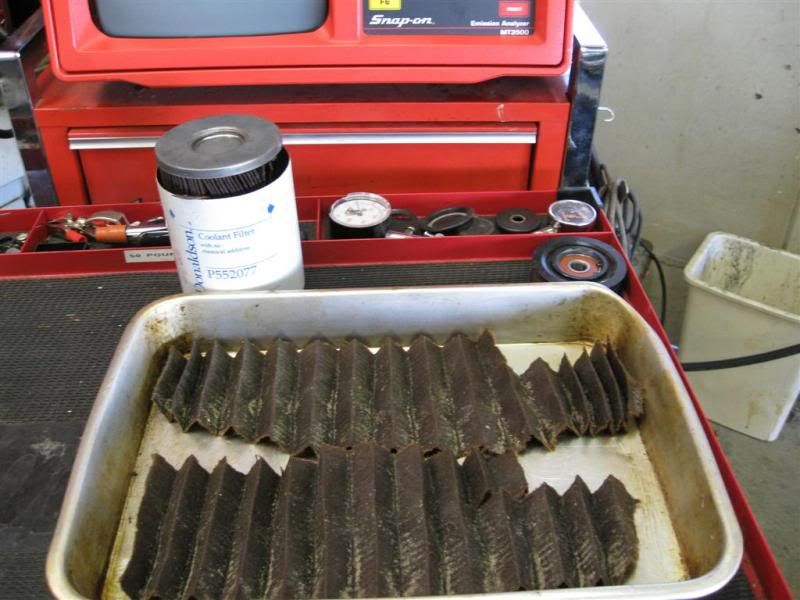
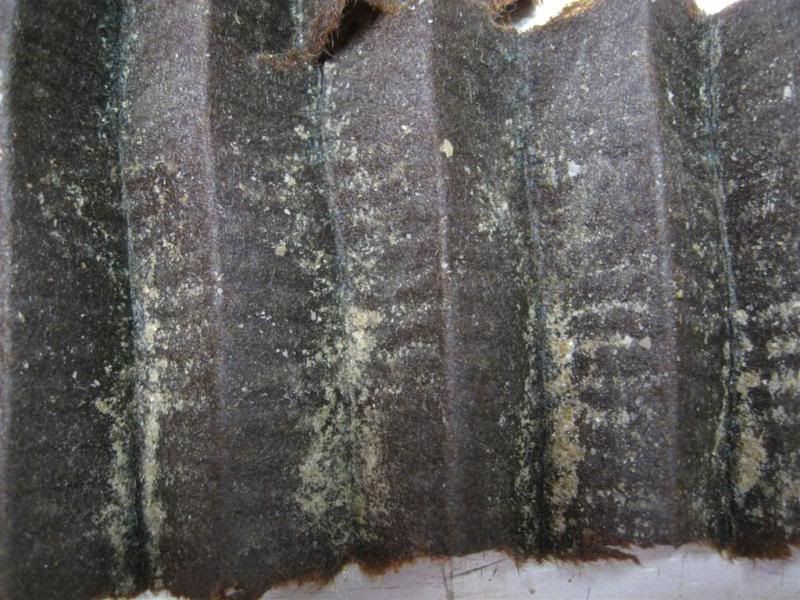
It works great, you'd be surprised all the garbage it pulls out!
Here's some pictures of one that was cut open off of a Supra that's owned by a super OCD owner who's cooling system was super clean to begin with
http://www.supramania.com/forums/sho...coolant+filter
Just imagine what it's gonna do on my rusty nasty old cooling system..
Here's some pictures of one that was cut open off of a Supra that's owned by a super OCD owner who's cooling system was super clean to begin with
http://www.supramania.com/forums/sho...coolant+filter
Just imagine what it's gonna do on my rusty nasty old cooling system..
07-14-2011, 03:15 PM
#10
1995 Ford F-150 XL 4x4

Join Date: Aug 2010
Location: Kettering, OH
Posts: 118
Likes: 0
Received 0 Likes
on
0 Posts
have to join to see the pics...
I flushed my system last year when I first got the truck, it took about 45 minutes of flushing to clean everything out, ended up with about 30 gallons of nasty crud.
I flushed my system last year when I first got the truck, it took about 45 minutes of flushing to clean everything out, ended up with about 30 gallons of nasty crud.

